


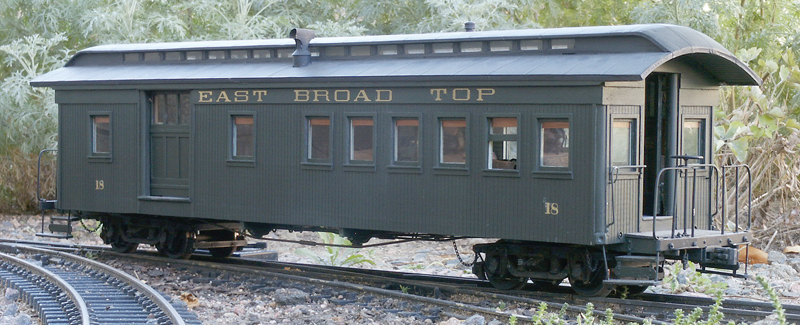
Shortly after I moved to Colorado, I was presented with a surprising opportunity to peer into yet another East Broad Top time capsule, sitting out on the Colorado plains. Two surviving EBT passenger cars, then part of a stillborn railroad museum, had just been bought at auction by the Friends of the East Broad Top (FETB) and were to be shipped back “home” to Orbisonia. I went to assist with the packing, but also to look at one car in particular in an effort to answer many questions surrounding its origins. This car, combine No. 18, is the oldest surviving relic of the East Broad Top, dating from 1876. As soon as I stepped onto the platform, I knew I had to build a model of this car. What I didn’t know was how much more the model was going to teach me about the prototype.
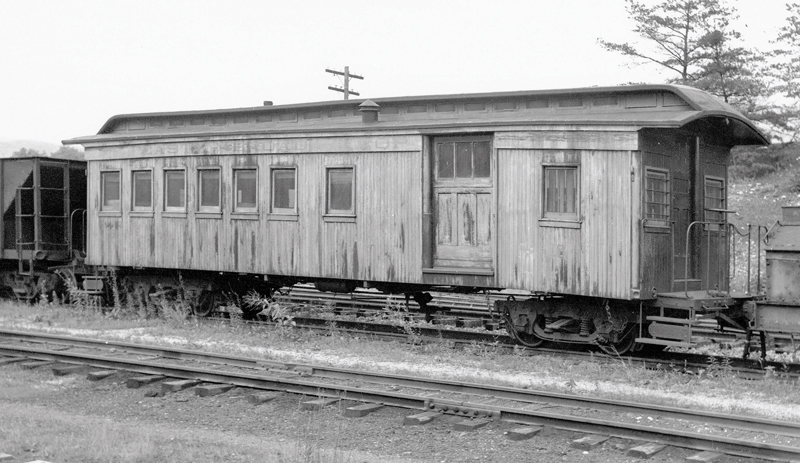
Typically, when one begins to build a model, one first looks for photographs and drawings to aide in the process. In this case, I had both—a good drawing (though I would discover one oversight in the building process) and plenty of photographs. My work as editor of the Timber Transfer, FEBT’s quarterly historical magazine, puts the majority of the group’s vast photo archives at my fingertips. These helped in many ways, but the car underwent physical changes early in its life, right around the time period I’m modeling, and prior to when most of the photos were taken. Also, the photos showed little in the way of specific details, most views being typical portrait shots of the entire car. Still, between those and my own photos, I had enough to begin the quest. I figured I’d fill in the blanks as I went along.
My first objective was to build this model as close to prototype construction as possible. This was partly due to a desire for historical accuracy, but also because, in 1:20.3, the model is large enough to do this.
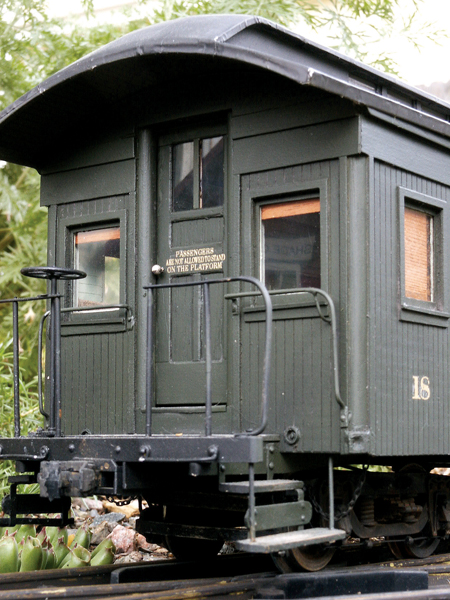
Frame timbers were cut to size on my miniature table saw and assembled as per measurements and photographs I had taken of the underside of the car. Two layers of scribed siding were added on top of these timbers to form the car’s floor. End platforms were added next, likewise built like the prototype’s. The layout of the brake rigging is based on conjecture. The hardware extant on the prototype is from later, when the car was equipped with air brakes. I found a drawing depicting typical, manual brake rigging, which I adapted for this car.
For trucks, I didn’t have much choice, as commercially available, narrow-gauge passenger trucks are limited. The prototype rode on trucks with an unusually short wheelbase of only 4’2″. The wheelbase of Bachmann’s passenger truck scales out to 4’6″, which was close enough for me. Detail on the Bachmann trucks is rather crude, so I cut off all the molded-on brake rigging, adding new brake beams and other details to better match the prototype.
The walls are built around a 1⁄8″ plywood core, with scribed siding laminated to both sides for the interior and exterior siding of the car. Each wall was built up individually, then glued to the frame. I had the window frames laser cut. I put the outside half of the frames in place, leaving off the inside frames and glazing until the model was painted.
The roof was perhaps the biggest challenge, but I got a big hand from the prototype. The clerestory on the roof was not original to the car. By the time the shop crews added it to this car, they had already converted two other cars. During those conversions, they learned (the hard way) the benefit of keeping the ribs in place to prevent the sides of the car from bowing out. When they converted combine Nº 18, they left the ribs in place. I was able, then, to build a skeleton roof frame, using pre-bent, square brass rod as the roof ribs. The brass gave the roof the strength needed and held the shape of the arch throughout the length of the roof.
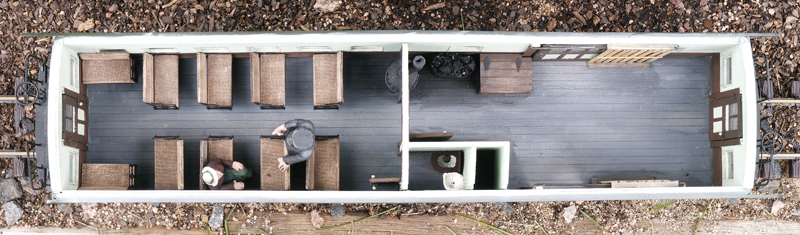
When building a passenger car, a full interior is imperative. The inside of the prototype was remarkably well preserved, despite the seats being all but rotted away. The published plan matched my photographs well, so the construction went without a hitch—until I got to the toilet. My photos of the back wall of the lavatory didn’t match the plans. I had a friend crawl under the car, now back in Pennsylvania, to locate and measure the toilet discharge for me. This proved that the back wall was actually closer to the window than what’s depicted in the plan, and there was a closet added behind the toilet at some point in the car’s history. This answered the question of why the extra window, evident in old photographs, disappeared: the closet wall would have bisected the window.
No model is complete without a proper coat of paint. The colors I chose for this model were based on historic practice, though they may not have been accurate for the exact time period I’m modeling. There was enough paint still in place on the interior of the car to determine fairly accurately what the inside looked like toward the end of its in-service days, but time had all but stripped off any signs of existing exterior paint. My research into the color schemes and lettering styles of the EBT passenger cars showed no strong consistency at all, regardless of era. This led me to make an educated guess as to what the car would have looked like. The exact shade of green, even if it had been preserved, would have been subjected to the effects of time and the elements.
Historical accuracy is one of the key elements that drives my model building. Through these models, I can see history as it existed, in three dimensions and in living color, not just in grainy black-and-white images. Every time I dig into my stack of books and photos, I discover something new—something that changes my understanding of what was. Each model becomes its own history lesson and, as the train gets longer, the history becomes more complete. I’ll never know everything there is to know, so I guess I’ll just have to keep on building.


Follow-up… Further research shows this car was one of two purchased by the East Broad Top Railroad for service on their Shade Gap branch in 1881, built by Billmeyer & Smalls.