First, let me say that these considerations should not dissuade you from getting started. If you are new to the hobby or have been waiting for the right time to break ground, it would be better to begin building something than to feel intimidated by trying to tackle too much at one time. Trial and error is still a good teacher, and the bottom line is whether this will be an enjoyable and satisfying project. Besides, there are no building codes when it comes to garden railways (although you should check with your local zoning authority if you are starting a big project). I am now building my second railroad garden, and the principles I’m sharing come from 15 years of experience with the first one. Believe me, I had my share of learning the hard way. If I can save you some time and effort, and possibly some frustration, I’ll consider it worthwhile.
Drainage
Standing water or soggy soil can lead to many problems: soil erosion, hydrostatic pressure against retaining walls, shorted electrical circuits, frost heave in northern regions, and plant loss from root disease, to name a few. Fortunately, there are simple measures to keep surface water flowing. The degree of pitch across the area of the garden will determine how well surface drainage occurs. If the soil is sandy, much of the water movement will occur through the soil. If it is mostly clay, the water will tend to run on the surface. Providing channels for runoff during heavy rains will reduce unwanted erosion of roadbed, hill sides, and planted areas. If the drop along open channels is more than a couple of degrees, you should install small rock dams or diversions in the channel to slow the rate of flow.
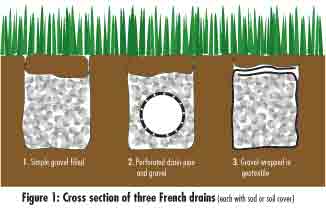
When there is no satisfactory way to provide surface drainage by means of open channels or swales (because of hills, raised roadbeds, or collections of buildings) the process must go underground. The simplest below-surface drainage system is the French drain. A French drain is basically a narrow trench filled with gravel, with enough pitch to redirect surface or ground water away from a given area. It is made more efficient if a flexible, perforated drain pipe is enclosed within the gravel. This arrangement will maintain efficiency longer if the gravel is encased in geotextile (landscape fabric, a.k.a. weed barrier, for us gardeners). For draining smaller areas without the need for higher-volume water movement, a trench filled with gravel wrapped in the geotextile works fine and is considerably cheaper without the drain pipe (figure 1). The geotextile keeps silt from seeping into the gravel and clogging the drainage channel.
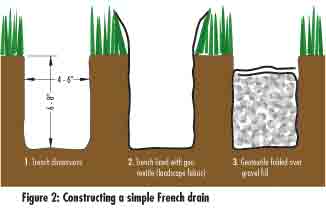
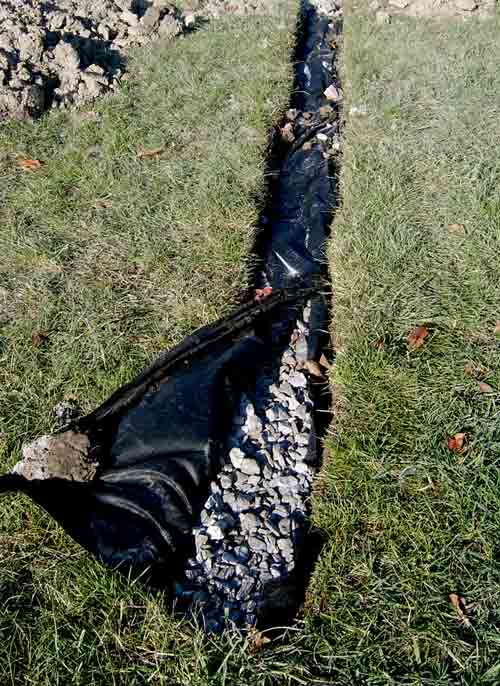
To construct a simple French drain (figure 2), first dig a narrow trench (4-6″ wide and 6-8″ deep). This trench may be straight or have any number of curves, as long as it maintains a drop of at least 1/2 to 1% (1″ drop per 100-200″ length). Lay 36″-wide landscape fabric over the trench from one end to the other and push it down to the bottom, allowing an equal amount of excess fabric to stick out above the trench on each side. Fill the lined trench two thirds to three quarters full with crushed limestone or washed river gravel the size of nickels to quarters. Fold the remaining fabric down over the gravel, one side first, then the other. If the French drain runs through an area of lawn, sod can be replaced over the fabric/gravel tube, completely hiding the channel. If it runs through a planted area, the remaining upper part of the trench should be filled with a 50:50 soil-gravel mix.
The trench should run through the area you want to drain, to a lower area that will accept the excess water. This can be an open drainage ditch or culvert, storm sewer, pond, dry well, or rain garden. A dry well is a vertical-sided hole, several feet deep, filled with gravel. To determine if your soil has adequate drainage to accommodate a dry well, fill a 1-2′-deep test hole with water; if the hole empties in an hour, your soil percolation rate is adequate for a dry well. A rain garden is a planted, depressed area that will accept excess rainwater runoff. Native wetland edge plants are recommended for rain gardens because they generally don’t require fertilizer and are more tolerant of local climate and soil conditions. The plants, their root systems, and microbial soil colonizers act like a huge sponge to take up and filter considerable amounts of runoff water.
Infrastructure to support the railroad
It is easier to organize and access wiring for track power, switch controls, building lights, etc. if these wires are collected to convenient distribution points and then conducted through underground conduits to the central power source and controls. Compressed-air tubing for switch control can also be included in these conduit runs. The ideal time to bury conduits is during the early earth-moving stage of outdoor-railroad construction.
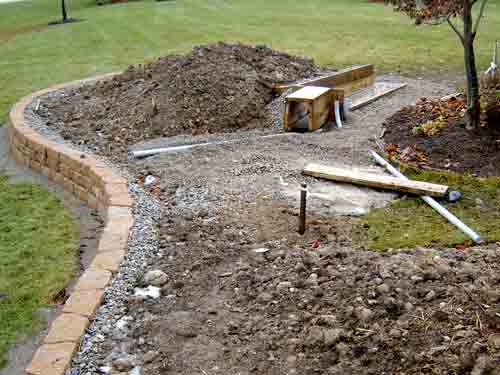
Plastic (PVC) conduit tubes are commonly available in 10′ lengths and are relatively inexpensive. Choose an inner diameter size (1, 11/2, or 2″) that will accommodate the gauge and number of wires you will be using. Wires and compressed-air tubes can be snaked through these underground conduits easily after the basic roadbed is in place, and the individual wires can then be distributed, buried in the gravel roadbed. PVC conduit is considered rigid but can take a gentle curve along its length. Elbow connectors with a 90° bend work well to make sharper curves and to bring the underground contents up to a junction box or a central control box.
If you are planning to make cast-in-place bridge abutments or building foundations, consider doing that during an early phase of construction. To give adequate support (and avoid frost heave in northern regions) a substantial gravel base (about 4″) should be tamped into place where the concrete structures will be cast.
Infrastructure for the garden
Besides adequate drainage for root health, garden plants also need an available source of water when there is not enough rain. Many gardens can be watered with an overhead sprinkler positioned along the periphery and connected to a garden hose. This is an easy, non-permanent way to provide water. There are drawbacks to this method: some plants get too much and others not enough water, water is wasted where it lands on walkways and unplanted areas of the garden, and evaporative loss is greatest when water is sprayed into the air. Excess runoff water from overhead sprinklers can cause soil erosion and when foliage is frequently wet, there is increased risk of fungal diseases. A better system would utilize drip irrigation (see “Miniscaping,” December 2006). The larger 1/2″ main supply tubes distributing water to different areas of the garden are best positioned and buried during the early stages of shaping the garden. The smaller 1/4″ micro connecting tubes can be positioned among the plants later and then covered with mulch.