The following pruning discussion primarily deals with P.g. conica. There are smaller varieties, like P.g. ‘Pixie’ and P.g. ‘Jean’s Dilly’, which I rarely prune and use as town and home trees.
I’ve been teaching clients to use the following technique, but I don’t insist on it. Our garden railways are, after all, our personal thumbprints of expression. You might invent a better way, which I’d like to hear about.
The science
In a dozen years of visiting countless garden railways, I’ve found that the most-planted tree in just about any state, except in the deep South, is the dwarf Alberta spruce. Like Christmas trees, most are kept in a dense cone, perhaps cleaned of branches near the ground. Years pass. Although a true dwarf shrub, the tree’s DNA creates a cone shape with a ratio of 2:1, height to width. They grow wider and wider, as they gain 2-4″ in height each year. Recognizing this dilemma, some space-conscious railroaders get out the hedge clippers (and, yes, chain saws) to shear the sides and top, occasionally finding brown gaps when finished. This crew-cut treatment will keep the tree small only so long, because the sun-starved inside of the branch eventually runs out of growing points (buds). Dead gaps often appear the next year because the bud-filled tips have been removed, leaving older, non-productive tissue that won’t sprout new growth.
The other issue is that shearing the tips makes the tree shrubbier and denser. The hormones in the tips say, “Oh yeah, cut off my terminal buds and I’ll give you more buds-a lot more” (photo 2). The term for this is “pinching back.” Call it what you like, it works only for a while; then you either have to like the dead look or replace the tree.
The timing
Before you run outdoors with magazine and pruners in hand, let’s talk about when to prune. Dwarf Alberta spruce is recommended for USDA Hardiness Zones 3-8, but I’ve seen healthy specimens in Zones 9 and 10, given afternoon shade and enough water.
In warmer climates, I recommend severely pruning spruce in mid to late autumn so as not to stimulate a new flush of growth, which can be damaged by freezing temperatures. By cutting off bud-bearing branches at this time, you save yourself extra pruning next spring because buds are set on the previous years growth.
Alternatively, prune spruce trees just before or after their spring growth and before intense sun on hot days can burn newly exposed leaves. Some experts say fall pruning also has an advantage because summer pruning can expose new cuts to insect damage.
Those in the colder, northern climates need to prepare their plants for a longer dormancy, so fall pruning may send the wrong message (although I’ve seen recommendations for fall pruning of spruces in Zone 4). After the buds have sprouted and hardened (no longer tender), usually in May or June, a severe pruning in late spring will allow more time to repair for the coming winter. It’s difficult to give advice for every situation in an international magazine so I suggest you test your pruning skills on just a few trees before making a costly mistake. One or two dead trees can model lightning strikes.
The technique
Let’s look at what to do if starting with a dwarf Alberta spruce that has been growing over 5 years in the ground (photo 2). In the photo, notice that a previous attempt to shorten the tree has produced lots of new growth around the dead apex; eventually this would make a bushy flat top. Even though I want to lower the apex, I start pruning at the bottom to see what the tree will tell me.
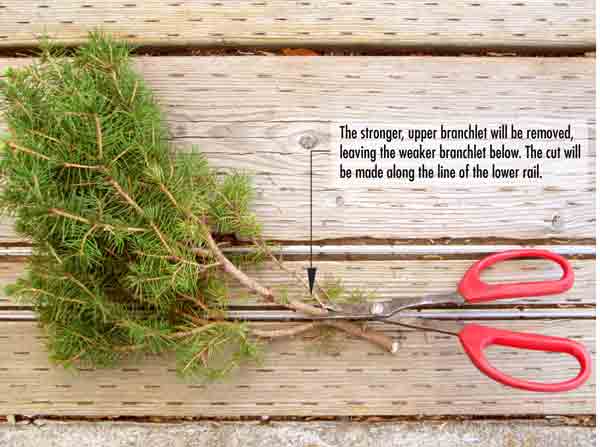
Spruce branches have what is termed an “opposite arrangement” of branches. Knowing this habit, I prune much of the growth away from the top of each branch, leaving a bottom “branchlet,” and making sure that it has buds. To demonstrate this technique, I have placed a typical branch on a track in the orientation it was on the tree (photo 3). Opposite branchlets on the main branch point up and down, then left and right, and so on.
DNA tells the branch tips to point up, but there is a loophole, called “directional pruning.” We want our lower branches to look heavy and old, and to point outward or perhaps down a bit. In photo 3, the lower rail shows the cutting path I will take with my pruning shears on every branch of the tree, starting by pruning the strongest upward branchlet and leaving the weaker horizontal branchlet on the bottom. I’ll then cut smaller branchlets off that one and finally cut the terminal end to eliminate the strongest, longest tips. I’ll leave the shortest tips, with some buds.Finding the place to start cutting is tricky on a densely branched shrub, as in the branch in photo
3. Pick a branch (any branch) and fold up only the tip to expose branchlets attached to that main branch. If you see a decent branchlet underneath, cut off the big one you are holding up (where it meets the branch). If, when you lift the remaining branchlet, you see another good branchlet underneath, cut off the one you’re holding. Repeat this procedure on the entire tree, except the very top. If you see a cluster of branches coming off the trunk at one point, isolate a weaker one and get rid of the others. Less is more, but don’t model a sparse mountaintop tree in a lush grove.
Decide at what height you want the lowest branches, based on the full-scale tree you are modeling, then similarly decide on the height of the tree. I leave low branches to hide things I find unsightly and remove them to expose goodies. Sometimes the plant will grow one or more secondary trunks and you may need to decide to keep one or part of one to hide a bare trunk on that side.
The apex
Lowering the top is not as difficult as you might think, but harder than just lopping off the top three years of growth, as happened in photo 2. There’s a trick to it.
Using the tree’s “apical dominance,” choose a good-looking side branch a few inches lower than the intended top. Pick a lateral branch on the side of the tree you call the front. Unless you waited about 10 years too long, this branch will be flexible and you can bend it up, snug to the trunk.
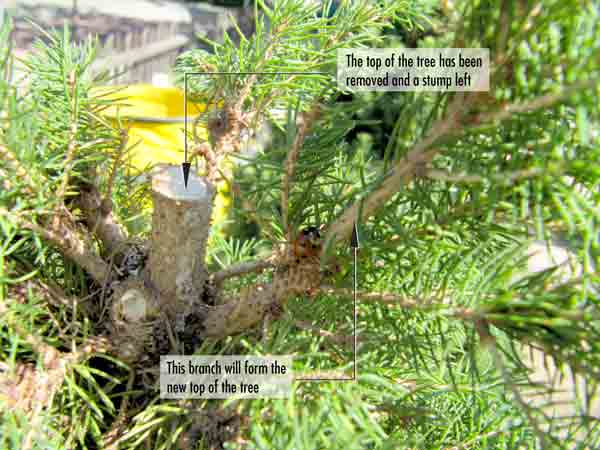
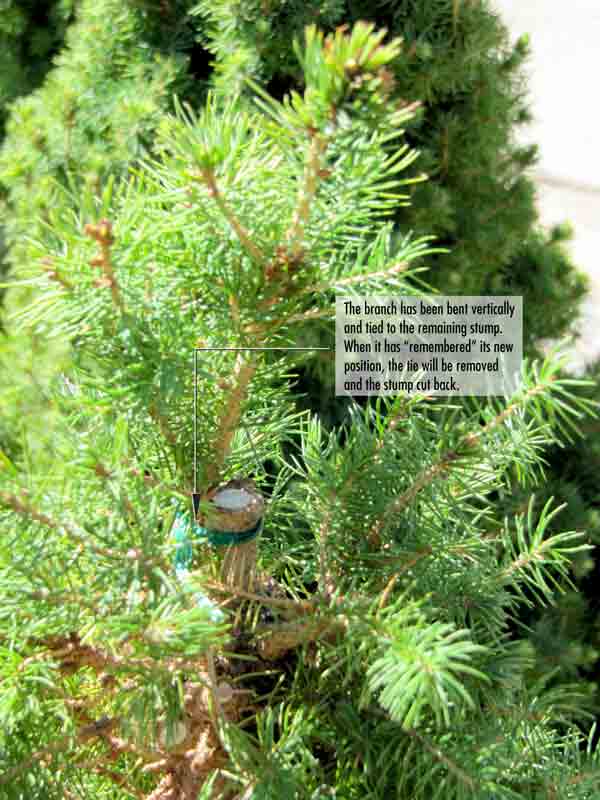
In photo 4, I’ve chosen the branch on the right and cut off the top of the tree to leave an important, but temporary, stump. Photo 5 shows the placement of a temporary (green) twist-tie. Be sure to remove the tie and the stump after the branch has retained the “memory” of its new verticality. Having pruned hundreds of little trees, I occasionally find apices on which I forgot to remove the tie and find that a bulging gall has formed under the tie, while other branches have assumed dominance. This can be fixed using the above technique.
Aesthetic pruning
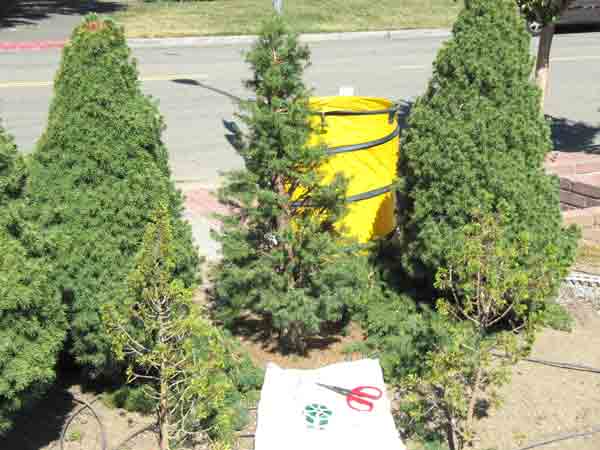
Finally, in photo 6 we see the results of a half hour of pruning the tree in the center. I decided to begin the bottom branches only 4″ from the ground to hide the street. In the process of pruning, I relieved the tree of two-thirds or more of its growth, not to mention the dead leaves piled up inside with snails, spiders, and a peanut hidden by a jay. Inside branches will be happy to receive the wind, sun, and rain, which will help keep the tree healthy. Spray it with the hose to repel the notorious spider mites during hot spells.
We garden railroaders are actually pioneers in this process of creating scale trees in our gardens. However, we can learn from the bonsai masters and from the tree itself. This method of pruning translates to many conifer species. Because we’re growing plants in the ground, our trees usually have more vigorous root growth than those in pots, helping us achieve greater success.
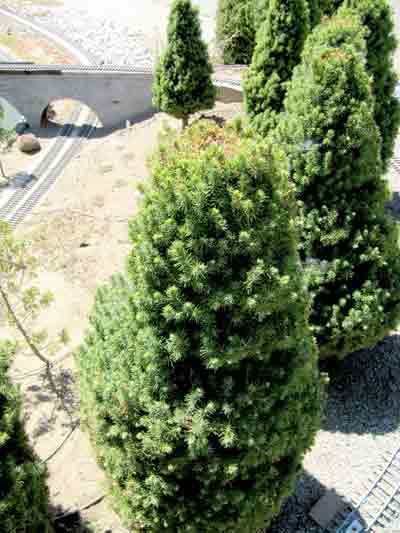
It may help to have a professional person start the process, which you can then more easily maintain. Such was the case in photo 1, in which a person who had taken a course in “Aesthetic Pruning” got the homeowner past the initial severe pruning so he could then keep them in scale. If you want to experiment, prune a few trees when you feel like it, then see what they do. Get your gloves on!
Learn more about dwarf Alberta spruce.