Earthwork on the project railroad: We are ready to begin grading the line. The first thing we had to do was to transfer our design to the ground. This would give us a feeling for how the railroad would actually sit in its site and it would also delineate where the earthwork had to be done.
Transferring the drawing to the ground
Drawing our trackplan on the ground amounted to redrawing the plan to a different scale-full size instead of 1/2 inch = 1 foot. The most important points on the plan were the center points of the curves.
Once these points were plotted on the ground the entire plan could be redrawn. Since we located the points on the plan using the edge of the patio and the wall of the neighbor’s garage as reference points, it was easy to plot the same points on the ground by taking the measurements from the plan. There were three points that we had to establish: the centers of the two curves that form the ends of the railway and the center of the curve that forms the spur line.
Once these points had been plotted and marked with wooden stakes, we drew in the lines of the track. The main curves were done with a 6-foot-long piece of string (to plot the points at a 6-foot radius) with a loop in each end. One loop was placed over the center stake while the other was looped over a sharp stick. The curve at each end was then simply scratched in the dirt. The process was repeated with the spur track, but using a string that was 4 1/2-feet long.
The straight passing siding was drawn by scratching a line down a piece of string held taut from the points where the switches diverged from the mainline. The slightly bowed mainline adjacent to the passing siding was eyeballed in until it looked good.
We wanted a smooth and accurate S-curve on the opposite side of the railway-the “inside” of the kidney, as it were. We couldn’t plot the center point of that curve because the neighbor’s garage was in the way and we weren’t up to doing a lot of fancy geometry. Instead, we took a large piece of cardboard and cut one edge to a 6-foot-radius curve. That became a template that we aligned with the ends of the approach curves, and then scratched a line along it.
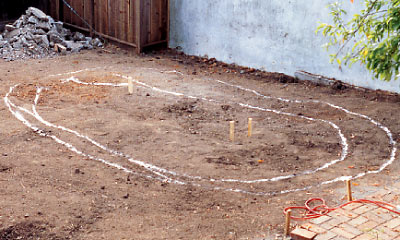
Our railway was now complete in the form of rough lines scratched in the dirt. The only problem was that it was hard to see. We got some baking flour from the kitchen and poured it on the ground along the lines of the railway (we could also have used chalk or spray paint intended for ground work). The result was magical. All of a sudden, there was our railway, fully laid out on its site just as it was on the paper plan. Viewing it like this really brought it to life. We could see where we had to make cuts, where our retaining wall would have to go, and where the mountain could be built.
Rough earthwork
A fair amount of rough earthwork had to be done even on this tiny railway. We had to cut and fill so the mainline would be level, build a retaining wall to hold the fill in place, carve away the area where the trestle would go, place the big boulders near the S-curve, and, of course, build our mountain in the middle.
We started with the cutting at the top end. First, we marked where we reckoned it had to be, based on our elevation readings and the track line on the ground. Then we started digging. The ground was very hard and progress was slow, but we kept at it. Fortunately, the weather smiled on us. All of the removed dirt was hauled in a wheelbarrow and dumped at the lower end of the line as fill.
When the cutting was as deep as we wanted (checked with the water level), we started on the fill. We had a fairly substantial pile of rocks that had been dug up, so we decided to use them for the retaining wall. We located the base of the wall a foot or so from the track line and sloped it up toward the track. The wall defined both the curve and the lower end of the railway.
Then we were ready to build the mountain. Before we started, we removed the stakes for the center points of our curves and replaced them with much longer ones, so they wouldn’t get buried when we started building the mountain. We’d need them in the future to restore the track line to the ground.
We started building the mountain by piling up concrete rubble that we had from an old patio. This formed the rough shape of the mountain. On top of that came dirt – lots of dirt. We had to have a deep enough layer of dirt on top of the rubble that, when we started planting things, we wouldn’t run into concrete. Consulting our plan, we shaped the mountain as we went, keeping it away from the station area at the base. We tried to make the mountain look as natural as possible.
When we finally achieved the pinnacle of alpine perfection, we created some natural stone outcroppings at the top with some leftover rocks. These not only helped the mountain look like more than just a pile of dirt, it gave it shape and form and provided some nooks and crannies for plant material.
Once the mountain was reasonably finished, we dug out the place for the trestle. We did this by eye, using our plan and the actual trestle as a guide. One face of the gorge in which the trestle was to sit backed up into the mountainside, so it had to be retained with some large rocks. We didn’t actually install the trestle at this point because our final grade had not been established, but we carved the land around it to the point that we knew the trestle would fit well when the time came.
At this point, we were nearly finished with the rough earthwork. Our track line on the ground had long since vanished, so we put it back to see how the railway would look in its brand new landscape. This was an easy job (especially when compared with building the mountain) and in 15 minutes or so the track line was back on the ground. Time to deal with the site of the S-curve.
We had some fairly large rocks on hand, so we used them to make a rock formation near the garage wall. This was a contrivance to justify our S-curve, which evolved like this:
“Let’s have an S-curve in the railway.”
“Why?”
“Because the train will look cool going through it. It’s less boring than a straightaway.”
“But we can’t just have an S-curve sitting out there in the middle of nowhere. That would look pointless.”
“Well, OK, let’s stick something there for the curve to go around.”
“Like what?”
“Well, how about a rock formation, something too big to blast into oblivion, so the railroad had to go around it?”
So that’s how we ended up breaking our backs constructing a natural rock formation that looked like it’d been there since the dawn of time, something that a railroad absolutely had to go around. But, when the project was finished, it looked pretty neat and we were glad we did it. The train not only looked good going through the S-curve, but it looked just right coming through the rocks.
The spur line was to climb the back side of the mountain to reach the banjo factory that was inexplicably built at the top. We had to retain the grade going up the mountainside, so we built some cribbing and installed it adjacent to the route of the spur line. This involved building the crib as a single, solid unit, digging the dirt away so it could be properly placed, then backfilling up to grade. Cribbing adds an interesting man-made feature to a garden line, and miniature plants can also grow between the stringers.
Once all of the earthwork was finally done, the track line was restored one last time in preparation for trackwork.