An overview of garden railroading: Garden railroading is the art of combining a model railroad and a beautiful garden to create a railway-like atmosphere. The difference between a traditional indoor layout and a garden railway is the difference between realism and reality.
Indoors, the goal is to create the illusion of reality through the use of artificial materials — mountains are made of plaster, rivers are made of plastic resin, etc.
Outdoors, you are dealing with real life. Mountains are made of dirt, rivers are made of water, rocks are made of stone. This can be both a blessing and a curse. Washouts can cause problems, snow can stop trains, and trees and branches can fall on the track. But when you compare these nuisances to the joys of having a railroad at your doorstep that is constantly changing with the seasons, the weather, and even the time of day, this seems a small price to pay. Most people even consider it to be part of the fun.
A little history
Garden railroading is probably the fastest-growing aspect of the model train hobby today. It is not new, though. In Britain this pastime goes back more than a century. In the USA it achieved some popularity in the 20s and 30s, but it had all but died out by the time the Second World War ended. There is one garden railway still extant in the US that goes back to the 1920s. This is the one at the Los Angeles County Fairgrounds in Pomona. It can be seen in operation every year while the fair is in progress.
The resurgence in popularity of garden railroading was due in large part to the advent of the colorful LGB trains from Germany. These trains were designed specifically with outdoor use in mind. As the company began introducing more US-style trains, garden railways began to spring up all over the country.
Getting started
Before you begin to plan your railway, examine the area your line will occupy to see if it’s suitable.
Is it secure? Is it more or less level, or will you have to level it up with additional earth, retaining walls, or bridgework? Is there an existing garden, or will the garden be designed along with the railway? Are there things in the way — like clotheslines, houses, or swimming pools — that must be removed or worked around?
You should determine at the outset how elaborate you want your line to be. As a general rule, less is more. A traditional indoor railway may have many loops of track, dozens of engines, and hundreds of pieces of rolling stock.
Outdoors, where we are dealing with the elements, a single-track mainline usually suffices, with sidings at stations, industries, and points of interest, and perhaps a branch line to an outlying terminal. To get started, a single locomotive and three or four pieces of rolling stock — freight or passenger — are all you really need.
In choosing a first train, decide what your railroad is to be.
Is it a line that will haul only freight? Is it a passenger line that connects small towns? Is it an old-fashioned narrow-gauge steam railway, or a modern, standard gauge, diesel-powered line? The space you have available may help to answer these questions. A small industrial line, with little engines, short cars, and tight curves, will fit better into a limited space. A modern mainline road will require broader curves and longer straight stretches to look right. Do your homework. Read books and magazines on the subject before jumping in.
Scale and gauge
Scale and gauge are two important terms that have caused a lot of confusion over the years, and will no doubt continue to do so. They are sometimes used interchangeably, though incorrectly.
It really is quite simple: Scale is nothing more than the proportion of the model to the full size train. This can be expressed as a fraction or a ratio (as in 1:24 scale) or as the scale’s relationship to a foot (like 1/2 inch to the foot, or just 1/2 inch scale).
Gauge is simply the distance between the rails, measured from the inside edges. Where it becomes confusing is when we begin to see all of the different scales — many of them very close to one another — that are used with the different gauges.
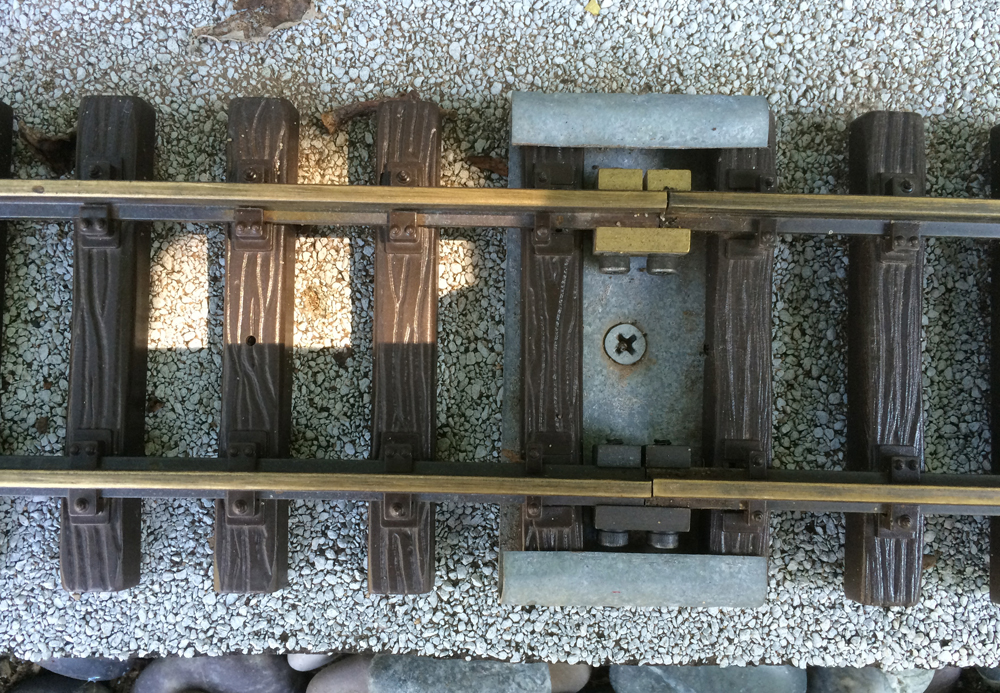
There are many, many possibilities. LGB is 1:22.5 scale — also called G scale — and it runs on No 1 gauge track (45mm between the rails). This gauge is sometimes called “G gauge,” but this is a misnomer that adds to the confusion. No 1 gauge goes back to the late 1880s, and there is no reason to rename it today.
Track and trackplan
There is a wide range of commercially available track today, and this is probably the best approach for the novice. When you have gained some experience, you might want to consider building your own.
Commercial track is available in short pieces of set lengths and curvatures — called sectional track — or in longer sections that you can bend to suit your own needs. Sectional track is good for some applications, but it can be very limiting. If your railway is not to be permanent, sectional track can be easily picked up and put down at will.
For a permanent railway, though, you should consider using flexible track. This can be bent to any desired curvature, and with it you can make your railway go where it should go, not where it may have to go with sectional track.
In designing your trackplan, use the widest-radius curves your space will allow. A six-foot radius might be considered a minimum (although sectional track will take you down to two-foot radius), and ten to fifteen feet will give your railway a much more plausible look.
Space is always a problem, so do what you must; but tailor your rolling stock to your curves. Very long engines and cars just don’t look right negotiating very tight curves.
When planning grades, try not to make them steeper than about 3% (3 inch rise over 100 inches horizontal travel). Steep grades are unrealistic, and they will severely limit your train length.
Roadbed
There are many ways of installing track, but one of the simplest — and to my mind, the best — is to do it the same way a full-size railroad does it: float the track in ballast. Dig a shallow trench, say 2 inches to 3 inches deep, and fill it with ballast up to the level of the bottom of the ties.
Set the track in place, making sure it is straight and level. When it is just where you want it, backfill with more ballast up to the top of the ties, which should be flush with the surrounding ground. There is no need to line the trench with plastic. On the contrary, good drainage is important and an underlayment may impede it.
By floating the track in the ballast, you are allowing it to move, which it will do. The heat of the summer will cause the rails to expand and the cold of winter will make them contract. The spring thaw may bring frost heave. Floating track will move as it needs to, but will be very easy to realign when necessary (probably just once or twice a year, if that). The more established the railway becomes, the less it will change.
The ballast you use is important. Don’t use round stones like pea gravel. They will slide around and won’t really grip the ties. A heavy rain will wash them away. Use a crushed stone that has a “tooth” to it. This will lock with the stones around it and make a firm bed for the track to sit on. Crusher fines from a rock yard, or chicken grit from a feed store are two good sources of ballast.
Electricity
Electricity in the garden is not a problem. Trains generally run on 12V-18V DC, which is quite safe, even in the rain. However, you’ll need to keep your power pack dry and safe from the weather. And a ground-fault circuit interrupter is always a good thing to use between your power pack and the house current. Talk to the folks at your local hardware store about them.
Perhaps the biggest problem in running electricity through the rails is maintaining continuity across the joints as the rails expand and contract. One way of doing this is to solder jumper wires across the joints. There are clamp-on rail joiners that aid in continuity, too. Electrically conductive grease — available at electronics-supply stores — can also be used in the joints.
Trains run on the same voltage that garden lighting uses. The two systems can be successfully integrated, creating wonderful nightscapes.
Alternatives
If you finding running electricity through the rails to be a big hassle, there are other ways to go. Battery-powered, radio-controlled trains are becoming very popular today, and several companies offer systems that can be fitted to existing track-powered trains.
Another popular alternative is live steam — real steam locomotives to pull your trains. These burn either alcohol or butane gas, and are quite safe to operate in the garden.
The garden
Many beautiful garden railways have been created by people who claim not to be gardeners. Gardening is a fascinating aspect to the hobby, and railway gardening has become a sub-hobby in its own right.
It is the garden that often draws entire families into garden railroading. Look into your local rock garden society. Rock-garden plants go especially well with garden railways. Go to garden centers, read gardening magazines and books, and visit public and private gardens in your area.
Join your local garden railway society. Meet people. Have fun. That’s what it’s all about.