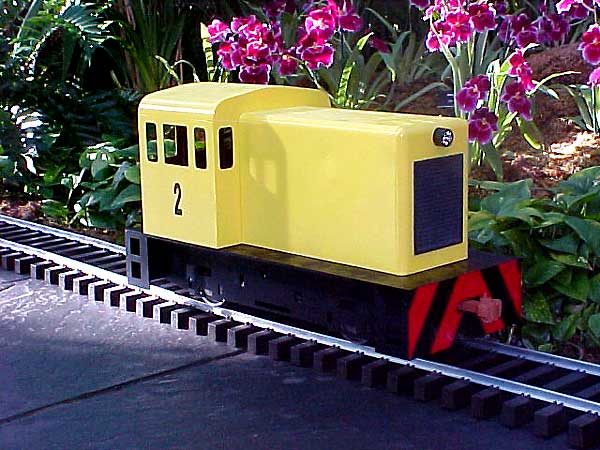

1″ scale, diesel switcher, gondola, and track kits
Riding Railkits, Inc.
249 MacPherson Dr.
Corbeil, Ontario P0H 1K0 Canada
Price: $1,995 for locomotive; $350 for gondola (not including trucks and couplers); $149.95 for gondola detail kit; $59.95 for a 10-foot section of pre-fabricated track
Web site: www.ridingrailkits.com
Generic, industrial, four-wheel diesel switcher and gondola kits for the beginner ride-on-scale garden railroader; made of steel, aluminum, urethane, and fiberglass castings; requires tapping, cutting of metal parts, and painting
Pros: Easy-to-read plans and simple machining skills make placement and assembly of parts easy
Cons: Some parts are heavy and you must be careful of sharp edges
For this review, I built the locomotive, a gondola, and 20′ of track. It is not too difficult or time consuming to put together a credible train from these kits. They come with all the necessary metal, urethane, and fiberglass castings. Nuts, bolts, and rivets are sealed in their own plastic wrapper for easy identification and storage. All larger pieces have been pre-welded.
For assembly, you’ll need the usual toolbox assortment of screwdrivers, wrenches, and files. You won’t need a gantry crane or a mill, but some parts are heavy and you will need to tap several holes of various sizes to receive machine bolts. You’ll also need a pop-rivet tool. A pair of leather gloves might be helpful as well, as some metal edges are sharp. The instructions were written with the beginner in mind. I felt as though a friend was looking over my shoulder, giving advice and encouragement as I built the train step-by-step. A pamphlet of illustrated drawings accompanies the written instructions.
Riding Railkits claims it should take no longer than three to four hours to build the locomotive. I think that’s optimistic, especially for the beginner. Tapping metal to receive a machine bolt was a skill I needed to learn, but with a little patience and practice I got the hang of it. It took me about three weekends to build and paint the locomotive.
The finished locomotive is 14″ high and 26″ long. A rechargeable 12V, deep cycle, lead-acid battery (not included) provides power. The cable from a hand-held controller plugs into a nine-pin control receptacle in the deck behind the cab. Inside the locomotive, a circuit board controls the speed, direction, and optional lights and sound systems.
The engineer controls the locomotive while seated on a padded boat-seat in the gondola (provided). Riding Railkits claims the locomotive will pull three adults on level track at a maximum speed of five miles per hour. The horn supplied with the kit sounds like a battery-operated bike horn, but it gets your attention. A standard Maglite flashlight, fixed inside the front of the locomotive, provides light for night running. A detail kit and realistic sound system will be available soon.
The basic gondola kit shouldn’t take more than a Saturday to assemble. If you choose to add Riding Railkits’ detail kit, schedule in another weekend. The majority of the work in building the basic kit involves cutting reinforcement ribs to size, drilling rivet holes, and riveting the ribs in place on the sides and ends of the pre-assembled body. 1″ Scale Railroad Supply manufactured the pre-assembled automatic couplers and Symington-Gould-style trucks.
I used Rustoleum primer, Gloss Black, and Safety Yellow spray paint. Self-stick vinyl numbers and letters work well for lettering and are available from any local hardware store. The prefabricated track consists of plastic, UV-resistant ties, which slide onto 3/4″-high aluminum rail. Each tie has plastic spacers to maintain a uniform distance between the ties. Aluminum rail joiners match the contour of the rail. The rail bends easily to form curves. The tightest-radius curve a small train will negotiate is 15′. A typical suburban backyard of 60′ x 120′ is large enough to accommodate an interesting railroad.
Riding Railkits’ goal was to make an inexpensive, reliable, entry level, ride-on-scale train for the garden railroader. If you’ve ever thought about adding a larger-scale railroad to your garden, this is a good choice. The kits are easy to build, the customer support is friendly and responsive, and there are many products to choose from when you are ready to add to your railway.