Remote Control Systems
PO Box 578
Casino NSW 2470 Australia
Price: A$99 (US$93) + A$15
air postage
Website: http://rcs-rc.com
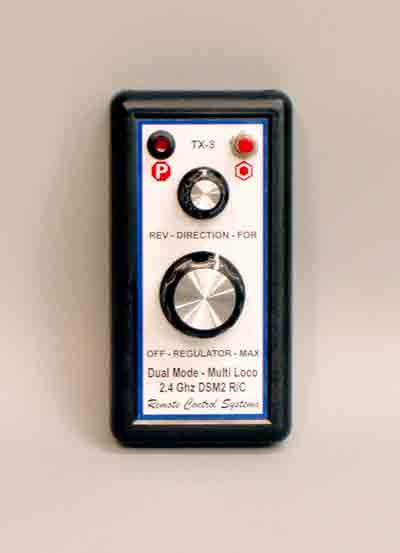
TX-3 three channel, 2.4GHz, radio-control transmitter for operation of live-steam
locomotives
Pros: 2.4 GHz spread-spectrum technology; smooth, simple control; small; lightweight; excellent range
Cons: None
Fast forward a few decades to the advent of spread-spectrum radio control, which is what is used in the RCS TX-3. Instead of transmitting on one channel at a time, both the transmitter (Tx) and receiver (Rx), in a spread spectrum, are constantly hopping from channel to channel. Once the Tx/Rx are bound, they start the synchronized sequence of channel hopping. The pair automatically set themselves to an unused frequency when switched on.
Operation is constantly self monitored and the set will move to an unused frequency if any interference occurs. Because 2.4GHz R/C systems work on higher frequency short-wave length, the transmitter antenna is only about 15cm (6″) long, and is flexible; the receiver antenna is much shorter, too. This allows the transmitter and receiver to be mounted in smaller areas than FM units.
The TX-3 is much smaller than the usual stick-type controller. The hand-piece case is 51/4″ high x 23/4″ wide x 7/8″ thick (135mm x 70mm x 25mm, respectively), with the knobs adding another 5/16″ to the thickness. I found this size to be quite comfortable in my hand, and easy to fit into my tool box.
The small knob adjusts the valve-gear setting via the servo connected to the Johnson bar (reverser), while the large knob operates the throttle (regulator) servo. Both knobs have a slight detent in the top center of their rotation. In the case of the valve-gear knob, this detent is used to mark the neutral position of the valve gear. Since the throttle “off” position is when the large knob is rotated counterclockwise against the stop, the detent can be used as a reference point in your throttle applications.
The upper-right binding button controls Ch. 5, with a snap-action of 90° full travel. This can be used to operate a whistle or, perhaps, an uncoupling setup. The transmitter uses a 9V alkaline battery. The TX-3 can also be used to control battery R/C “low off” and “center off” electronic speed controls.
To start the installation, I read through the instructions, which consist of six pages of written information, many black-and-white photos, and a wiring diagram. I found these instructions also covered other types of TX-3 installations, such as the use of auto binding or electronic speed control. The information for this particular setup was covered in about one page, plus a few photos. This installation recommends a DSM2/DSMX receiver, which is also available from RCS. However, I used a Spektrum AR6100 receiver that I already had on hand.
The first step was to manually bind the transmitter and receiver by following the simple instructions on page one. This consisted of inserting a binding plug into the receiver battery slot and adding battery power. Then a few more steps, consisting of pushing the transmitter on/off and binding buttons, were used, while watching two lights flash to indicate the process was successful. Easy stuff. (RCS also offers a DSM2-EM receiver with auto-bind as well as programing capabilities.)
Next, I connected the servo leads to the proper slots in the Rx, as indicated in the instructions, and tested the system. The valve gear moved as required, with no adjustment, but I found that the throttle servo was operating backwards due to the position of the servo-control arm. To change this I simply unscrewed the arm from the servo shaft and repositioned it 180°. Now both servos’ control arms moved properly. I also plugged in a servo to test the snap-action movement for the whistle, with success.
Testing under steam was done on the Denver Garden Railway Society track on the grounds the Colorado Railroad Museum. Before lighting the fire, I powered on the transmitter, then the receiver, and checked to make sure the servos were working properly. When the pressure came up, I rotated the small knob to the full forward position, then slowly turned the throttle knob until the locomotive started to clear its cylinders. The engine was then moved backwards and forwards a few times to remove all of the condensate, all with smooth inputs to the knobs.
With the cylinders clear, I slowly opened the throttle and off went Acoma Nº 8. The controls felt natural, with little time required to get comfortable with them. After a few reverse/forward practice cycles, I backed the Nº 8 onto a train with ease and started out for a run. During the run I did severe starts, stops, and speed changes, with no glitching at all, no matter where I stood around the club’s steam track.
Next I did a range check, walking into the wood-construction DGRS club house/storage building, shut the door, and operated the train with no interference. Next I went to the farthest corner of the fenced-in railway, then outside of the fence, and, finally, ended up around 250′ away from the steam track, all with perfect control of starting, stopping and speed. That high range is probably extreme and could be due to the fact that the receiver antenna ends are exposed at the top of the coal bin on my engine. The instructions say to expect around 164′ (50 meters) of range, with a bit less behind walls and mesh fences.
I am impressed with this live-steam controller. It is small, easy to use, glitch free, lightweight, and with a range that should cover almost any garden-railway application. I plan on using it to operate several of my live-steam locomotives.