News & Reviews Product Reviews Phoenix SM-18 Sound and Motor DCC Decoder

Phoenix SM-18 Sound and Motor DCC Decoder

By Kevin Strong | June 3, 2019

| Last updated on November 3, 2020

Two components combined onto one board

Email Newsletter

Get the newest photos, videos, stories, and more from Trains.com brands. Sign-up for email today!

phoenix_1
Kevin Strong
Phoenix SM-18 Sound and Motor DCC Decoder

Phoenix Sound Systems
3514 West Liberty Road
Ann Arbor, MI 48103
734-662-6405
www.phoenixsound.com

Facts & Features
3-amp capacity dual-mode sound and motor decoder
Plug-and-play installation
High-quality sound recordings
Easily customizable using the PC interface (separate purchase)

Price: $265

phoenix_2
Kevin Strong
phoenix_3
Screenshot of PC interface (separate purchase)
Kevin Strong
Phoenix Sound Systems have long been regarded as the gold standard of stand-alone sound systems in large scale. Over the years, they’ve been used in traditional track-powered locomotives and paired successfully with pretty much every flavor of command control system that’s been on the market. They’re quite versatile in that regard.

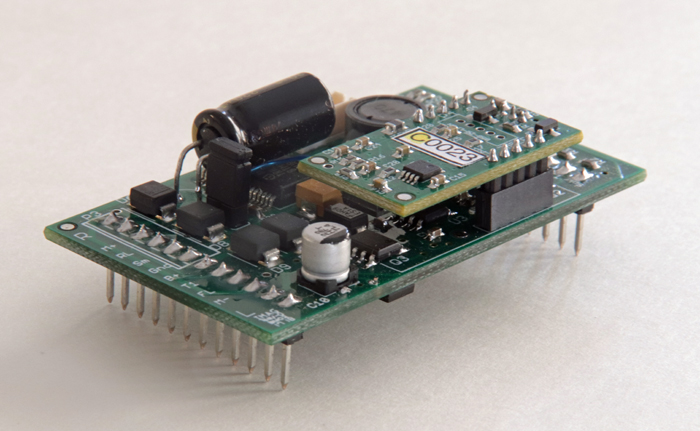
This offering from Phoenix marks its first foray into the world of Digital Command Control (DCC) motor control. Rather than having the modeler find a motor control DCC decoder to pair with their sound system, Phoenix has combined the two components onto one board. It saves space and time, since you can program everything at once without fear of overlap between two separate boards. Its first board in the line is a plug-and-play decoder, intended to go into any Bachmann locomotive with the 23-pin universal socket.

Note that while Aristo-Craft also used this same socket, the pins on the second row of the socket in Aristo-Craft locomotives may or may not match the decoder or even be connected to carry the light or sound functions to the locomotive. The instructions state that plugging this decoder into an Aristo-Craft locomotive will void the warranty. Aristo-Craft’s version of the socket did not standardize anything on the second row of pins (called “J2”), so there’s the possibility that the pins may not do anything at all, or they may somehow feed power to pins where power shouldn’t be on the Phoenix board. I would advise reading the documentation that came with your Aristo-Craft locomotive to determine the wiring of the specific socket in that locomotive before trying anything with this decoder. The motor and headlight controls (the “J1” side of the decoder) are standard between the two manufacturers’ sockets. Phoenix should have a screw-terminal version of this board which can be used in non-socket-equipped locomotives soon. (You can buy adapter boards as well from various manufacturers.)

The board is designed to plug into the 23-pin Bachmann socket, and measures 5/8” x 1 3/8” x 2 3/8” additional height above the top of the socket. The decoder has a socket for Phoenix’s external programming jack should you wish to use the firm’s PC interface to program the sounds and DCC functions on this board. (This is a separate purchase item that runs on Windows-based computers only, $90)

This board has a continuous current capacity of 3 amps. That will be sufficient for Bachmann’s locomotives, but if you were to use this board via any of the adapter boards on the market, it may not be sufficient to run more power-hungry diesels. Phoenix told me they’re working on a higher-current-capacity version of this board and hope to have that available soon. The decoder will work on track voltages up to 24 volts.

Installation is plug and play. I removed the “dummy plug” from my Bachmann 2-6-0 and plugged in the Phoenix board. I tested the locomotive using a PIKO Navigator DCC command station. I applied power to the rails and the engine’s sounds came to life. I pressed the headlight button, and the headlight came on. I pressed “F4” to turn on the smoke unit and I had a nice plume of smoke coming from the locomotive in short order. I pressed “F6” to turn on the firebox flicker, and—nothing. I pressed the other lighting function buttons, and the firebox started flickering when I pressed “F3”. Apparently, the default values for the function CVs as the board came from the factory did not match the manual. Those are easily changed if you desire.

I nudged the throttle to step 1, and the locomotive just started creeping forward at well under 1 scale mile per hour. Transitions from step to step were smooth. Control was very good. The usual DCC Configuration Variables (CV) are there for speed tables, acceleration, and deceleration if you wish to do speed matching for consists. There aren’t a lot of extra features with this decoder in terms of motor control; no prototypical braking options or similar things. I would like to have seen a bit more explanation of the less-common CVs included in the manual, such as “kick start,” and “DCC Rate (Speed vs. Throttle.)” Those appear to be decoder specific, so some further explanation would be welcome to the newcomer.

Operation on analog DC is similarly smooth, though you do need at least 6 volts going to the track in order for the decoder to wake up and start powering the locomotive. This is common to DCC-equipped locomotives, and the biggest drawback to running such engines in a DC environment. If you’re looking at this board to add sound to a locomotive that will be running in DC, look to Phoenix’s stand-alone PB11 or PB17 sound board, as it’s designed specifically for DC. Note: This decoder prefers filtered DC. It will operate on pulse-width-modulation, but the speed control is finicky.

The sounds are everything we’ve come to expect from Phoenix, which is to say it’s the same sounds and software that Phoenix has used for years piggy-backed onto this new motor control board. There’s one sound file loaded onto the board (usually by your dealer), and you can audition all of Phoenix’s sound files on their website to help you make your choice. The sound files are high quality. There’s a reason Phoenix has been the go-to system for stand-alone sound for as long as they have. If you need to change the sound on your board, you can do so via Phoenix’s PC programming interface.

If there’s one gripe I have, it’s that the architecture of this board has the motor and sound controls existing parallel to one another. There’s no integration of what kind of load the motor is drawing to have any effect on the sounds. Other motor/sound decoders use the motor’s back electromotive force (BEMF) to change the sound of the chuff or the RPM of the diesel motor in response to how hard the locomotive motor is working. The Phoenix board doesn’t have this capability.

Overall, though, if you’re looking for a quick and easy way to get your Bachmann socket-equipped locomotives running with DCC and sound, it doesn’t get any easier than this. Plug-and-play simplicity is a significant strength, especially for modelers who consider themselves electronically challenged. The sound is a known commodity and well-respected for quality. If you add the PC programming interface, the sounds are easily customized.

2 thoughts on “Phoenix SM-18 Sound and Motor DCC Decoder

  1. aristo manuals never explained if the second row of pins were connected or not. A user should inspect the motherboard, and I would recommend cutting any traces to any pins.

You must login to submit a comment