Photo by Nancy Norris
Like a grade-school report, “What I did on my spring 2020 vacation,” this story is about optimism in the face of confusion and lack of resources. We had just started a new little garden railway loop in front of our house, but hidden from the street. Having built a gallery along the walkway, we next needed a tunnel along the house, but not touching it. With no big culvert tube or concrete blocks, I chose to simply call it “tunnel art.”
Sheltering in (a good) place
How do we build a railway during “stay at home” orders? Where will the materials come from? Will I have to compromise strength, prototypical design, or creative freedom? Fortunately, I have a corner of my yard (respectfully hidden behind sheds and gates) where I store odd ends of lumber, bits of metal, and PVC pipe leftover from projects. New stuff, like a bundle of cheap redwood “tomato stakes” mostly ripped from heartwood, we keep under tarps. I felt like an astronaut trying to build a machine from random parts in a hatch.
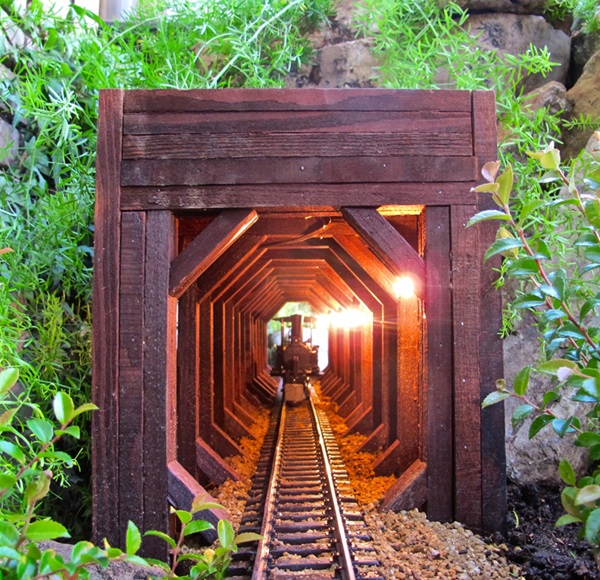
More like a snow shed, we framed up a 5-foot tunnel on a 2 x 8 using the ¾” x ¾” redwood stakes. My helper, Nick Schofield, Titebonded and brad-nailed the many pieces into an Fn3 scale shed. At 1:20.3, those boards would be 15″ thick – close enough. I’ve seen pictures of long wooden railway sheds where light filters in to show the timbers and support gussets, more or less as in photo 1. Seeing those beefy boards, fastened to protect the train and lit from tiny lights, feels like a promise kept – a metaphor for help amid days of disorientation.
Unique technique
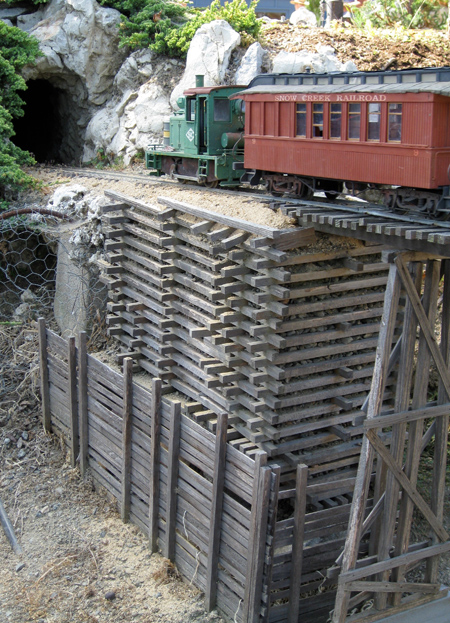
Photo by Nancy Norris
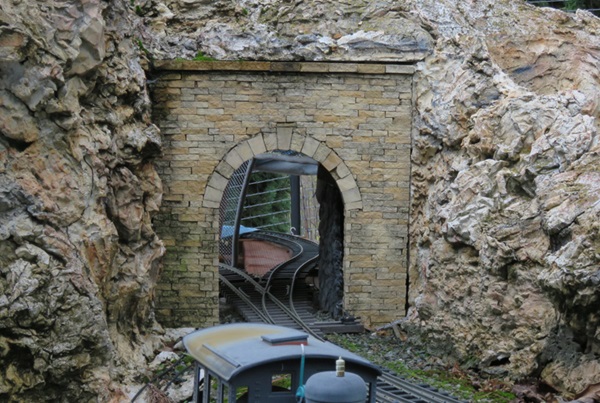
Inspiration for my tunnel came from reviewing hundreds of photos taking during National Garden Railway Conventions. Bob Treat’s Snow Creek Railroad shows how dramatically packing together fun features can be; the stone portal sits above cribbing and a trestle (photo 2). Japanese garden juniper (Juniperus procumbens ‘Nana’, Zones 4-9) ties it to the greater yard.
Photo by Nancy Norris

Photo by Nancy Norris

Photo by Nancy Norris
Tunnels are fun!
Photo by Nancy Norris
On their beach-inspired California Short Line (photo 6), where sand and grasses predominate, Bill and Dolores Rodriguez remind us of the lyrical nature of garden railways: “The words of the prophets are written on the subway walls” (Paul Simon).
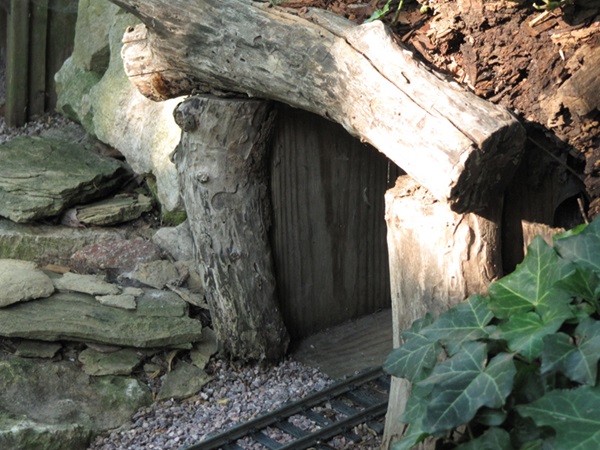
Photo by Nancy Norris
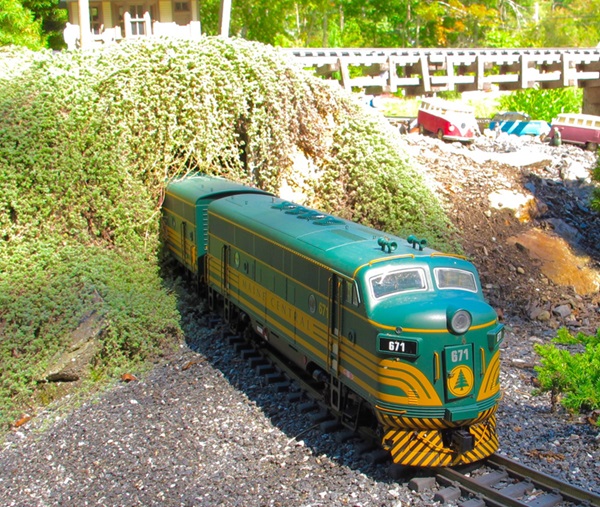
Photo by Nancy Norris
Darkness to light
Subterranean gallery, covered road, hollow conduit, in-and-out, shut in then freedom, a shortcut – no matter what you call it, your horizontal passageway through or under an obstruction will provide days of anticipation, wonder and excitement. Even the mail lady gets to share in my front yard fantasy.
From World War II leader Winston Churchill, “A pessimist sees the difficulty in every opportunity; an optimist sees the opportunity in every difficulty.”
Resources
Garden Railways’ back issues
Build a long curved tunnel, June 1998
Cascading trees and the rocks that support them, June 2008
Portal portfolio, Feb. 2010
Aesthetic abutments, Dec. 2013
Tunnels, Feb. 2015
Hardscape using cement products II, Feb. 2015
Do over! Turning a tunnel into a canyon, Feb. 2015
How to landscape a tunnel, Apr. 2015
Regional gardening reports
Zones listed are USDA Hardiness Zones
What are the hows and whys of your tunnels?
Prototypical fantasy
Rob Reiter
Pleasant Hill, California, Zone 9
My many rides on the railroads of Disneyworld and Disneyland became my unconscious “prototype” for my garden railroad. When traveling on the Disney trains, I board in one “land” ending up in another; going from Adventureland to Frontierland was a relatively short ride separated by a tunnel. The scenery changed by the time I exited the tunnel. So on my railroad something similar happens. From full sun with succulent plants to a shady green space with ferns, the train travels through all these changes. Of course my tunnels don’t benefit from Disney workers clearing the tracks of leaves and twigs, so given my four tunnels, I have been using a track sweeper from Earl Martin. The sweeper blows the leaves off the tracks easier than my reaching into these tunnels.
Stan Ames
Chelmsford, Massachusetts, Zone 6
2. Build up the tunnel’s sidewalls with flat-sided rocks approximately 8″ high.
3. Set the center tunnel height by driving stakes driven into the dirt.
4. Using the stakes as a guide, fill the tunnel with mud and dirt, creating a form to support the rock lining. (It is important that the tunnel’s width and height is correct for trains, as once these steps are complete the clearances are hard to change.)
5. Mortar flat rocks over the top of the domed dirt form.
6. Fill any cracks between the top rocks with dry mortar and then pour moistened concrete mix over the entire form.
7. Wait for the concrete to set before digging out the dirt from inside the tunnel. (This limits the length of the tunnel, since its center must be reached from each side).
8. Hose out the remaining dirt.
9. Install and ballast the track.
10. Add soil and scenery on top. The result is a tunnel that looks like it was blasted through solid rock.
Ray Turner
San Jose, California, Zone 9
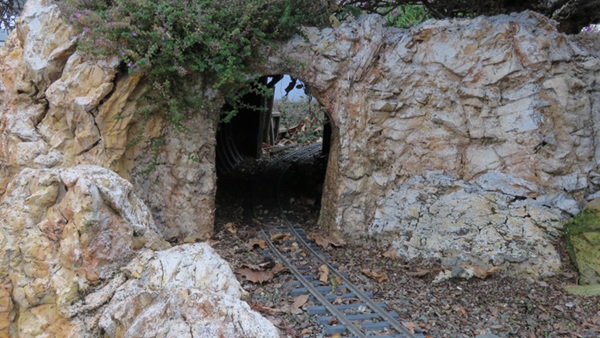
This tunnel portal is cast concrete made by making a wood form for the general shape of the opening, packing crumpled aluminum foil around and pouring a white Portland cement and sand mix around it. The rockwork around it was also created as a concrete casting. Lemon thyme (Thymus citriodorus) growing over the top gives the feeling that the tunnel has been there for a long time.