The arguments against soldering are weak at best. One is that you need expansion joints. This is bogus. Yes, if you have unsoldered joints you will see a gap open up when the temperature changes, but have you ever seen that gap close back up? Expansion and contraction of the track is handled by the roadbed. On a hot day the track will widen at the curves. On a cold day you may have a 10′ radius and on a hot day it may be, say, 10’1″. This is why you should never anchor the track. It should be free to float in the ballast.
The other argument, which has some validity, concerns the desire to later change the trackplan. Still, this does not present a huge problem. You simply cut the track to remove it and resolder it where needed. The reliability of soldered joints is worth the extra effort this may take.
I do not solder rail joiners at turnouts. Instead, I clamp the ends with rail clamps. I have found that the majority of trackplan changes are made at turnouts.
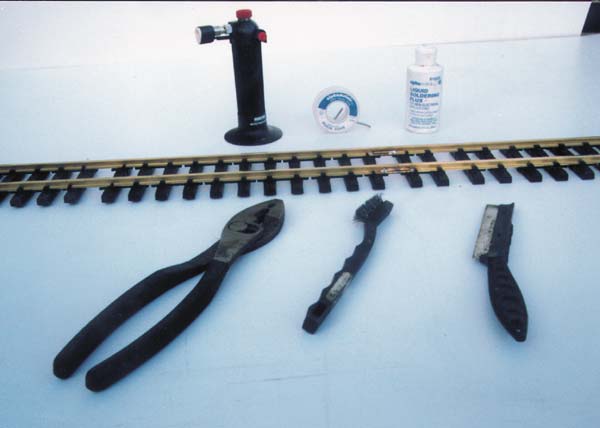
Here is the method I use to solder flex track. I use 40/60, rosin core, wire-type solder. With brand new flex track, the rosin in the solder will provide enough flux. If the track is tarnished, it will be necessary to use additional soldering flux. I use a liquid-acid type flux. (Paste flux is very messy when used in the garden-everything sticks to it-but it can be used if you are doing penance.) The function of flux is to clean the metal. You may see a warning that says acid flux should not be used on electrical connections. This does not apply to track. We are actually making a structural connection.
If you are trying to solder old track that has turned black, you will have to clean it first. I use copper-pot cleaner to start with and finish with flux. Once the rails have been prepared, slip on a rail joiner. If you are using acid flux, squirt a little into the joint. You are now ready to apply the heat.
There are several tools that can be used to solder track: a resistance-soldering unit; a large, electric soldering iron (175-200 watt chisel tip); or a micro torch. I have used all three and have found the micro torch is the best all-around tool. These sell in the range of $30 to $45.
The important thing about soldering is to get the work hot enough and to melt the solder into the work. Start by heating up the joint by passing the flame over it. This takes a little practice. Do not hold the flame too close to the work. The small blue tip of the flame should be about 1/8″ to ˜” from the work. A little experimenting will teach you what the proper distance should be.
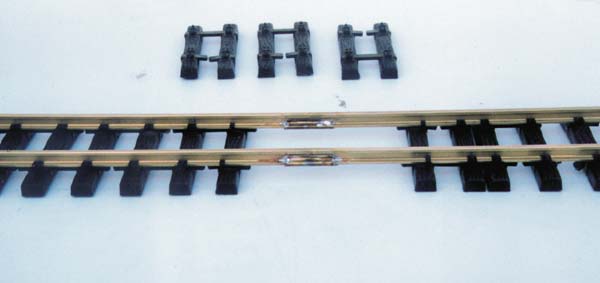
When the rail joiner starts to turn colors, this means it is coming up to temperature. Start applying solder at one end of the rail joiner on the opposite side of the rail from where the flame is being applied. Touch the solder to the end of the rail joiner and let the heat pull it into the joint. The flame should never actually touch the solder. The rail and joiner should be hot enough to melt the solder. Once solder is pulled into one end of the joiner, do the same at the other end. Then apply the heat to the other side of the rail and repeat the process. If done properly, the solder will be very shiny and will flow evenly.
Next, take a large pair of pliers and grip the rails where they join. This will bring the rail heads into alignment and the pliers will act as a heat sink to help cool the joint. Let the joint cool until it is solid before releasing the pliers. Wash the joint off with water to remove the flux. If done properly, there should be no beads or balls of solder on the joiners and the surface should be relatively smooth.
If you become proficient at soldering, you will be able to bond a joint without melting the plastic ties. The trick is to get in, get the metal hot enough to melt the solder, then get out. Here is a trick that can help you until this skill is learned. Before installing the rail joiner, cut the webbing that connects the ties, so that you have three loose pairs of ties on either side of the joint. Remove the web completely from the ends of each pair. This will allow you to slide the ties safely away from the flame. When cool, slide them back into place.