When gravity, earthquakes, or water pull the rug out from under a cliff face, its strata and fracture lines burst open. Solid slopes suddenly turn fluid. Rocks bounce and roll, creating talus, which settles in a pile at the foot of the cliff—possibly damming a waterway. Garage-size boulders split from slopes and tumble to the tableland below. A mammoth chunk hangs precariously on a precipice—a postcard moment. Fallen debris blocks car traffic, warranting emergency management and construction vehicles.
Would you like to rupture your miniature mountain on purpose? Why not break up the uniformity of a static mountainside and make talus a focal point? First, let’s compare the construction of a rockfall with a far less stable waterfall.
Alternative to waterfalls
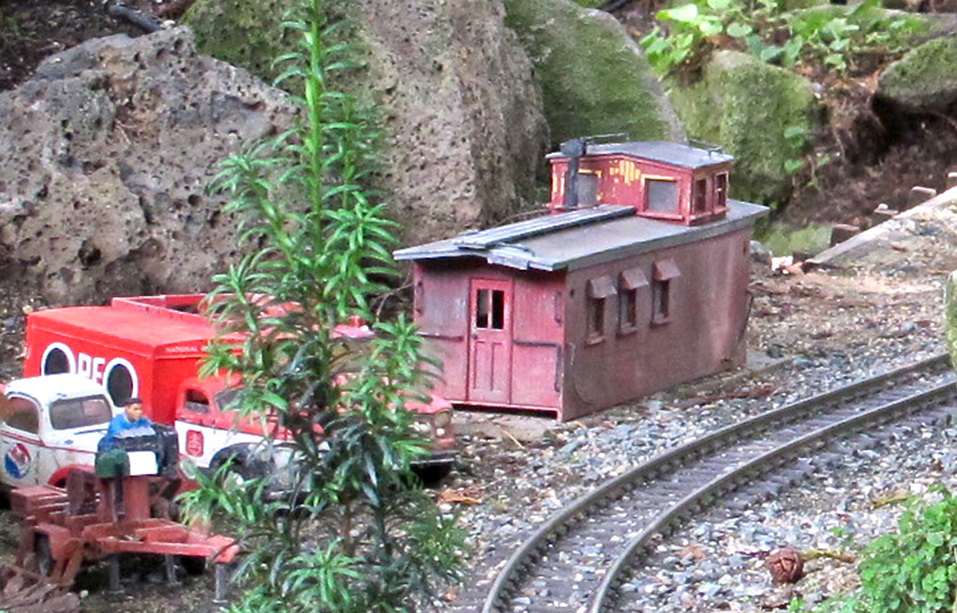
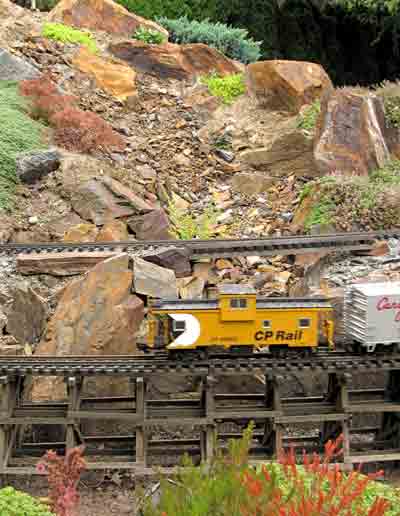
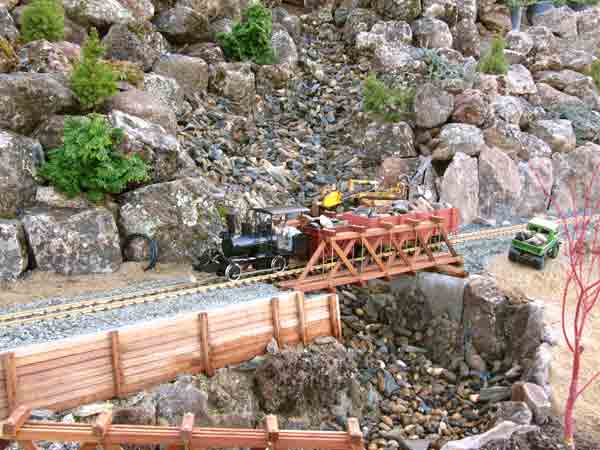
A waterfall appears unnatural if it’s spouting from the summit of a mountain, whereas a rockfall legitimately cascades from a steeply banked ridge where trees may be difficult to grow. On the opposite side of the mountain in photo 1, Bruce and Monica Coleman had constructed an elegant water feature flowing under a historic bridge (see “Canadian railways, part 2: British Columbia,” GR August 2011). On this side, we see sliding chipped rocks—also necessitating bridges. This “scree” varies the landscape and gives us a dramatic first view when entering their backyard. I imagine that, after hauling truckloads of native boulders past this spot, the Colemans may have been inspired (after sweeping the broken bits and shards off their driveway) to model shifting talus—no plumbing, pump, or rubber liner, but falls nonetheless.
Due to maintenance issues, some folks only run their water features occasionally, but this dry attraction “flows” timelessly, 24/7. In figure 1, it’s easy to see why rockfalls require less preparation and almost no maintenance, but thoughtful placement and choice of materials will prevent the force of rain droplets, wind, and paw traffic from eroding your hillside into a weedy mudslide mess. Nature stabilizes “real” talus because its broad, mounded base and reduced slope (angle of repose) support the structure—a kind of retaining wall for future erosion control. To avoid building an expensively deep pile of sharp stones, we can cheat a little by modeling geo-synthetic technology.
Deceptively retaining
Apparently, the mailman knew I was studying rockfalls because he mistakenly delivered to me a Landslide Solutions magazine addressed to my neighbor, a professional eco-geologist. Before returning it, I read the cover article on engineering the stabilization of a Sierra mountainside with fabric and many metal “deadmen,” which are gun-shot into the slope to prevent landslides onto the road below. You can view the article and a slideshow detailing the geo-synthetic technology at http://www.landslidesolutions.com/projects/lake-tahoe-california-residential-lake-shore
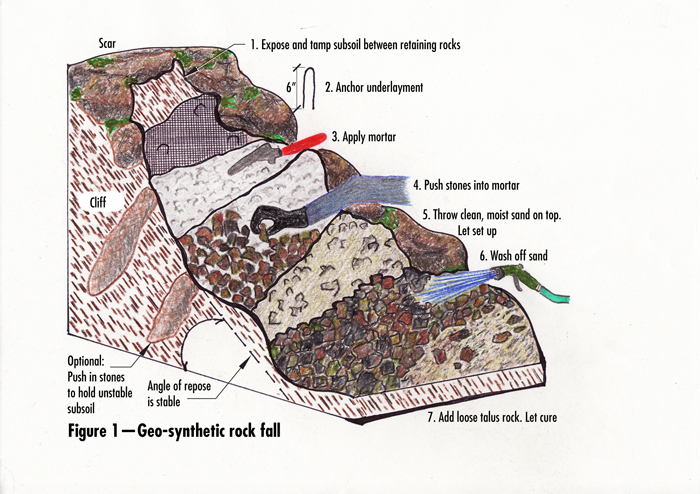
Establishing a sloping mass of rock fragments in our scaled-down railways may require similar geo-synthetic steps, as shown in Figure 1 and outlined here:
1. Cut away a depression in the side of a hill, small at the top and wider at the bottom—possibly a gap between two slopes. Remove any loose stones and tamp down the subsoil. If the hill was made from fluffy planting mix, excavate at least 6″ of that soil and replace it with coarse dirt, heavy clay subsoil, or sharp gravel, then tamp it firm. Now you’re ready to geo-synthetically retain the slope.
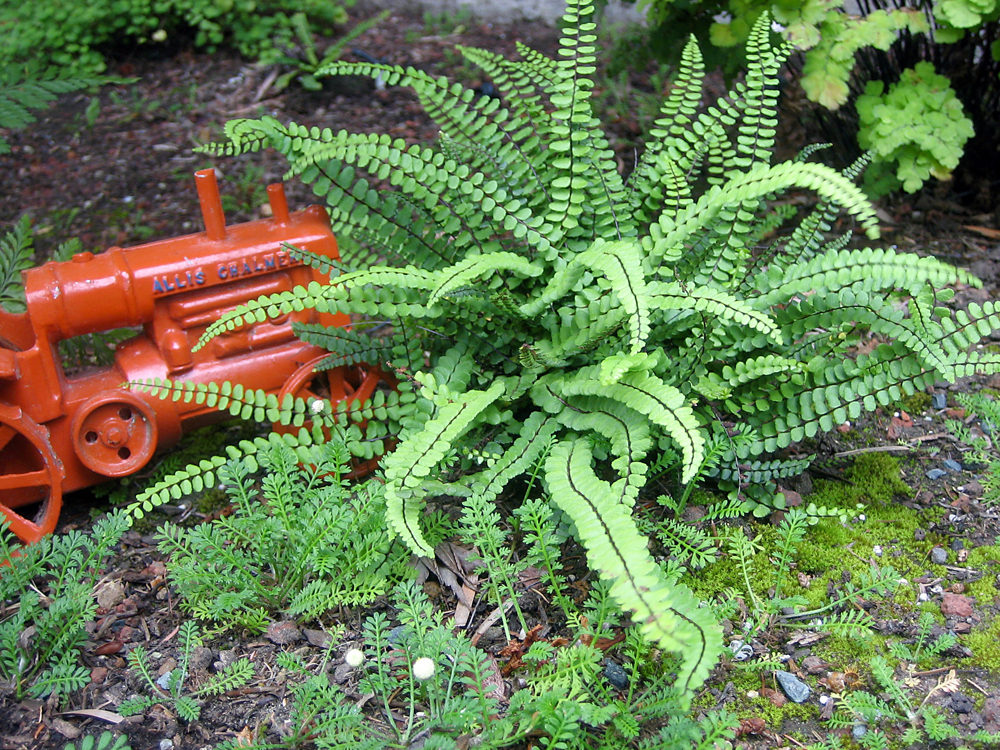
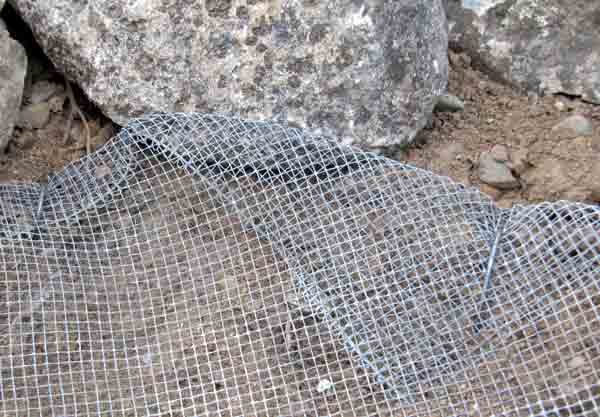
2. Over the subsoil, cut to fit a section of 14″ x 14″ metal-wire “hardware cloth” (photo 2) or use a plastic mesh (Tenax, for example, shown in photo 3), which won’t rust and break up. Anchor the mesh fabric by hammering into the subsoil many 6″, U-shaped wire staples, called jute staples or irrigation-hose staples.
3. The key to creating a permanent rockfall feature is next: mix type-S mortar or mason’s mix with water to the consistency of peanut butter (read the bag). Starting at the bottom of the slope, press mortar “mud” onto the mesh, approximately 2″ deep. Some mud will ooze through the holes of the fabric. Work in 1′- to 2′-high sections if your rockfall will be large.
4. You’ll have about half an hour to push your just-washed, sharp stones randomly into the mud, wall to wall, to hide the mortar, so work quickly.
5. Because the mortar will dry somewhat shiny and unrealistically whitish gray, throw moist clean, sharp sand, fines, or decomposed granite over the sharp stones while the mortar is wet (or use black mortar colorant in step 2).
6. The next day (or after the mortar has set up) hose down the rockfall to wash off loose sand to expose your creation.
7. Finally, scatter loose, sharp stones randomly along the sides and at the bottom of the rockfall to look like they bounced there. The goal is to hide the mortar and blend the rockfall into the
surrounding retaining boulders.
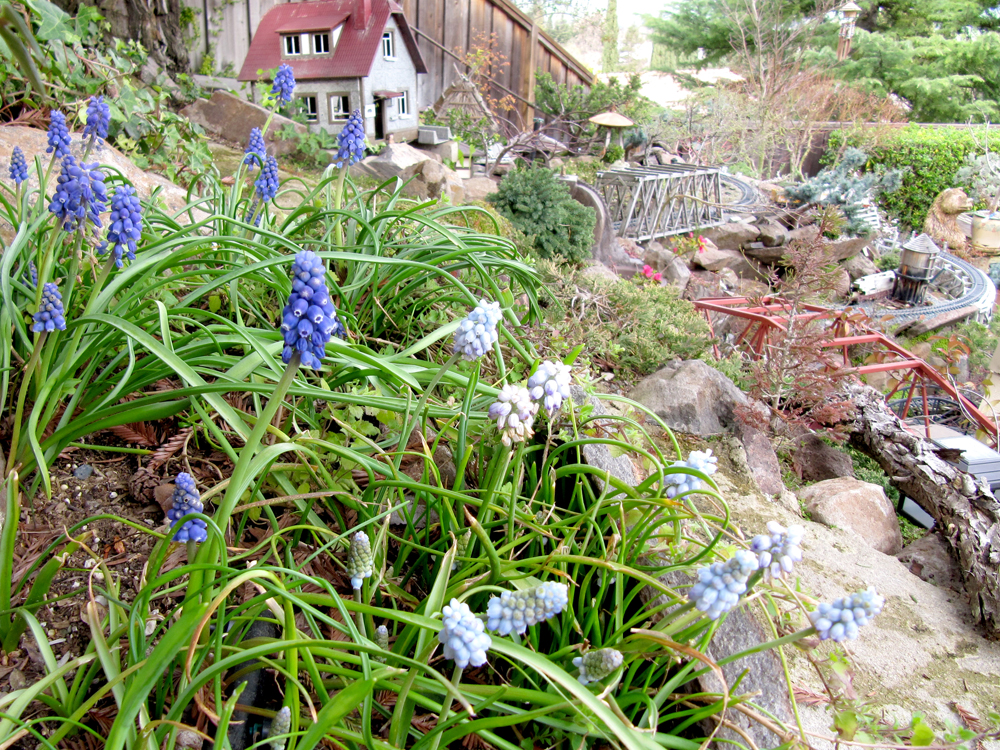
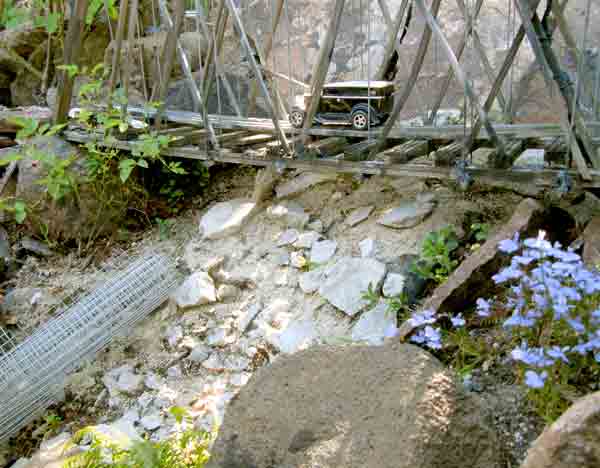
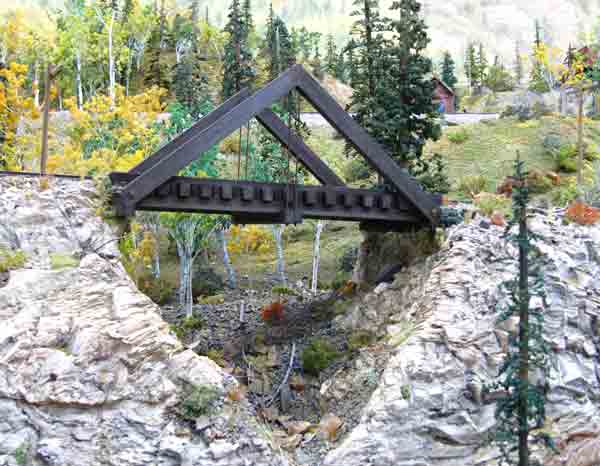
Do not walk or lean on this for many weeks, until curing has hardened the mortar. In very hot weather, regularly hose down the mortar and/or cover it with plastic or wet cardboard for a few days to prevent rapid (weak) curing. Jim Scheller’s rockfall in photo 4 was built according to these directions, in order to provide a desired focal point for bridges without
the fuss of water.
Split happens
Opening a cut in your hill is an opportunity to fill it with beautiful stones that you collect as a rock hound or buy at the landscape-materials lot. You might fall in love with the jewel-toned facets of clean stones scrubbed by recent rainfall or sprinkler action. And you can blow or hose it off anytime if it’s mortared together. Your new geological offspring stands out as brighter than the surrounding mother rock, which wears a gritty apron of growth. The triangular pile may point to the source of its creation; start narrow and widen at its base. Preventing instability and erosion of your new rockfall requires a respect for gravity coupled with the above bonding techniques.
Nancy Norris photo
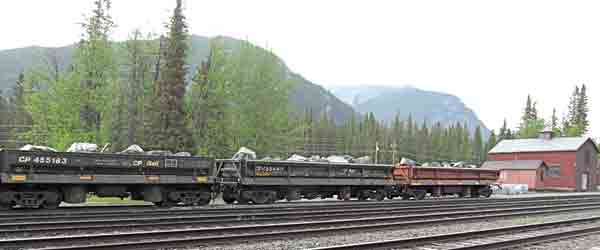
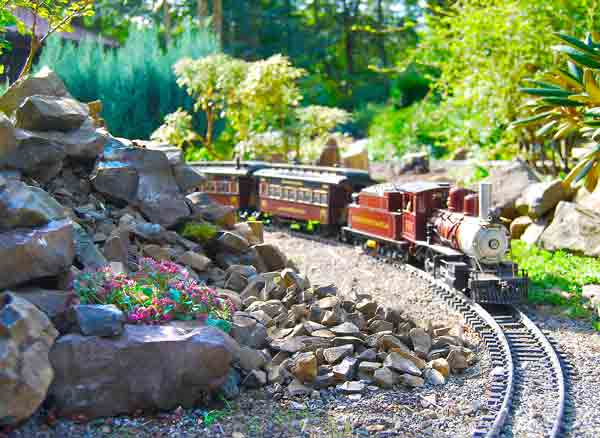
Driving around the 1:1 world, I’ve seen developed hillsides (too steep for plantings) that are covered with sharp rocks to prevent landslides. In the Canadian Rockies, at the Banff station (photo 5), gondolas loaded with boulders harvested from an accessible rockfall await transport to fix a trackside erosion site. While riding Amtrak, one day I noticed discarded concrete (photo 3) holding embankments along the Sacramento River. Even indoor railroaders (photo 6) can get into the talus look and won’t have to worry about small rocks or twiggy birch branches getting washed away—until dusting day.
Related reading
Read more about Tom Miller’s indoor railroad in the October 2009 issue of GR.
Regional gardening reports
Listed zones are USDA Hardiness Zones
Question: How do you mass small rocks or stones to hold back erosion or create geological effects?
Christina Brittain
Washougal, Washington, Zone 6-7
Ain’t nothin’ like the real thing
I found sources on the Internet that said the term “talus slope” is actually a misnomer. The authors suggested that the “slope” refers to the rock fall from top to bottom, while “talus” is specific to the rock bulge at the base, comprised of accumulating rock. Interesting!
When we built our Quinn Mountain Railroad, we wanted part of it to resemble the lush, green forests of Western Washington, and part to look like the high-desert land of the nearby Columbia River Gorge. For the arid regions, we constructed a high mesa, with sidewalls comprised of a type of rock that is indigenous to the area, called pillow basalt. This igneous rock formed when hot lava encountered water, then fractured as it cooled from both top and bottom. Ours is not an exact replica of a natural mesa but does have its steep sides and flat top.
Later, we created additional interest by adding a rock fall with a talus mound at the base. To make it as realistic as possible, we went back to the quarry where we found the larger rocks, to get 34″ crushed gravel that was a close match. We removed large rocks from a small section of the mesa to make room for the slide, then slowly poured two buckets of coarse gravel from the top, letting it cascade down and naturally fan out along the railroad tracks below (photo above). We then piled additional crushed rock on the tail of the slide to resemble the bulge of a talus. Finally, we tucked a few groundcover plants into the rocks. So far, the rocks have stayed in place without mortar or any other fixative.
Keith Yundt
Victoria, BC, Canada, Zone 6b
Rocks. . .a subject that warms my heart
As someone who grew up in the road-building and aggregate business, blasting, crushing, hauling, placing, compacting, and testing rocks of all sizes has been a big part of my life ever since I tried to chew on one as a young child. Even today, I test for the presence of chert by touching the rock to my tongue: if the rock sticks, then it is chert, as the water is pulled into the micropores of the rock by capillary action. So, naturally, rocks would play an important part in the construction and operation of my railroad.
In my experience, there tend to be two types of rock slides: those caused by the breakdown of large rock structures, owing to exposure to the elements, such as freeze/thaw cycles, water leaching out the softer seams, or earthquakes; and those that are caused by glacial deposits, such as sand and gravel trying to reach their natural angle of repose. There are many areas in Canada—and in British Columbia specifically—where the railroads constantly struggle to keep their lines clear due to both types of slides.
The railroads use different strategies to cope with these natural events. For the first case, they build avalanche galleries, rock-fall protection netting, and fencing, or even tunnels. For the second case, they try to construct retaining walls or have a regular maintenance program of excavating the gravel as it slides down over time. In many locations, this type of rockfall is useful, as it can be crushed for ballast.
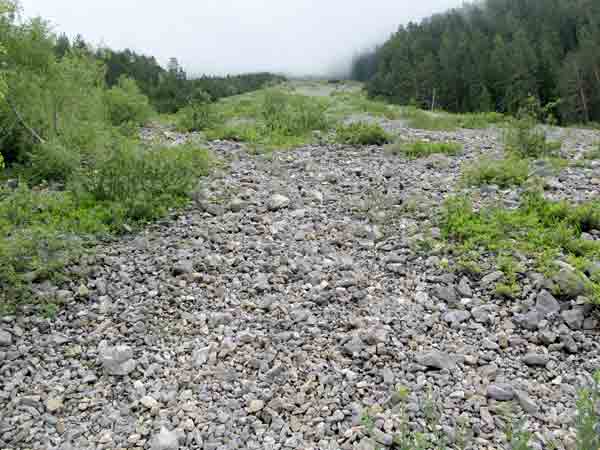
While hiking on a recent trip to my favorite railroad, the metre-gauge Rhätische Bahn (RhB) in Switzerland, I came across a large talus slide made up primarily of finer granular material that had been gradually moving down the mountain towards the railway below (see the photo at left, looking up the slope). In this case, the slope posed only a minor threat to the rail line, as it was already close to its natural angle of repose and therefore wasn’t moving quickly. This type of slope is ideal to model in our garden, since gravel is a good material for filling in between large mountain rocks, and is easy to handle in its scale size.
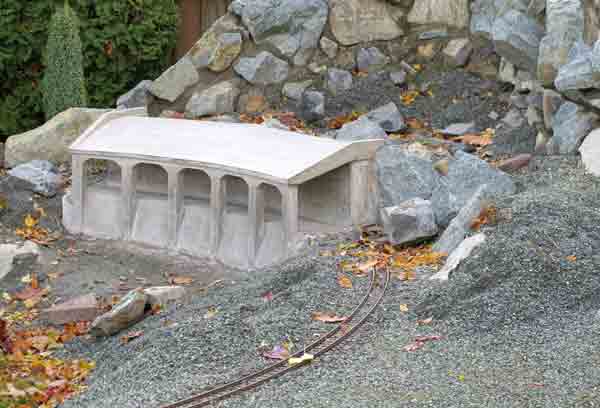
The newest section of my railroad will attempt to reproduce the difficult and challenging terrain of the Alps. I am currently building a concrete avalanche gallery, modeled after one found on the RhB line between Chur and Arosa. This avalanche gallery at the base of my mountain project retains the rock and soil fill behind the rail line to maximize the area for meadows and planting on the top of the mountain, and to minimize the encroachment of the “toe of the slope” of the mountain into our backyard. The avalanche gallery lets me over-steepen the slope and, once finished with all the talus rock in place, it should give the appearance of “motion without movement.” The picture above shows the gallery in its current state of construction. Immediately behind the concrete roof, I will place several large rocks side by side, with their flattest face towards the front of the gallery. In front of these rocks, and on top of the concrete roof, I will place smaller pieces of fractured rock to make it look like they have broken off the larger faces behind. I will also place some drought-tolerant plants, such as sedums or other groundcover, in this area, as it is natural that organic soils (and thus plant life) accumulate in this rocky debris over time.
Elsewhere on my railroad I have used rock to simulate a dry creek bed in a small valley where actual running water is not practical. Round river rock is perfect for this application. So, as you can probably tell, I have been happy to incorporate rock of all sizes and shapes into my garden railway and I’m sure I will continue to find uses for it in the years to come. Rock on!