


Water goes down to ‘seek its own level’. Hygroscopic tension forces water sideways when moisture follows the underside of a spill rock or fallen branch. Soil wicks water in all directions by osmosis. Splashing bounces up. Water evaporates into thin air and we wonder if the reservoir is leaking.
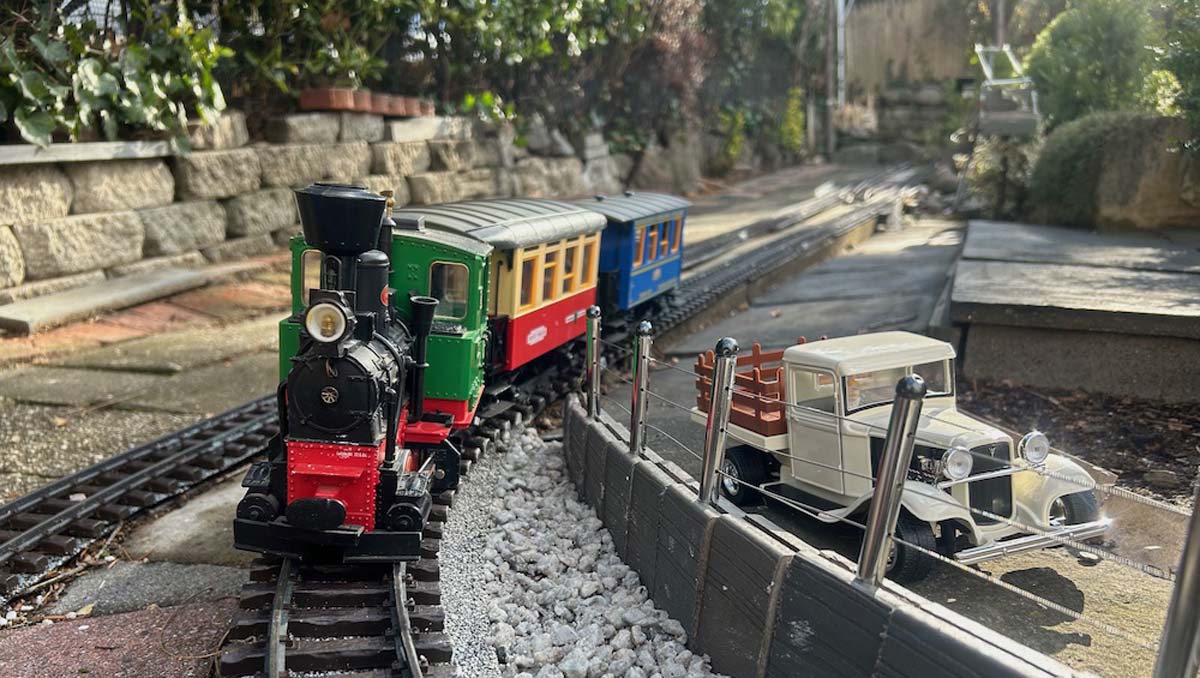
Water needs to move. A good water feature often becomes the focus of social gatherings as well as a place for personal meditation. A beautiful, well-constructed water feature increases the value of your property. It’s an investment in time (building and maintenance) and cost of materials. Planning one should involve its integration into your garden railway – what are you modeling? Mountain cascades? Fishing stream? Park fountain? Lake Tahoe?
The list of supplies that you can buy ahead of building time (and their cost) will depend on how extensive you make it. Building materials have several options, depending on how large you’d like the basin and how long you’d like the stream. If you have a sketch of the whole area (or at least the dimensions of the usable space) you can estimate how much product you’ll need. There’s also the question of which type of rock to get and how much. Visit a rock yard. Because the rock is not returnable (but is usable in the railroad) we can order more than needed. Plan well. The biggest cause of failed water features is leakage. “Water seeks its own level” means: watch for leaks.
From a “landscape-materials yard” or rock yard:
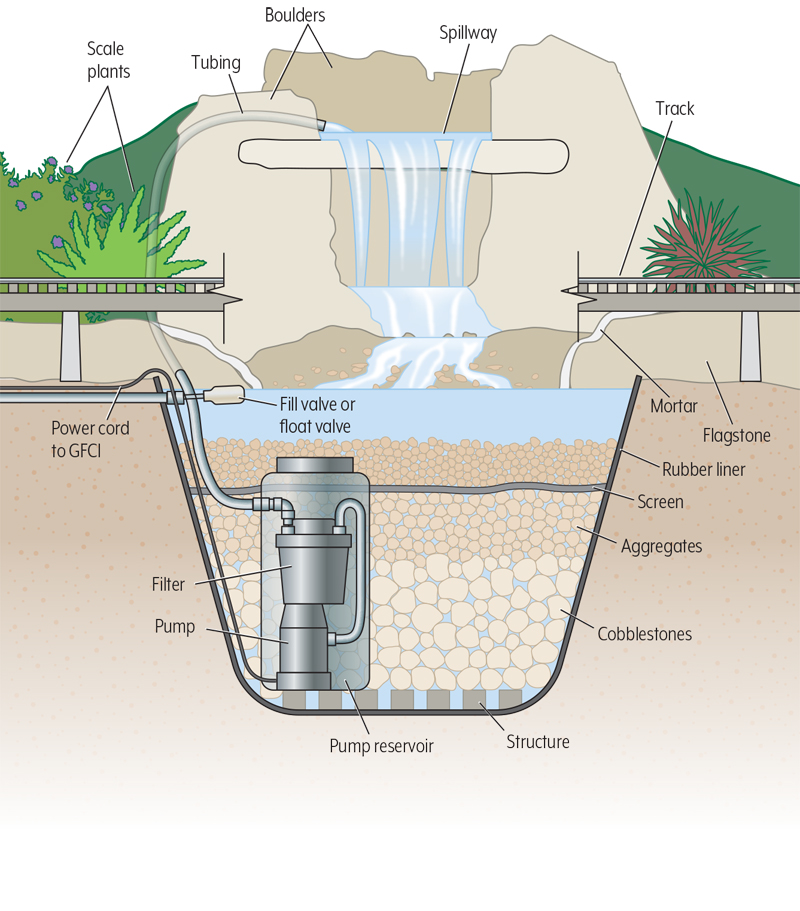
1. Boulders. Here’s what I suggest for most construction. “Moss rock” is what we typically use, but feel free to use a different rock. Moss rock is naturally occurring volcanic rock (NOT “lava rock”), which is reddish brown or blackish and has quite a bit of pocking (little holes), lichen (all seasons), and moss (in winter). What moss rock offers is a boulder that stacks to create retaining walls and verticality. Here in northern California the moss rock comes from Sonoma Mountain area. Always lean the rockwall into the soil by a 5-10% slope (batter).
2. Flagstone. For flat areas, lining stream beds, waterfall “steps”, railroad abutments (for bridges that span the watercourse), and leaning cliff walls, I also like to use a flat irregular flagstone, called “Cold Water Canyon”, CWC, which is a perfect match to moss rock, except that it’s almost flat. Each landscape-materials yard has its own suppliers, so you may have to spend an afternoon “window shopping” and gathering samples (usually they let you take a sample for free). You could take a picture of your finds and email that to your contractor with the names they give them and your favorites. You’ll want to repeat the water feature’s rock in the surrounding hills. And you should have surrounding hills to make the water feature look realistic, more or less. Flagstone with smoothed, tumbled edges helps to prevent holes in the liner.
3. Cobble stones. Find smooth 2-6″ “River Rock” to match the above rocks. These will fill the tub/basin as a primary natural filter to keep large items out of the water, so you can rake them up. They also keep animals out. You’ll need to remove these every year or two to clean the tub, so it helps if trees are not directly overhead. Largest stones go on the bottom and smaller on top to keep debris from settling into water. Avoid white rocks that look dirty with algae and minerals.
4. Aggregates. Then to finish the job, we’ll need several types of “gravel” or small stone to match the larger stones above. These can be somewhat more colorful as they represent the exposed, washed stones, worn by water. You may want to repeat the stone/gravel elsewhere for a rock fall feature to tie together the scenes.
A couple of sacks of “Gold Fines”, if available, are good to act like exposed river bottom. Looks like sand, but it’s DG gravel or “Decomposed Granite” and can be mixed with mortar and stone for little rockslides or rapids. This color (brown sugar) DG differs from the gray/blue colored DG we often use for track ballast and can be used to model gravel roads or old town yards under buildings.
From The Home Depot or similar home supply store:
5. Mortar. The liner should be hidden. To line the liner we need Mason Mix (Type S) or Mortar, usually by Quikrete or Sakrete and an appropriate amount of color to turn the mud any color but light gray, which is almost white when set (too bright). Black is good, but I like a black and brown mix best, which looks closest to dirt. If you choose light tan rock or if you choose red rock, then the mortar color should match. Now you can buy a tan mortar. I like to mortar the whole water feature, starting at the bottom to hide the edges of the tub. If the feature is meant to be an open pond, rather than a pondless water feature, I line the sides and bottom of the pond with mortared flat rocks on which one can walk.
6. “Rubber” liner (a synthetic, like HDPE or similar). Or use a combination of a plastic/rubber tub for the reservoir and rubber liner for watercourse. For larger water features I use Rubbermaid, or other brand, “stock tanks” from feed stores. The larger your basin the longer your water stays clean, but it’s more of a cleaning job later. Smaller tubs/ponds need cleaning more frequently. Stock tanks from feed stores are good for larger “pondless” water features. Protect from holes.
7. Spillway. This is optional, but a commercial spillway will even out the pressure of the water coming out of the tubing and spread it out if you want the sheeting look of water (more shiny) as it spills out and down. Spillways also prevent the water from shooting out, instead of flowing down.
8. Structure under cobbles. Milk crates or cement blocks with holes will make cleaning the tub easier down the road. These leave large spaces at the bottom for just water to get to the pump.
9. Screen. A screen or similar material, usually plastic and flexible lays over the blocks and larger rocks. This will help you remove debris (ex. tree leaves).
10. Pump reservoir. House your pump and manmade-filter material (what the water flows into before getting to the pump) in a bucket within the pond to allow you to access the pump to clean the filter and repair/replace the pump. There are fancy black reservoir tanks (from pond/fish stores) with covers, but a Home Depot 5-gallon bucket with fitted top will do for smaller water features. It’s unfortunate that they’re white or orange, but we’ll cover that up with a flat stone or you can buy a thicker black cover, which is more expensive.
11. Pump. Home Depot, Lowes and similar hardware and plumbing stores carry pumps measured in size by gallons per hour (GPH). For a smallish water feature with a decent waterfall, start at 500 GPH. You can lessen the amount of water by pinching the tubing, but adding more requires a larger pump. If the water is to be pumped up a grade, say 3 or more feet, the number of feet above the water level will determine how much pressure, and therefore water, will spill at the top/spillway. Figuring gallons per hour is the hard part and depends on the size and height.
12. Power. The pump cord should be long (16-20’) to reach a GFCI 110+V power source. No extension cords allowed! It’s best to provide a nearby GFCI outlet by digging 18” below the surface and routing Romex or other wire in Schedule 80 conduit “to code” so that your water feature is safe and saleable if you sell your home. Alternatively use a Direct Current bilge pump from West Marine (or similar) and wire accordingly to a DC source, such as an irrigation or low-voltage lighting control box/transformer.
13. Tubing. Long enough to get the water from the pump to the spillway, it should be flexible, un-kinkable, and strong enough to not collapse with some pressure on it. You may need fittings to mate the tubing to the pump outlet. Know that the outside diameter of pump feed needs to match the inside diameter of tubing. Then radiator or hose clamps fasten this joint. Larger less-restrictive tubing will give you a greater volume of water flow, but it’s limited by the pump’s outlet diameter.
14. Filter. The rocks will filter a lot. Much of the debris will break down and settle to the bottom. I like to use filter material, called “Bio Balls”, for the huge amount of surface area on which live the beneficial microorganisms. It’s a biological filter, which you pack into a heavy plastic mesh bag that I get at Leslie’s Pool Supplies. The bag lives in the bucket reservoir and is periodically removed and hosed off to remove gunk. Or you can buy commercial filters of open mesh foam. Water goes through the filter before going to the top of the feature. Running 24/7, your water will stay clear and smell sweet. If you don’t run the water regularly (some say it must be run 24/7) anaerobic bacteria makes it stinky and kills the aerobic (oxygen-loving) organisms. Stagnant/still water breeds mosquitos. Bio-filters are way better than poisons, chlorine, etc.
15. Automatic-fill valve. Water evaporates. (If you hate buying water, don’t build a water feature.) Fasten a float valve inside the bucket, similar to a toilet tank fill. I order this item (3/8” Watt brand with short float at Heieck Plumbing), as I know where to get it locally here. You can get the plumbing to it ahead of time if you know how. I use PVC pipe to get the water from the “city” water pressurized pipe ultimately from the side of your house. You can also use a flexible metal or plastic pipe to go between the PVC and the fill valve. The fill/float valve must have space to go up and down or the water will keep running and flood your yard.
16. Plumbing city water: remove hose bibb after turning off house water. With Teflon tape, thread on a brass tee fitting with perpendicular tee facing down. Thread on a ball (shut off) valve going down. Use adaptor fittings as necessary to attach PVC Sch 40 pipe, 3/4″ is good. If possible run PVC pipe (6 or more inches underground) to reach the container associated with the water feature. If you like, use a flexible pipe from the float valve to the PVC. Of course, go back to your original hose bibb pipe and tee and screw the hose bibb onto the horizontal end of the tee with teflon tape. If the bibb leaks, this is a good time to replace it. Turn on house water to test all.
From a fish and pond store or the aquatics section of a nursery:
17. Scale plants. A few floating or potted water plants inserted between stones will help ensure water clarity as they feed on nitrates, which are the malodorous result of debris decomposition. Green plants shelter the water basin to cool it down, can act as walls to catch the loss of splashing water and they look outstanding, blending the water feature into the railway garden naturally, while changing the habitat, too. Online or in my book you can find the names of good oxygenating plants, such as edible watercress or miniature parrot’s feather. Keep water clean and moving for the best source of negative ions and soothing energetic vibes. Ahh – agua!
For info on how to use water plants, see Chapter 10 “Aquatics have wet feet” in my Miniature Garden Guidebook at http://www.kalmbachstore.com/12444.html


Hi Nancy,
We have been puzzling over getting power to our little pond for years (Somewhere in the forum posts Tom Trigg and I had a running discussion on the issue. I dropped it at the time to address other challenges.). When you say “no extension cords,” do you mean to none from the pump’s plug to the outlet or that the pump needs to be hard wired to the outlet? Also, I am assuming the outlet itself should be a professional job if not already installed, or is this something that could be attempted as a DIY project?
We do successfully keep guppies and water hyacinth, but a pump would really open up what we could keep as we are in the tropics. With our liner probably leaking, it may be a good time to tackle this project if we can work out the power issue.
Thanks in advance!
Eric
P.S. If I could’ve added one thing to your article, it would’ve been mosquito control. Either add fish (guppies or Gambusia sp. (aka mosquito fish), a killer, or drain it. Otherwise, your neighbors will hate you!