We removed and salvaged what we could of the layout. The lower level was damaged beyond repair.
Rebuilding
Another year passed. The recreation room was torn out, sanitized, and rebuilt from top to bottom. The basement were getting back to normal and it was time for layout construction to begin again! Since new drywall replaced the old wood panels, I discovered the original benchwork for the layout would no longer fit, so a major reconstruction of the old sections became the first order of business. We cut and refitted the benchwork supports. New ideas were incorporated into the layout as the track runs came together. In total, the only areas I didn’t have to rework were the helix and the tracks that ran through the fireplace.
Rebuilding provided an opportunity to expand the runs. We moved the boundaries out from the walls an additional foot, which enabled double runs that are hidden from view. To construct the up-and-down connections between levels, I used 5/4″ x 6″ x 12′-long cedar decking. The new first level was installed on a 2″ x 6″ base, so we can stand on it. This is useful when I have to get to areas close to the wall for maintenance. I put in some
service entrances for access to hidden spots, so now I can easily reach all of the track areas.
Once level one was completed, I established level two and level three. Since level three consists mostly of up-and-down runs that connect levels two and four, I used short test boards as temporary roadbed to find the distance between each level.
Since I had to connect to level four at the existing fireplace, I placed levels two and three at equal vertical spacing and wound up with approximately 9″ of space between the rail tops and the bottom of the upper-run boards, which was sufficient for my purposes. In order to have the runs flow properly, I had to make one run go from level one to level four, continually traveling up a 4% grade.
The route
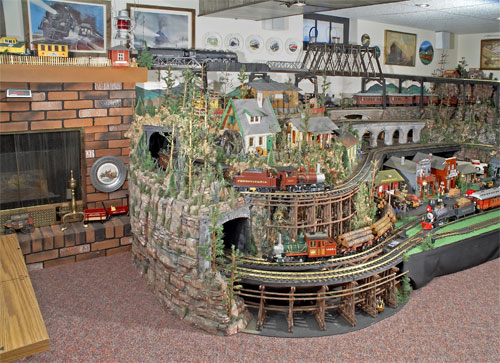
The indoor mainline covers 452′. It goes up the grade from level one to level four, through the fireplace, behind the helix (a curving ramp that gradually rises) on the left side of the fireplace, then turns back toward the bar. At the bar it goes around a half circle of two-foot radius track, heading back toward the town on level two. Track is mostly hidden, until it emerges near the high trestle and comes around just above and to the rear of the town. The track then turns toward the control/power-station building, passing behind it and out to level one. It then passes in front of the Red Rock Mountain, back to the lowest of the three-tier half circles, and heads back toward the town, running under the mountains, where three hidden yards store a 14-car log train and a six-car passenger set. It’s fun to run one train into this hidden yard as another is brought out. There are several run-through yards along the mainline.
To the left of the fireplace, a spur goes into the helix, up to the U-shaped fifth level. To the right of the fireplace, level five is mostly built on stilts and a series of bridges that lead it back toward the bar. Along the run are a short inspection-car run and a handcar line that goes through a truss bridge and into a mountain, then reverses. The third reversing run goes about midway around the Red Rock Mountain area.
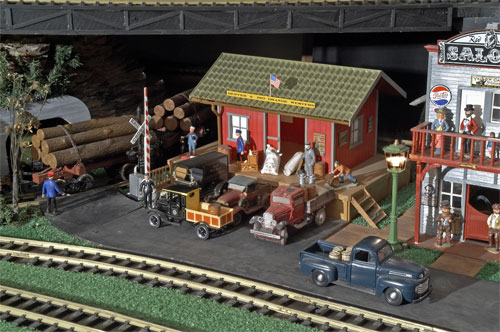
Near the station on level four are yards and sidings. A pass-through in front of the station has a spur that goes over the hand-operated turntable to a double engine house and sidings. Another spur goes around the rear of the turntable, where a long circus train is kept. A spur comes off level three to the back of the bar top. Here I keep a pull-out service tray to do repairs on the equipment. I often use this spur for extra storage.
The fifth level ends on the back bar, on a bridge. This run can be isolated to run AC- or DC-powered trains, and this is where I test and/or run MTH engines that normally run on our garden railway. In my early plan, level five was to go through the wall to the outdoor line, but we abandoned that idea because the stone foundation is 18″ thick and the ground level was too high in that spot. A quick change in plans turned level five into a streetcar reversing run and the present U-shaped run.
I found that by powering up trains during test runs, I could find problems before work progressed too far. Just a few small changes, made early on, paid off, such as some thin shims added here or there to smooth out the run.
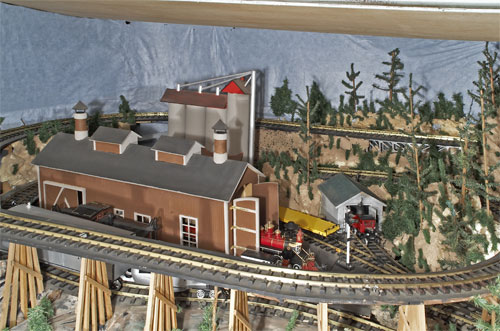
With the transition between level two and level three completed, the track was on a climb in full view, from just behind the power-plant-control-panel to just above and behind the town. Here I put in an S-curve to make room for the sawmill and a siding at the back of it, coming off the mainline on level four. The track then runs through the tunnel to the left (through the fireplace), around the helix, then back through the fireplace, returning to the corner.
I installed two more yards parallel to the main run on the right wall, from the corner, then passing behind the D.E.U. Line station, back down to level two. Track is hidden here, and does not reappear until it comes out of the tunnel near the creek. It passes over the trestle and by the town, then into a tunnel again, where it emerges near the bar on level one, running around the horseshoe bend (in a tunnel) and back to the town.
Once the mainline was up and running, I completed the yards. They currently hold 14 engines and made-up trains, which can be switched onto the mainline. Tracks into and across it are controlled by switches at the control-panel station.
Scenery
Mountains and much of the scenery are made from reclaimed foam packing materials used to pack lamps for shipping. A lamp is wrapped with a thin, plastic sheet and foam is poured into the box around it. The wrinkles that are pressed into the foam look like natural rock formations. I just peel off the plastic and fit pieces into areas as needed. While the glue dries, pieces are held together with 1/8″ bamboo, meat-kabob sticks, that I get from the grocery store.
The layout was completed when we returned home from the LGB convention at Purgatory, Colorado. We traveled through Sedona, Arizona, where the “red rock” idea came from. I incorporated that look into my mountain area, just below the turntable.
Last year I purchased an MTH Hudson and a Dash-8 diesel. I electrically isolated level five. I installed a bridge above the bar top so I can operate on AC as well as DC power. The U-shaped area of level 5 covers over 100 feet, on which I can run both MTH engines about an inch apart, controlling them at that separation through all speeds. This makes a fun demonstration, along with all the great sound effects and talk through the engine’s microphone system. When I can get electrified couplers on my Dash-8 diesel engine, my demonstration will be enhanced by coupling and uncoupling freight cars at will.
Our layout has accomplished what we wanted it to. I wanted a layout that only occupied about six feet of space along the walls of our recreation room, had a long run, and incorporated surprising features. I wanted to be able to store a dozen trains that can be brought onto the mainline in a realistic and interesting way. The D.E.U. Line Railroad depicts a functional, operating railroad.
In my view, a well-designed layout should hold your interest wherever you look. It then becomes a picture story that illustrates what the railroad is about. It’s what makes it come to life. My wife Janette and I enjoy it when we are told, “I see you have added something new again.” We smile when they point out some item that has been there a long time. Even though they have visited many times before, they study the layout more each time and see little artistic touches in the display.
Our grandson will soon be 14 years old. One day he will own the D.E.U. Line Railroad. I hope that he, too, may pass it on to his children. For three generations this family has had fun with trains.