I was still quite interested in the RhB. Since there was nothing accurately scaled (at reasonable prices) in 1:22.5-scale for gauge 1, I decided to create some closer-to-scale RhB models of my own, without knowing where the finished pieces might be used (a question of space-my workspace consisted of half a worn-out ping-pong table and two small vises in the train room). To display them, I decided to build a diorama of an imaginary small station scene, which needed only four left- and four right-hand switches.
The diorama
Full-size trains don’t go around sharp corners. Because that was all that was commercially available when I began, I decided to hand-lay all my track. I built wide-radius switches (as well as other models) on the kitchen table. All the rails were filed by hand, then laid on oak ties soaked in creosote. Switch targets are tall (like those at Bernina Pass) to accommodate possible high snowfalls in winter. Everything is manually operated, including switch machines, linkages, etc.
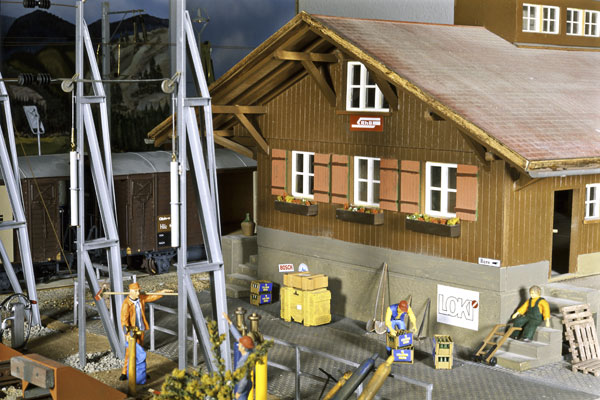
The next project was the RhB Type I station building. Every beam was assembled by hand. The roof is removable, and interior walls were installed on the first and second floors, to be fully detailed and lit later. The building is so heavy that it takes two people to lift it. Construction time was about nine months of evenings.
Then, a couple of proper RhB-type cars put my skills to the test. My choice was three “moorhead” cars (cement silo cars), which I made from brass sheet.
Working in a group
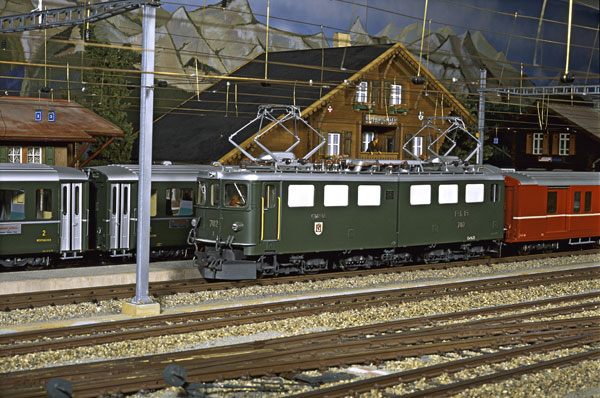
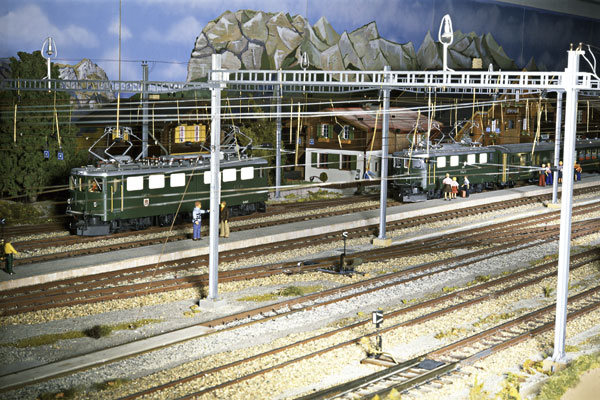
We have a 1:22.5-scale modeling group here (not LGB), with layouts open to members. The group contains some real modeling wizards. We decided to build four RhB Ge 4/4 I and Ge 6/6/ II locomotive models in brass, from the original drawings, as a team, since none were available commercially.
My contribution was to make the engine hoods and roofs. Without professional-level tools and machines, a project like this cannot happen. For example, the cooling louvers were made from copper sheet, shaped in a 100-ton press, with two annealing cycles. The water separator of the Ge 6/6 consists of 19 separate parts soldered together.
Mr. Fuchs was in charge of milling, punching, and toolmaking; Mr. Specht, catenary; Mr. Wanke, trucks (including gearboxes and motors); and Mr. Ade, electronics and painting (professional automotive lacquer).
We agreed to reimburse each other for material costs only, but not for time invested; this is a hobby, after all. It took me three years to complete my part of the work and the rest of the troops took about the same. One locomotive weighs well over 20 lbs. and has authentic sound, recorded during a run in Chur. There are no traction tires and all axles are powered. It is almost impossible to overload these machines. The endurance test on the open road passed with no problems. We now had locomotives that were not available in this quality from any other source, mass produced or custom built.
Rolling stock
I still didn’t have any place to run-just a 6′ x 15′ space in which I could at least enjoy the large scale at eye level. During this time I amassed a collection of Lebu passenger stock in the RhB transition-phase paint scheme of red and green. When you bring a ten-car train into the station and apply the brakes, it’s almost like 1:1 scale. Other coaches came from Magnus, who also provided freight cars. But four covered freight cars were still missing from the collection, so I built them. As with the prototypes, metal (brass) was used where there was metal, wood where there was wood. I can still remember drilling 1,800 1/32″ holes by hand, and then inserting tiny rivets with tweezers and soldering them from the inside.
The space problem
We planned to build a new home with a living space of 2,500 sq. ft. or so, with a half basement underneath-plenty for two people. However, our architect made it clear that this alternative really had no cost advantage and that it would be better and simpler to provide a full basement. Suddenly and unexpectedly, we had an empty space of 15′ x 40′-a home for my mountain of 1:22.5-scale material.
The planning of the layout was accomplished with the following parameters:
• A main station with tracks to the outside for a future expansion into the garden
• Wide-radius turnouts and a minimum track radius of 2.5 meters (8’2″)
• Power provided solely by overhead catenary
• Uncoupling performed only by hand
• Turnouts operated by hand
The station plan was developed to represent an older section (with reduced overhead catenary system) and a later expansion (with square catenary tower ends).
We expected to have a sawmill (Urs Brettli), switching and passing possibilities, Beat Staubwolkner Cement Plant, a locomotive shed, and a freight shed. Eight more turnouts were needed. To save time, US kits with code-250 rails were used. Two double slip switches, each 900mm long (36″) were scratchbuilt. It took almost a month and a half to hand file all the pieces and fit them together.
After two years of construction time, I had achieved the following: an easily accessible benchwork with a 20mm-thick (3/4″) surface on L-girders; handlaid and ballasted track, underlaid with 4mm (3/16″) carpet pad and 10mm (3/8″) styrofoam strips); prototypical rail connectors (a lot of work, threading and tightening over 400 little nuts); rail sides painted with rust-colored paint; working, scratchbuilt catenary system; buildings (kits by hmb) placed, including platforms and scratchbuilt brass buffers; and scratchbuilt station buildings.
The basis of the benchwork is modules of .9m x 1.8m (36″ x 71″), screwed together. It can be taken apart, except for the catenary wires. Catenary masts, hangers, and counterweights are all of brass (again by Mr. Schullern and Mr. Freilassing). The catenary wire and suspension cables are 0.8mm bronze wire from the jewelry industry. It didn’t take long to use 250 meters from the roll. The hanger cables are 0.5mm bronze wire. Over 100 pieces were soldered together with a steady hand-it took days.
The three cement silos for the Staubwolkner Co. are completely scratchbuilt. They were based on an undimensioned photo by Loisl and from photos of an 0-scale model. I tried to make a correct-scale conversion, based on reference heights. Lighting fixtures provide light for the night shift and, with lighted coaches, wonderful night scenes have been created. The next two years were spent in detailing, mostly around spots like houses, stations, truck shed, sawmill, and the Hotel Gansplatz.
Technical problems
One big technical problem was obtaining the right tensioning on the catenary wires. This was solved by fixing the wire at the end of the track; the other end is counterweighted with a force of about 3.5 lbs., using a stainless-steel spring with a travel of travel of 12mm. Thus, the locomotives’ pantographs don’t raise the catenary wire too high. The suspension cables (tinned, and thus solderable) and rollers come from a ship-modeling supplier.
Experience gained
Several lessons were learned during this project. For instance, perhaps I should have provided electric control for the turnouts. If, for example, tracks 1 and 2 are occupied, I can’t get to the inner switch lever without an extension arrangement. When uncoupling cars in the middle of the layout, you must be careful not to tear or knock anything down. I also found that CA cement can give up the ghost over time-little detail parts fall in the ballast and disappear into Never-seen-again Land.
Ballast is 1.5-2mm aquarium gravel, available in different colors at the pet store. I can’t understand why anyone uses coarse gravel, which in reality would be the size of soccer balls.
Since all the building projects are now complete, the residents and travelers (from Hückel, Elita, and Noch) have taken possession of their “lives.” When everything is placed correctly, then the illusion is complete. Since not all people dress alike, the Elita figures were bought unpainted and the Noch figures (over 100!) were repainted with hobby paints.
There won’t be much in the way of signaling; probably a just group departure signal, since no computer technology is needed for it. I am still looking for a product for typical RhB whistle signals. Speakers will be mounted under the layout or in some other well-hidden place, which can be activated by push-buttons at the control stand in a prototypical manner. I also painted a 12-meter-long backdrop. There were hundreds of trees to paint.