


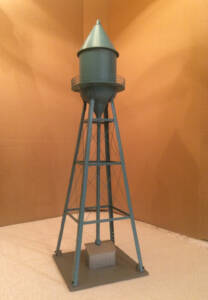
The inspiration for this structure came to me as I was driving through a small town and a water tank came into view. It was one of those old-fashioned styles of water tanks. I stopped to take some pictures, and later I did research on these types of tanks. This type of structure is referred to as an “elevated multi-leg water tank” and is made of steel. The style has been around for more than 100 years.
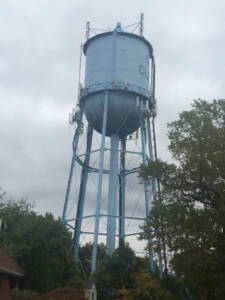
I did not set out to faithfully recreate this tank down to the last bolt. This design represents the typical water tank in a small town, so my aim was to capture that essence for my small-town railroad.
With the design selected, now it was a matter of finding the materials to scratchbuild it. I enjoy building my structures with objects from the recycling bin that I can reuse and repurpose. Giving these objects a new life is a satisfying activity.
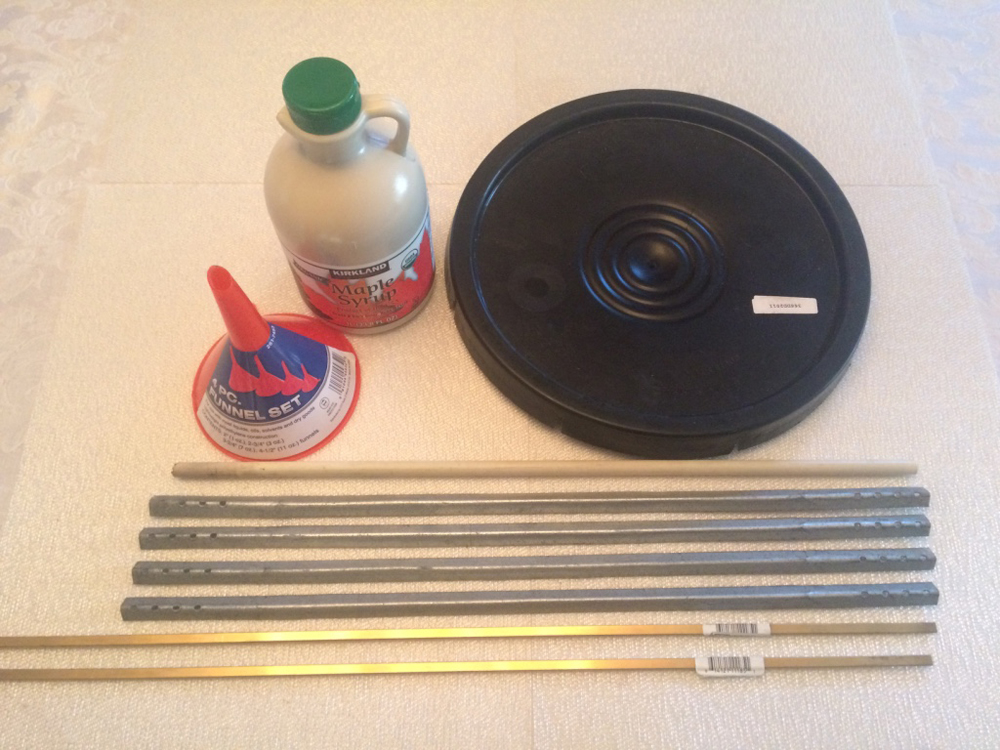
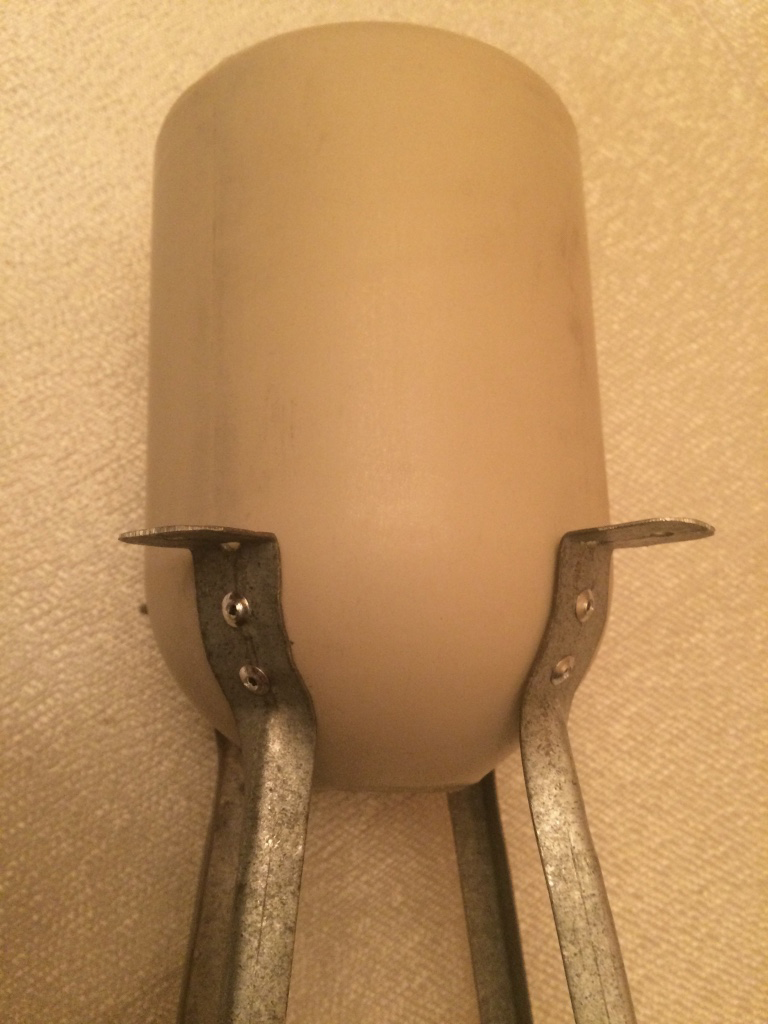
One morning during breakfast, while I was pouring maple syrup over my pancakes, it hit me. The maple syrup came in a small plastic jug. It is sturdy, and when I turned it upside-down, it looked perfect for the body of the water tank.
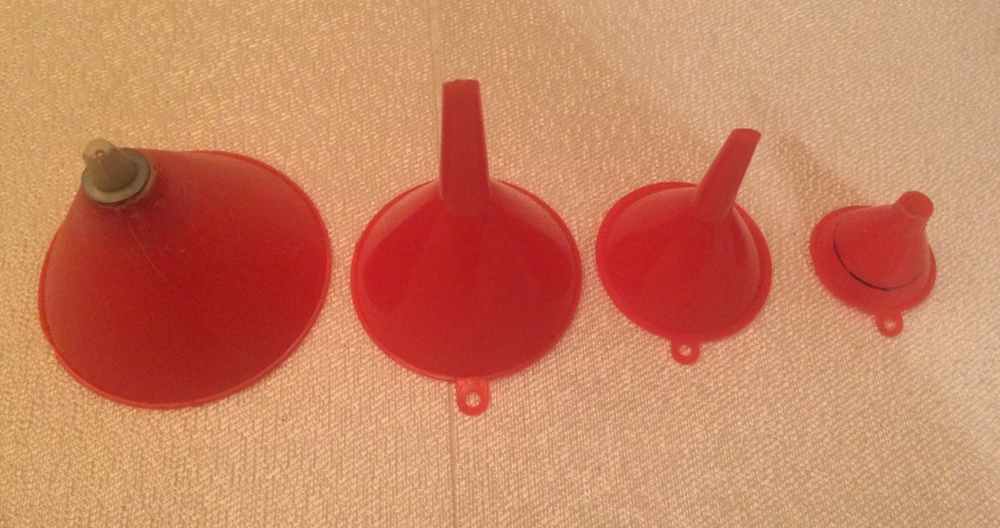
The tank has a peaked roof, so I thought a funnel would do the trick. I found a set of four funnels at a dollar store, with the largest (4½”) for the roof, and the smallest (1¾”) to connect the tank to the downspout.
If I were to stay in scale, the model tank legs would be too delicate for my needs. On my railroad I deal with a lot of tree debris, and a family of raccoons often visits and acts like they own the place. They trample and knock over structures any time they want. One of my main requirements is to use robust building methods and materials.
For the legs I selected galvanized floor joist connectors left over from a household renovation. These connectors are straps 20” long by ¾” wide, and they have a crease along their length to provide rigidity. I thought they would look fine as the legs and would provide the sturdiness to withstand raccoon shenanigans and any debris falling from the trees.
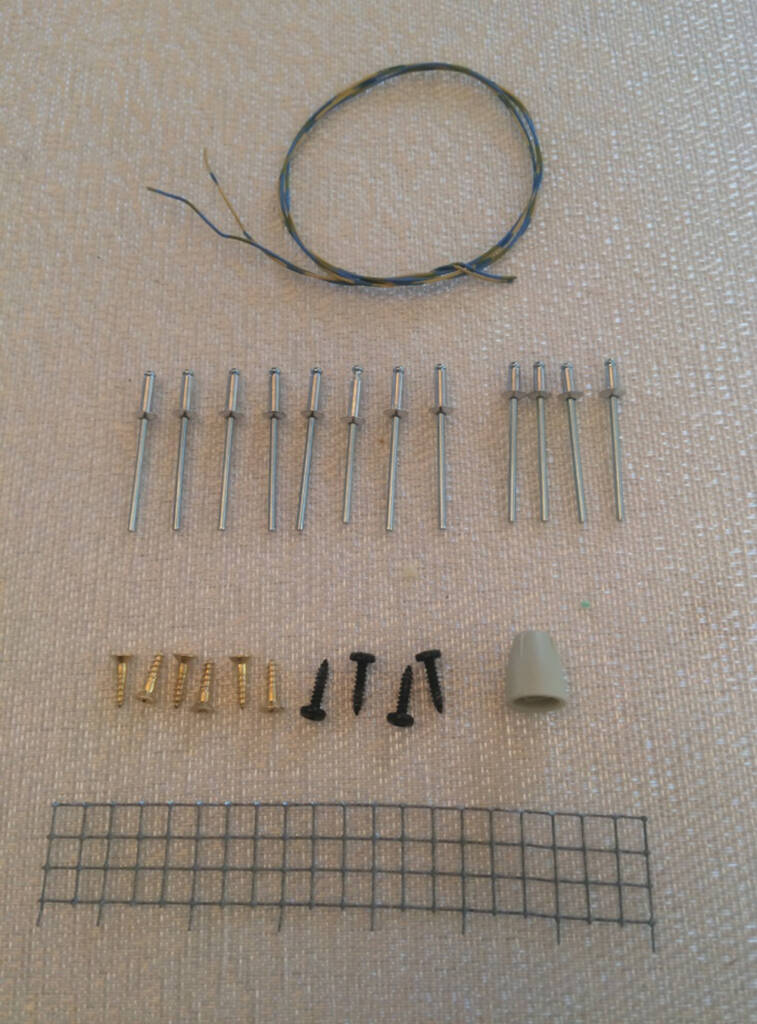
In the real tank, to provide structural strength, the legs have horizontal cross braces and what appears to be cables crisscrossing the braces. For the braces on the model I bought ¼” brass C-channels at the hobby shop, and for the cables I’m using thin copper wire (used normally for telephone connections).
The water tank has a platform around its perimeter, including a safety railing. I’ve been experimenting with hardware cloth for railings, so I’m using ¼” hardware cloth to fashion the railing. For the platform I’m cutting a disc from the plastic cover of a 5-gallon bucket.
List of materials:
- 1 plastic 33.8 oz. maple syrup jug (tank body)
- 1 plastic lid from a 5-gallon bucket – cut out a disc for platform
- 2 plastic funnels, 4½” and 1¾” ( roof and bottom of tank)
- 4 galvanized floor joist connectors, 20” long, ¾” wide (legs)
- 2 pieces of 30” long, ¼” brass channel – braces (50” needed)
- 18” of 3/8” plastic tube – downspout (or 3/8” dowel can be used)
- ¼” hardware cloth strip, 1” x 20” (platform rail)
- 1 piece of 2X4 treated lumber, trimmed to 1½” x 2” x 3” (equipment closet)
- 1 piece of ¼” cement board 8” x 8” (base)
- 4 pieces of treated lumber, ½” x ½” x ¾” (posts on base)
- 6 ½” brass wood screws (to attach posts and equipment closet to base)
- 4 ½” metal screws (to attach legs to posts)
- 8 1/8” x ½” aluminum rivets (to attach legs to body)
- 8 1/8” aluminum washers (to attach legs to body)
- 4 1/8” x ¼” aluminum rivets (to attach platform to tank)
- 10 feet of thin copper wire (for cabling)
- 1 small plastic knob or any other similar object (roof finial)
- 1 spray can of Rust-Oleum, Satin Vintage Teal (334090)
- 1 sheet of decal lettering for sign (optional)
Preparation
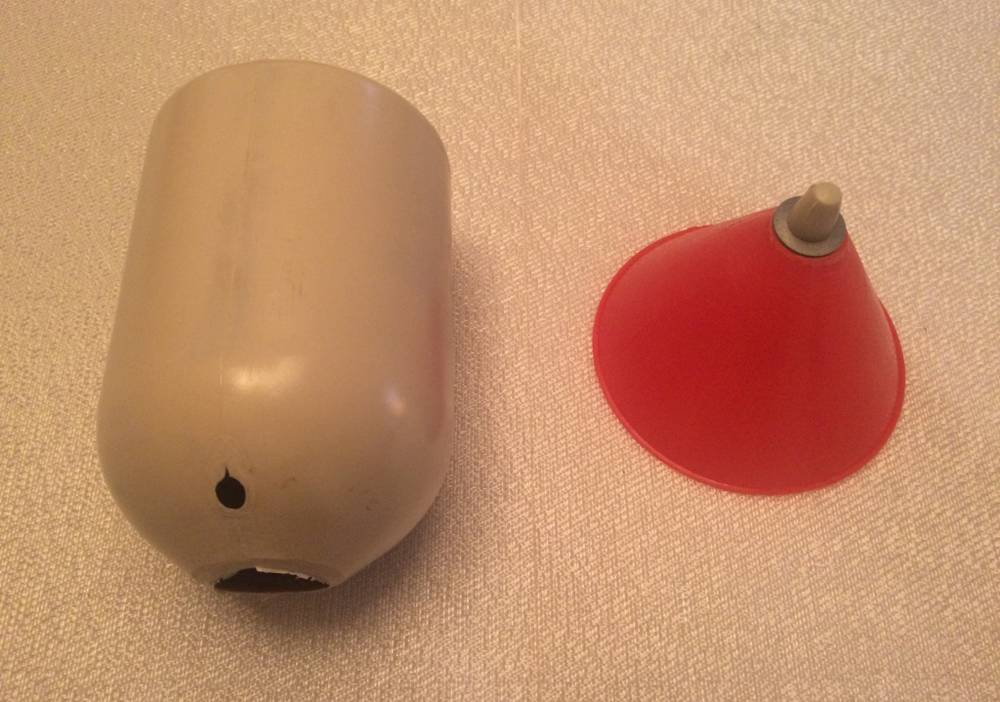
Body of tank: I trimmed off the loop and the neck from the plastic jug with a hacksaw. A ¼” hole was left in the body where the loop was attached, but I figured that one of the legs would cover it.
I smoothed out the base of the neck so it was round, but with a gaping hole. I trimmed the smallest of the funnels to fit over the hole. It will serve as the connector to the downspout pipe that comes out of the bottom of the tank.
Roof: I trimmed the entire spout and the hanging loop from the largest funnel. Where the spout was, I attached a plastic knob from my junk box as a finial, and it was ready to be the roof.
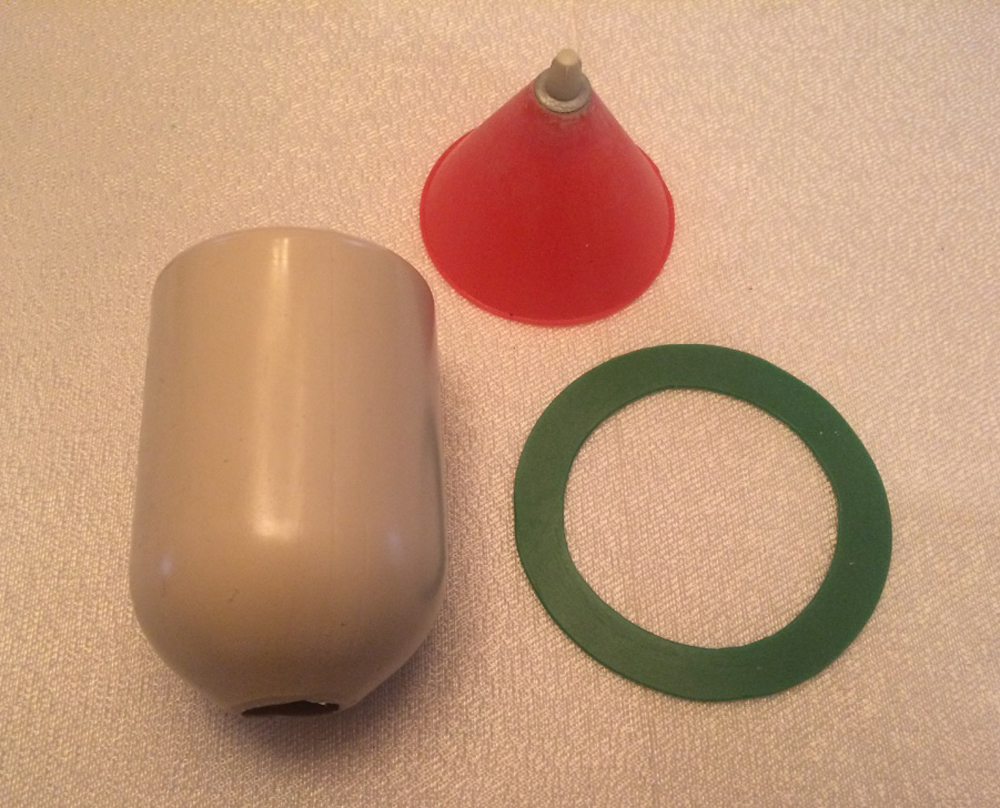
Platform: The platform is a ring, 5½” across on the outer rim, and 4” across on the inner rim. I marked these circumferences on the plastic lid with a permanent marker and used a jigsaw to cut the piece.
Railing: A 20” long by 1” wide piece of ¼” hardware cloth serves as the fence around the platform. The wires running the length of the piece become the horizontal rails, and the wires across are the “posts” of the rail. I trimmed off the horizontal rail along the edge that will be at the bottom. This leaves ¼” pieces of “post” wires sticking out. Leaving the first ¼” “post” alone, I cut off the second and third posts. I repeated this process for the rest of the strip. The posts that remain will attach the rail to the platform.

Legs: Using my vise and a hammer, I bent the crease along the legs to 45 degrees (L beams), but left about 2” on one end flat, since the holes on that end will be used to attach the legs to the body of the tank and hold the platform. Then I bent the flat tip at the second hole (¾” from the tip) to form a 45-degree angle where the platform will be attached. The rest of the flat portion (about1¼” long), where the remaining two holes are, gets bent to form a curve to coincide with the shape of the tank.
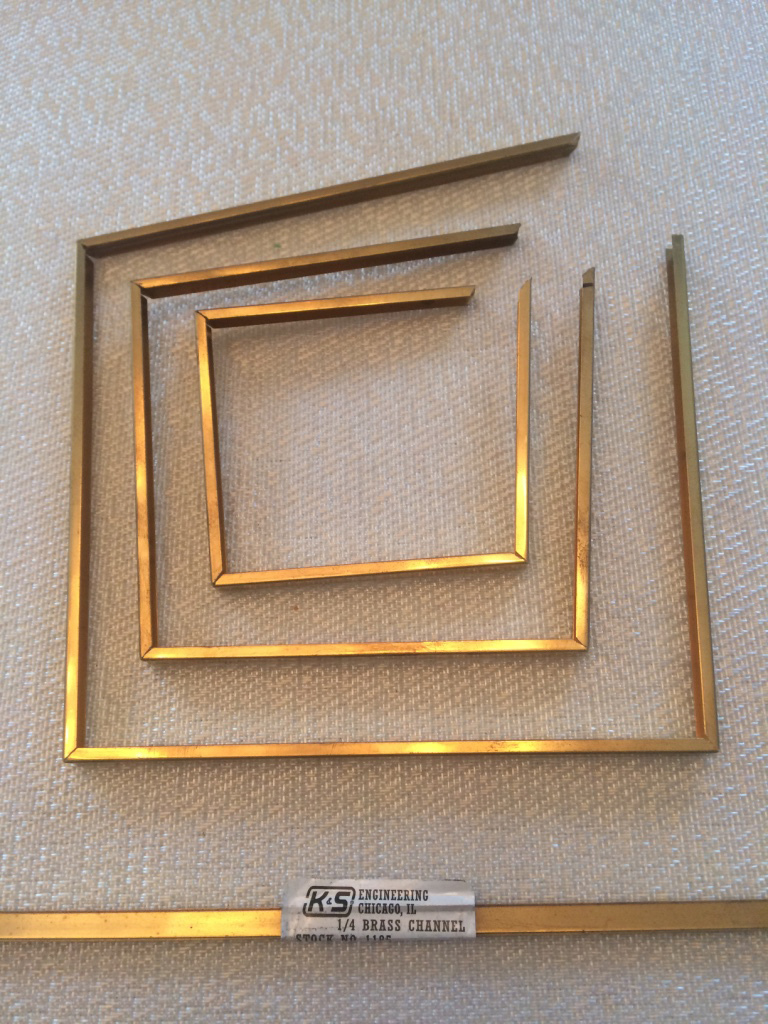
Horizontal braces: Braces are made from ¼” brass C channel. On a tower side, the top brace is 3” long, the middle brace is 4” long, and the bottom brace is 5½” long. For the entire top brace, I cut a 12” piece of channel, and filed a notch every 3”. For the middle brace I cut a 16” piece and filed a notch ever 4”. For the bottom brace I used a 22” piece and notched it every 5½”. The notches are all 45-degree Vs, including half Vs at the ends, so when bent at each notch, they form a square.
Cables: I had some leftover “twisted pair” telephone copper wire. I used strands of this wire to represent the cables crisscrossing the legs of the tower.
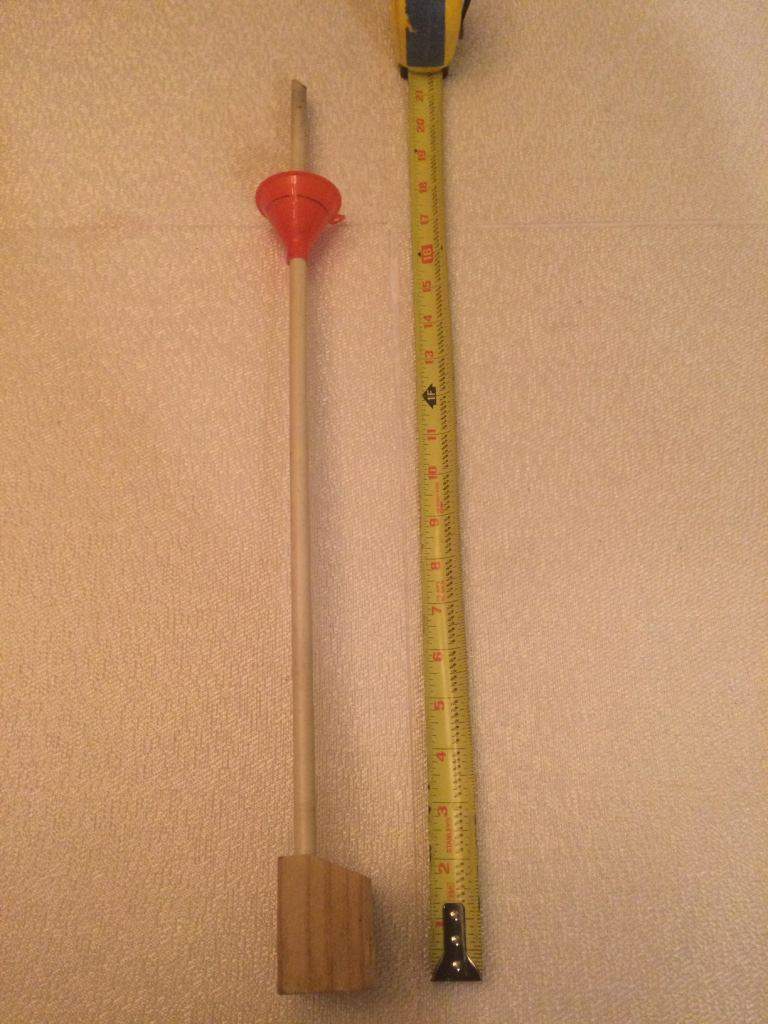
Equipment closet: The pipe (3/8” plastic tube) that comes out from the bottom of the tank connects to an “equipment closet” at the bottom of the tank. I trimmed a piece of treated 2 x 4 to form the body of the closet (2” high, 3” wide, and 1½“ deep).
Base and posts: The base is an 8” x 8” piece of ¼” cement board. Four posts (½” square by ¾” high) trimmed from treated lumber are attached to each corner using glue and ½” brass screws. The tank legs get attached to these posts. This base gives stability to the legs, and because of its weight, it provides stability to the entire structure.
Assembly
Legs to body: I marked a line around the circumference of the tank with a pencil, 4” from the bottom of the jug (which is the top of the tank). That is where the platform will be positioned. Following this line, I made four marks at equal distance from each other, about 3” apart, around the tank. That is the position for each leg.
NOTE: Make sure one of the legs is positioned to cover the small hole in the tank where the handle was cut off.
Aligning one leg to the markings on the tank, I used the holes in the leg to mark and drill 1/8” holes in the tank. I then used two 1/8” x ½” aluminum rivets and two 1/8” aluminum washers to attach the leg to the body of the tank. The gaping hole in the tank gives access to place and hold the washer while the rivet is being secured. Repeat for the other three legs.
Legs to base: Placing each leg bottom at the outer part of the posts and using the hole at the bottom of the leg as guide, I drilled pilot holes into the posts and secured the legs with the small metal screws.
Braces to legs: With the legs firmly attached to the base, I soldered the braces to the legs. Because of the thickness of the legs, my soldering tip was not powerful enough so I had to use my soldering gun. The key to soldering is cleaning the two parts to be fused. I used steel wool to polish the legs and the braces.
To ensure proper alignment of the braces, I used pieces of wood as jigs. I placed a 5” high piece of pine between the base and the bottom brace to hold the brace in place while I soldered each corner. The jig for the middle brace was 5¼” high, and I placed it between the bottom brace and middle brace while I soldered the middle brace. The top jig was 4¼” high, and I repeated the process.
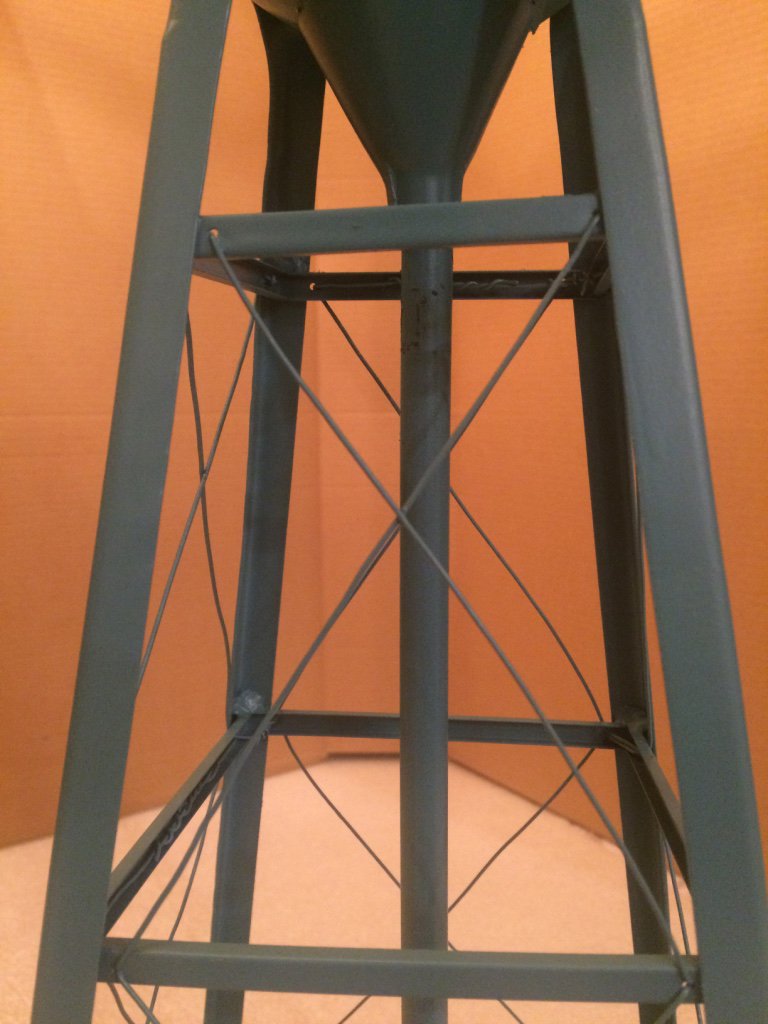
Cabling: This step can be confusing, so I’ll be referring to the sides of the tower as side 1, side 2, side 3, etc. First, on each brace I drilled two 1/16” holes, one at each end of the brace right next to the legs. Second, each section (top and bottom) has wire threaded twice between braces in order to achieve the crisscross pattern.
Side 1: Using about 4 feet of wire, I started threading the wire on the top brace. I inserted one tip of the wire on the left side hole and made a knot behind the brace. Then, using the other tip, I threaded through the right side hole in the middle brace (wire down).
Side 2: The previous step left the tip of the wire inside the tower. I threaded the tip from inside the left hole in the middle brace, and brought it up to the right side hole on the top brace (wire up).
Side 3: I brought the wire out from behind of the left hole on the top brace and threaded it through the right side hole on the middle brace (wire down).
Side 4: Finally I brought the wire out from the rear of the left side hole on the middle brace and took it up to the right hole on the top brace (wire up).
This completed half of the top section.
For the other half, I continued threading the wire and brought it out from behind the left hole of the top brace on side 4. This puts the wire at a point where, by following the same instructions above, I completed the top section. To secure the end of the wire, I attached it to the piece of wire behind the corner brace.
For the bottom section, using another 4 feet of wire, I followed the same steps as above.
Rail platform: Using a very thin drill bit (the size of the hardware cloth wire) I made a hole at the edge of the platform to accept the first of the ¼” wire “post” from the rail. I inserted the first post and determined the location for the second post. I kept drilling and inserting each post until the entire rail was completed. Before trimming the extra rail, and to secure the circle firmly, I left an extra ¾” piece of the fence for an overlap. I used ½” for the overlap, and a ¼” to bend over the beginning of the rail. To secure this patch, I trimmed the last “post” in the overlap portion, leaving ¼” pieces of rail sticking out. These pieces get bent over the beginning of the fence. This overlap is visible in picture 12. I then used long-nose pliers to bend the protruding portion of each of the ¼” posts at the bottom of the platform.
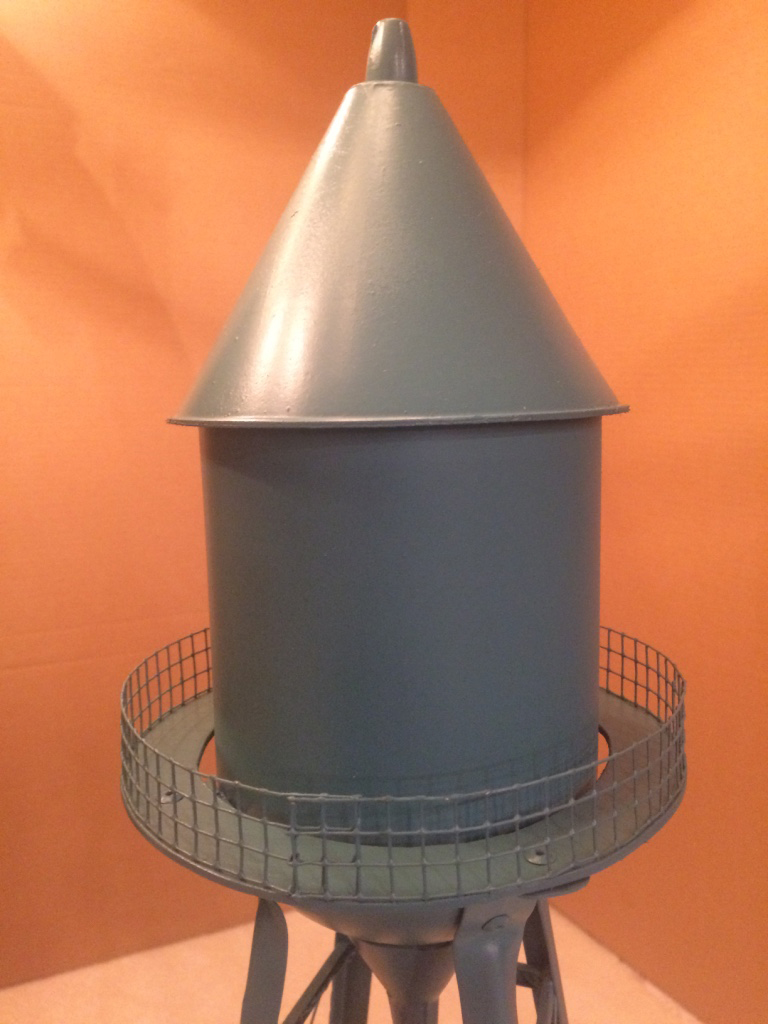
Platform to tank: I positioned the platform around the tank on the top of the bent tips and, using the holes in the bent tips as guide, I marked the location of the holes from underneath. I drilled 1/8” holes on the platform and attached the platform to the tips using ¼” rivets.
NOTE: Instead of rivets, you could use epoxy, silicone caulk, or other adhesives. Since I’m dealing with raccoons, I went with the rivets.
Underbody of tank: I trimmed about ¼” off the rim of the small funnel. I also trimmed the spout about halfway, making sure the downspout pipe fit snugly in the funnel spout. I glued the small funnel to the underbody of the tank, making sure it was level.
Roof to tank: To make sure the roof and the top of the tank (bottom of jug) are ready for gluing, I sanded the underneath the roof and around the tank where the roof is attached. I applied silicone to both parts and joined them, making sure the roof was level.
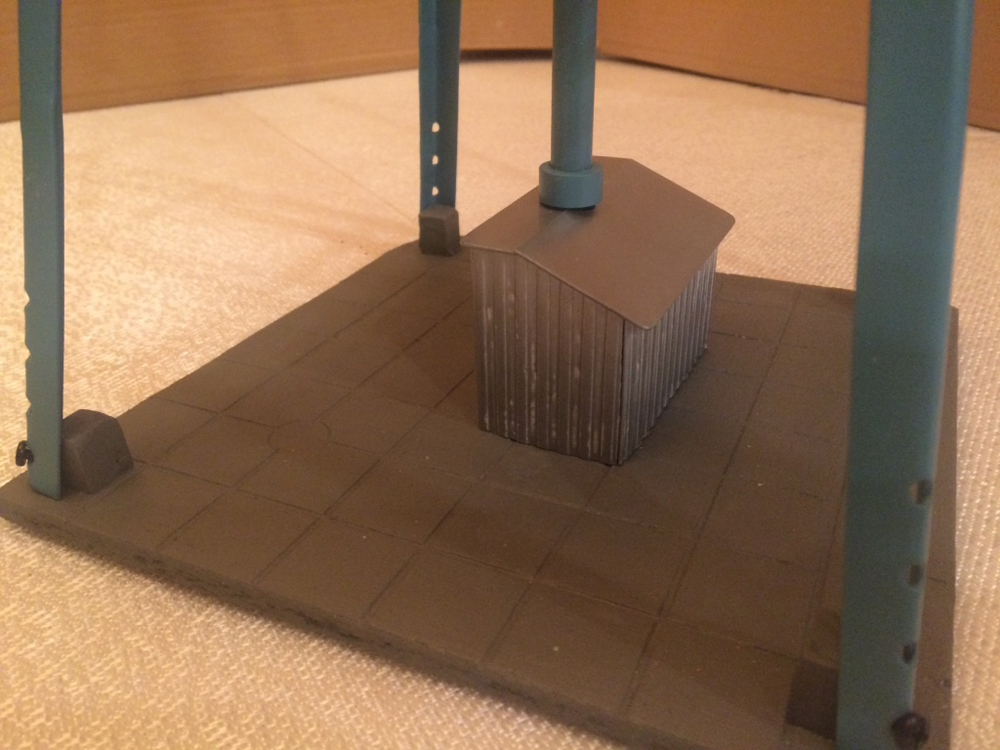
Posts to base: Using exterior glue and one screw each (from underneath), I attached the four posts to each corner, about ¼” from the edge of the base. Then the base got a coat of gray exterior stain to resemble a concrete slab.
Paint –I washed the entire structure (sans base) with warm soapy water and rinsed it well. I used a vinegar bath to “pickle” the metal parts before painting. Once everything dried, I sprayed the entire structure with a coat of Rust-Oleum primer (334019).
After the primer dried, I gave the entire structure two coats of Rust-Oleum Satin, Vintage Teal. Once that was dry, I applied the lettering and weathered the structure with a very diluted gray stain. Finally, the entire structure got two coats of satin Rust-Oleum clear matte (249087) to protect the weathering.
NOTE: The downspout gets primed and painted separately.
Equipment closet to base: Once I trimmed the 2 x 4 piece to resemble an equipment closet, I veneered the walls with pieces of vertical blinds that resemble metal siding and added a styrene piece as a roof. On top of the roof I drilled a 3/8” hole, ¾” deep, to receive the downspout. In my junk bin I found a ring to serve as the collar for the downspout, which gives the closet a nice finish. The closet got a coat of silver spray paint.
Once all the paint dried, I reattached the tank assembly to the base, making sure the downspout was fitted inside the tank and on top of the equipment closet. I centered the equipment closet on the base and, drilling two pilot holes first, I attached the closet with two brass wood screws from underneath.
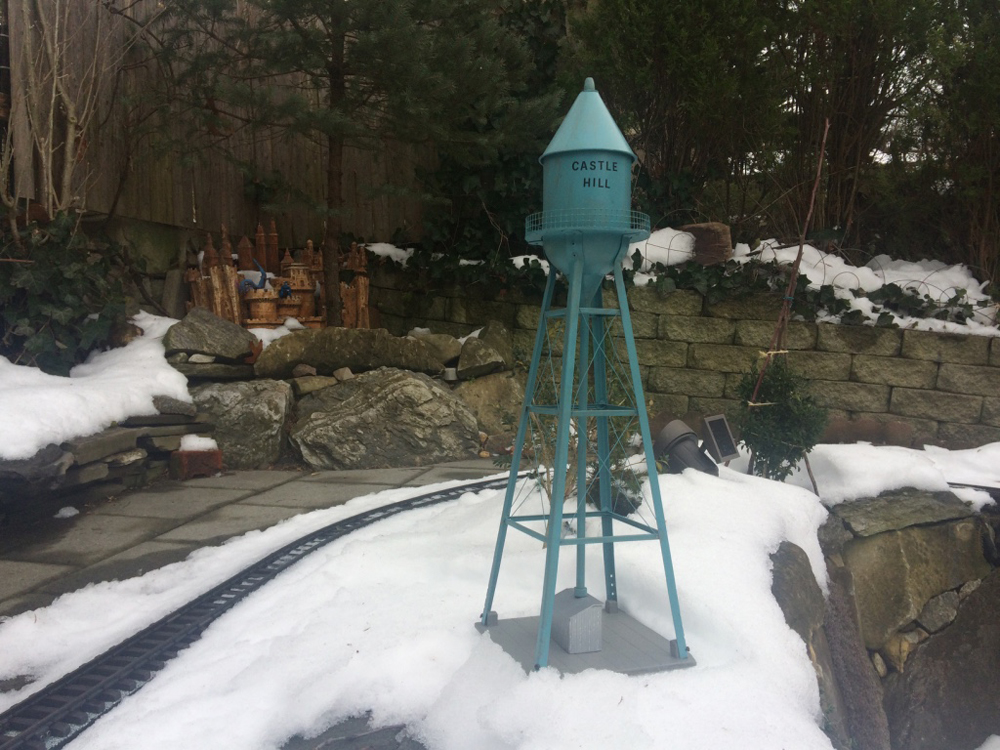
The finished structure captures the old-fashioned, small town atmosphere such structures evoke even to this day. I think it looks great in my railway.


