


When I take my granddaughter to the local neighborhood park, I usually envision seeing a large-scale garden railway running loops through the park. So, one day I contacted one of the people in charge and shared my vision of the garden-railway.
In time, someone contacted me to let me know that it would be a great idea to have a train running in the park, and that the best time will be during their upcoming Fairy Walk festival. This festival is one of many activities this park organizes through the year for local children.
As the icing on the cake, they informed me that there is a contest to build a “fairy” structure or scene that gets placed around the park to be exhibited as part of the contest.
So, not only do I get to install a garden-railway, but I get to build a “fairy” structure to enter in the contest, how great is that?
The rules of the contest indicate that the structures and scenes need to be made with organic material found in the garden, like leaves, twigs, acorns, tree bark, etc.
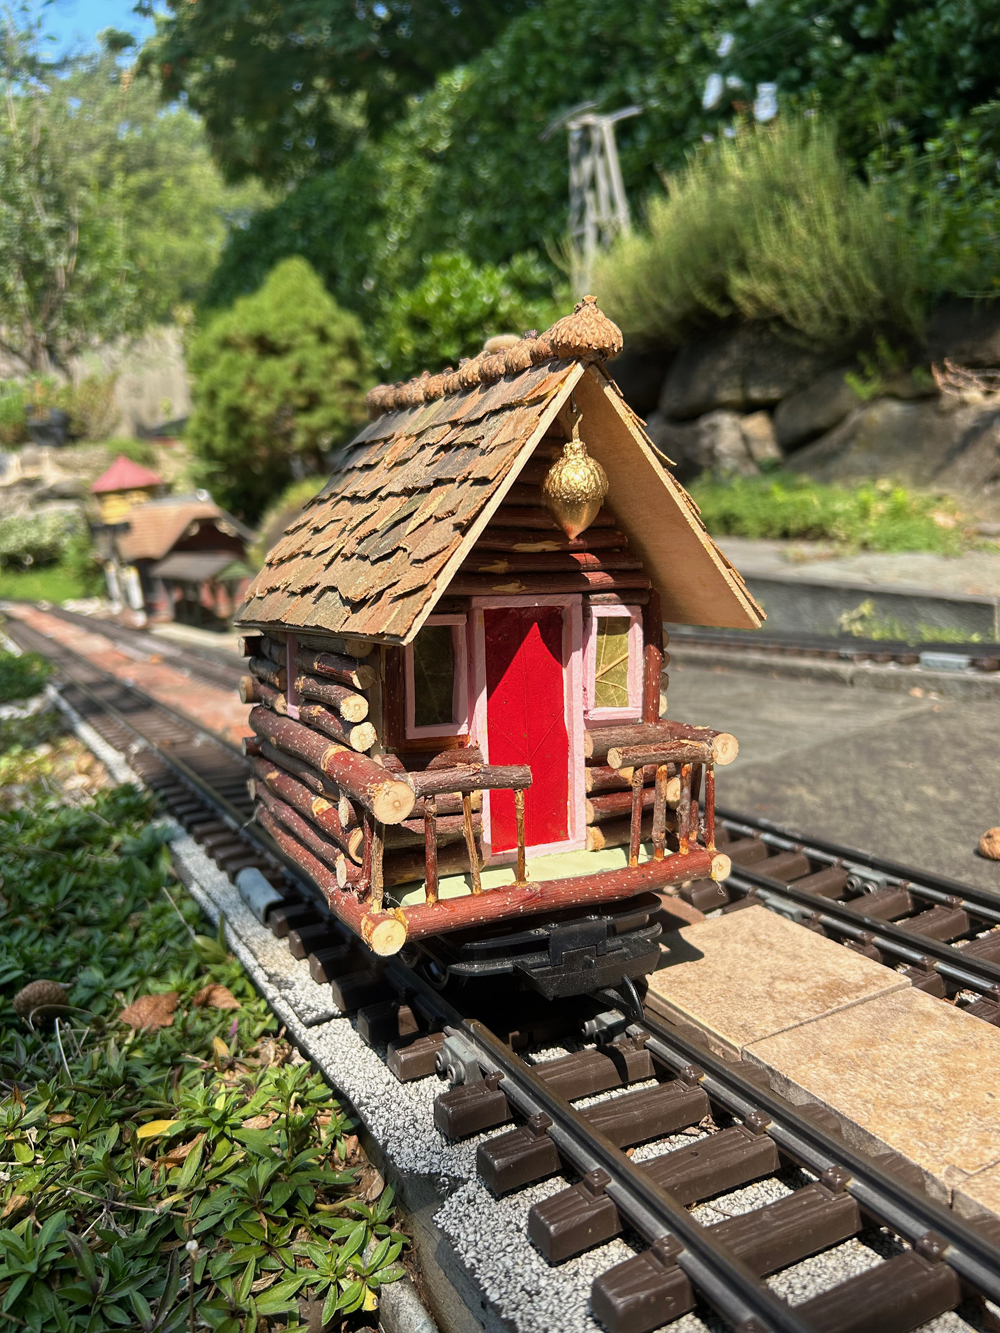
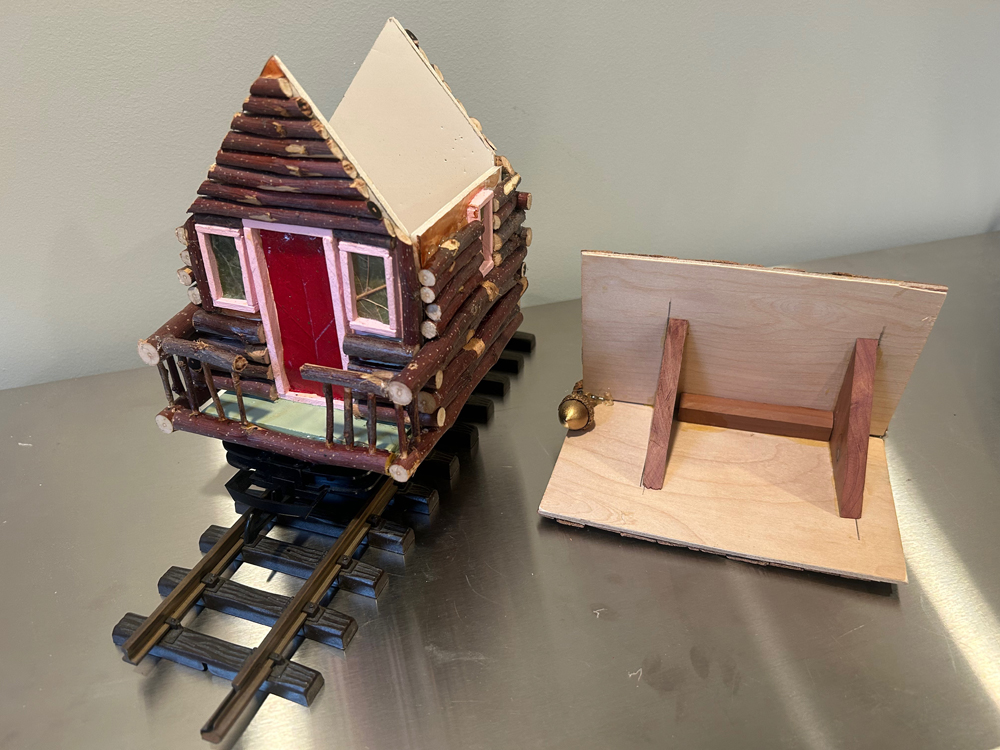
I thought I would combine the railway and fairy themes, and create a Fairy Walk Log Cabin Railroad Car.
I have the chassis of an LGB No. 4143 Dump Car, left from a kitbashing project I did a few years ago. I removed the brackets that hold the tipping container, so it is mostly flat. I thought this chassis would be perfect for this new project.
To have a sturdy underlayment structure, I’m using a piece of 1/4” thick cedar plank for the floor, 1/8” thick foamboard for the walls, 1/8” thick plywood for the roof, 1/4” strip wood to reinforce the inside corners of the foamboard walls, and 1/8” strip wood for door and window frames.
The organic materials I’m gathering include, thin apple tree branches (for the logs), acorns (for various embellishing), maple tree bark (for the roof shingles), multi-color leaves (for windows and door treatments), and twigs for the balaustres in the porch railing.
Materials
Base: 1/4” thick cedar plank, 4 3/4” L, 3 3/4” W (Pic. 2)
Bolsters (to clear the wheels in the car): 1/4”X 3/8” cedar stock, 3 1/4″ L
Walls (1/8” thick foam board): 3 3/4” W, 3 1/2” H (side walls), 3 5/8” W, 6” H (front and back walls), height measure is from bottom to peak.
Door dimensions: 1 1/4” W, 3” H
Timbers for frame (1/8” strip wood): Bottom and top – 1 1/2” L, Sides 3” L
Piece of maple leaf painted red to represent the actual door.
Window dimensions: 3/4” W, 1 1/8” H (all 4 windows)
Timbers for frame (1/8” strip wood): Bottom and top – 3/4” L, Sides 1 1/8” L
Pieces of green maple leaves to represent glassing.
Roof underlayment panels: 2 panels of 1/8” thick plywood, 6” L, 3 3/4” W.
Underneath roof brackets: 2 triangles of 1/4” cedar stock, cut to match the roof pitch.
In my case, these are isosceles triangles, measuring 2 1/2” for the two equal sides (which are attached to the roof panels), and 3” for the longer side.
Chimney: 1 1/2” long piece of 3/4” square pine strip, trimmed to fit pitch of roof.
Roof shingles: Maple tree bark cut into 1/2” wide strips and chopped into 3/4” long pieces.
Construction
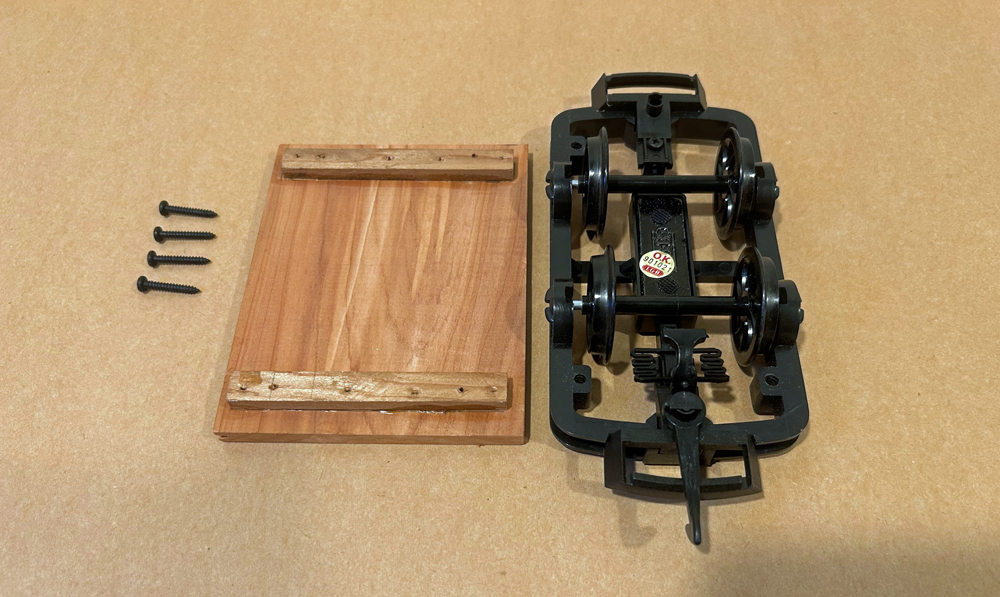
Glue and pin the bolsters to the base. Using the four existing holes in the chassis as guide, mark, and drill four holes in the bolsters using a 1/16” drill bit. Four, 3/4” screws will be needed to attach the cabin to the chassis.
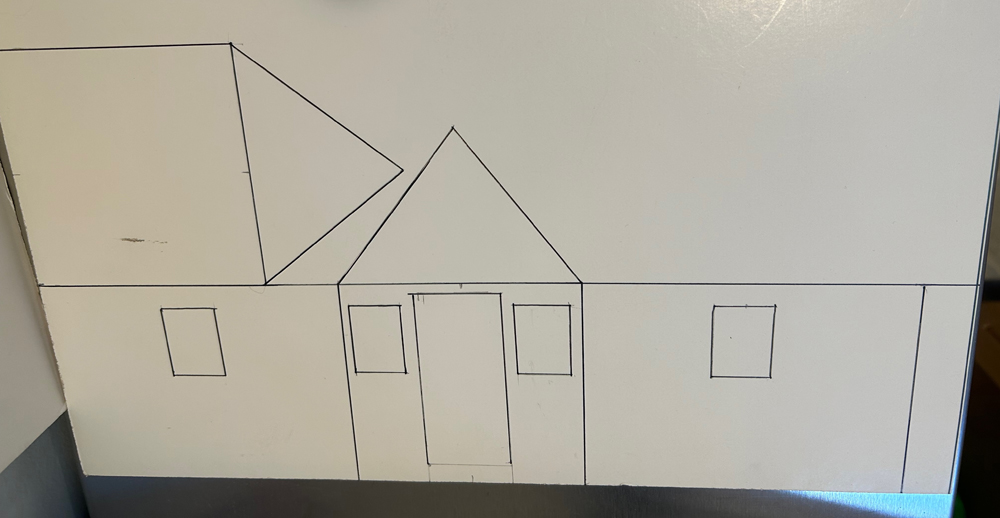
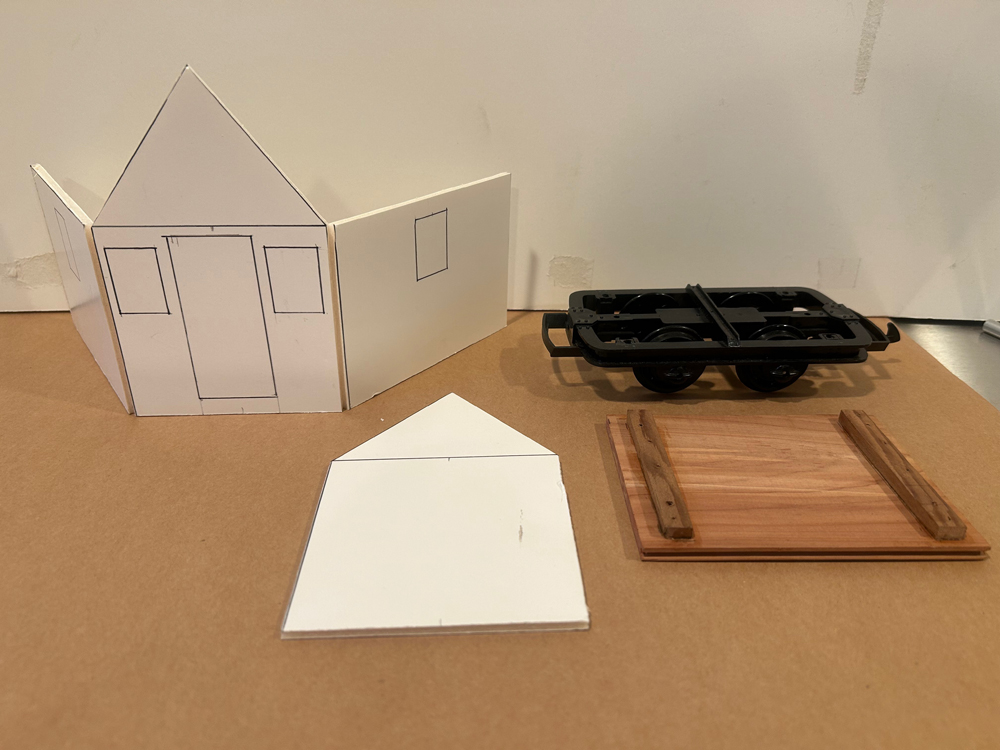
With a thin marker I outlined the pattern for the four walls. Initially, I did not plan to have a front porch, so when I trimmed the foamboard, I shortened the length of the side walls by one inch. This gave me a 1” front porch, and 3 3/4” wide walls.
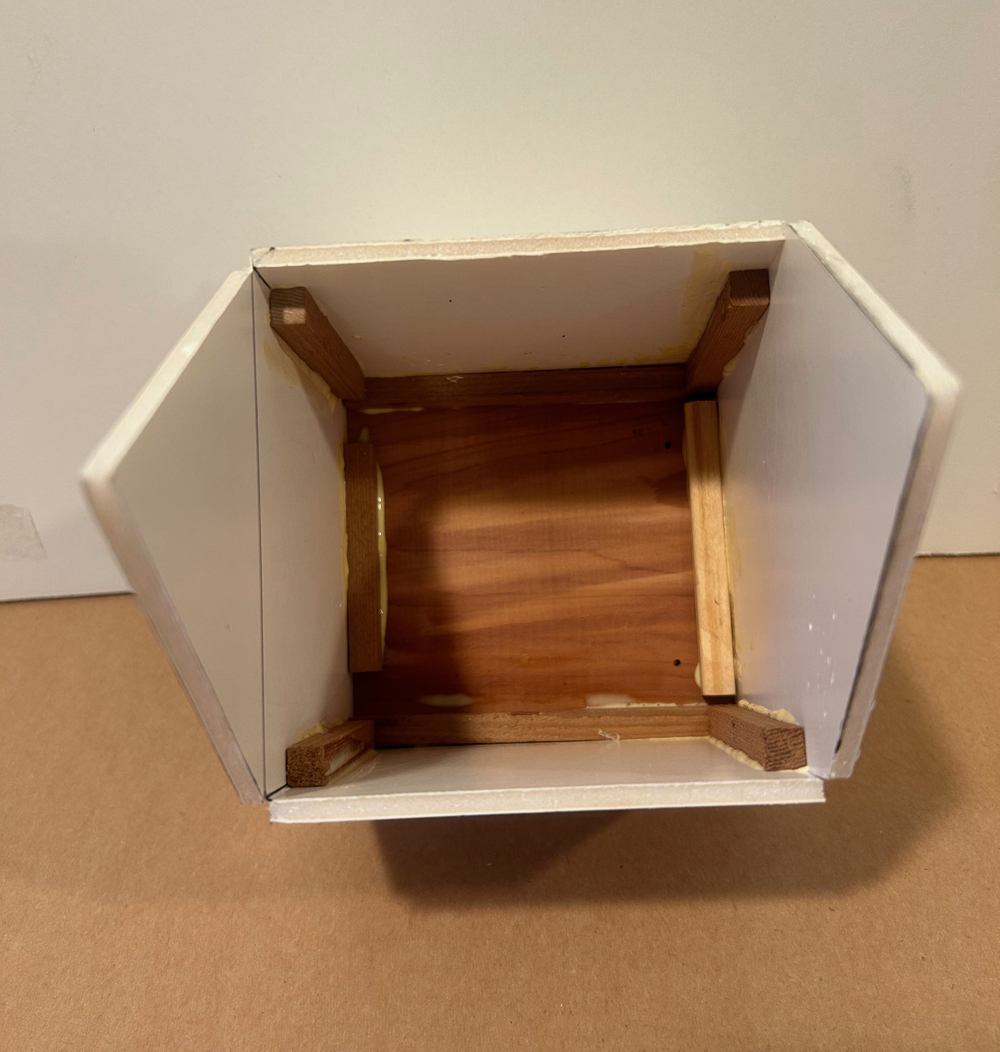
To give structural strength, I glued the walls overlapping the base using waterproof carpenter’s glue. Then I glued pieces of 1/4” stock to the floor/wall joints and to the corners of the cabin.
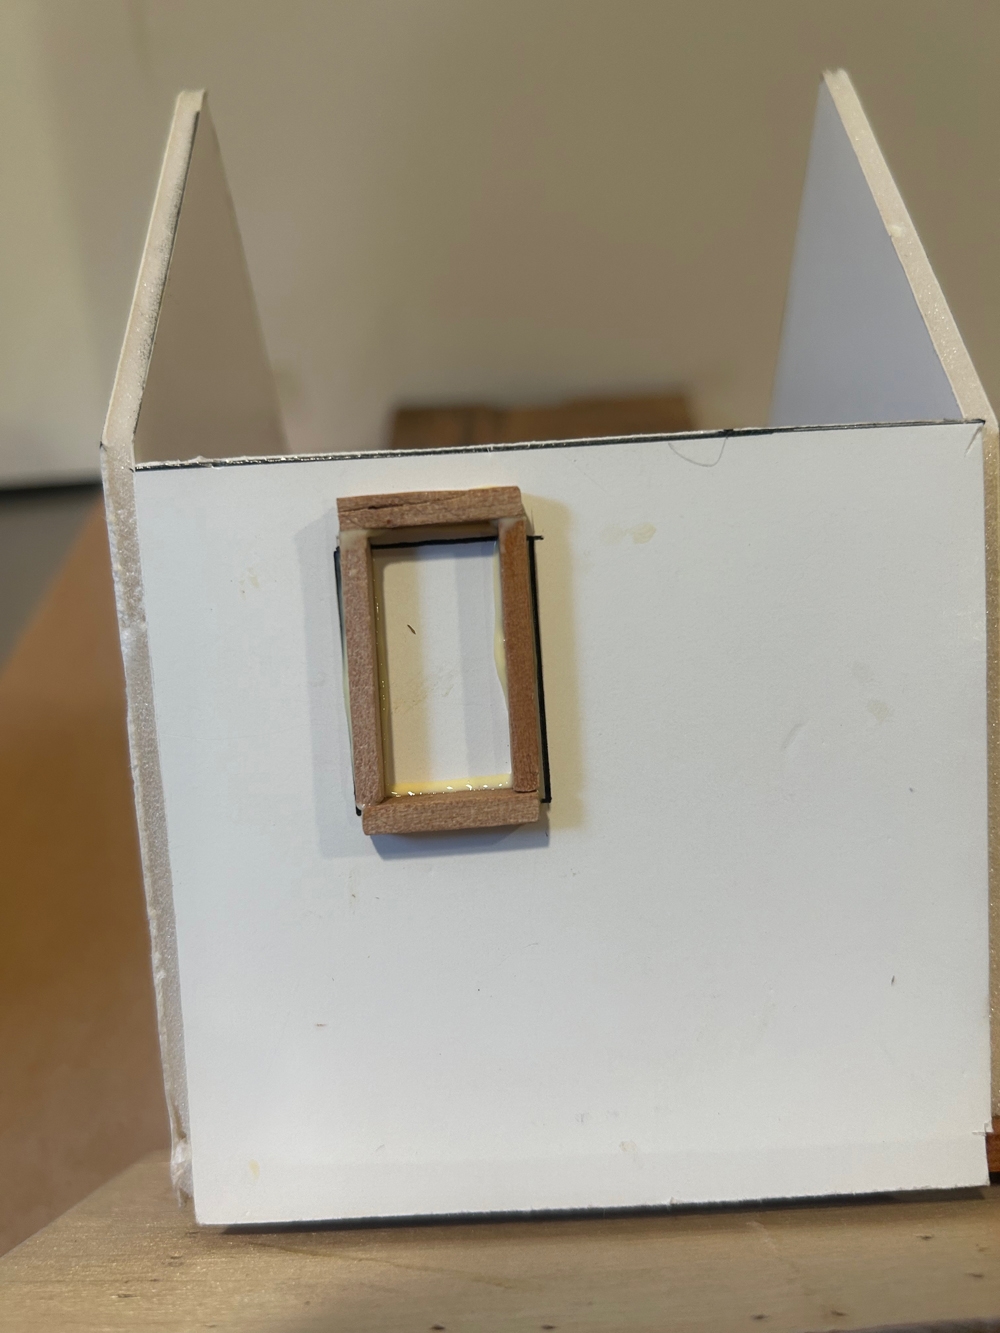
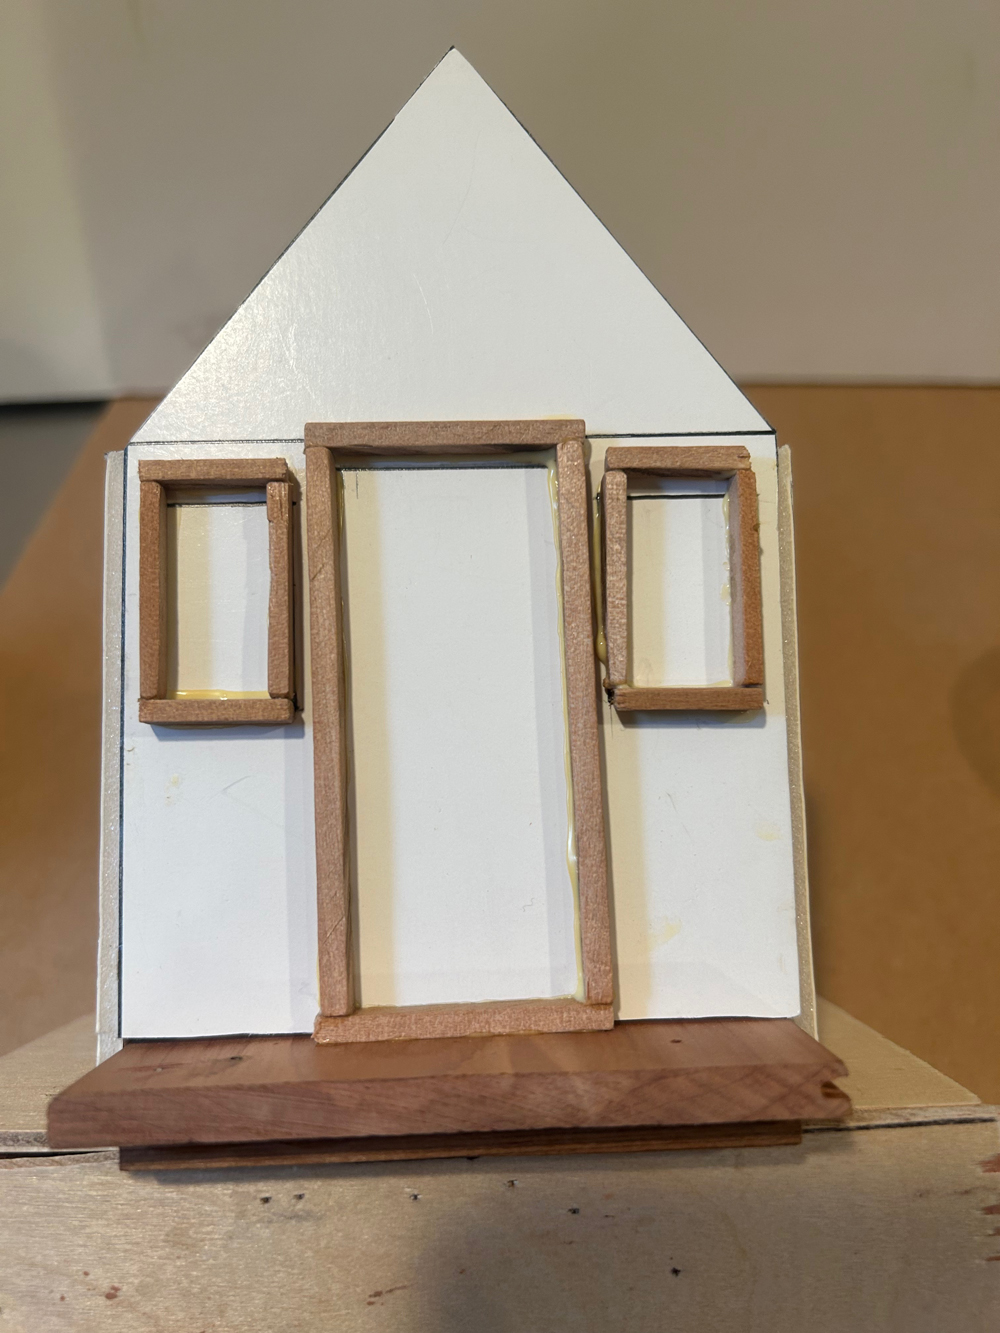
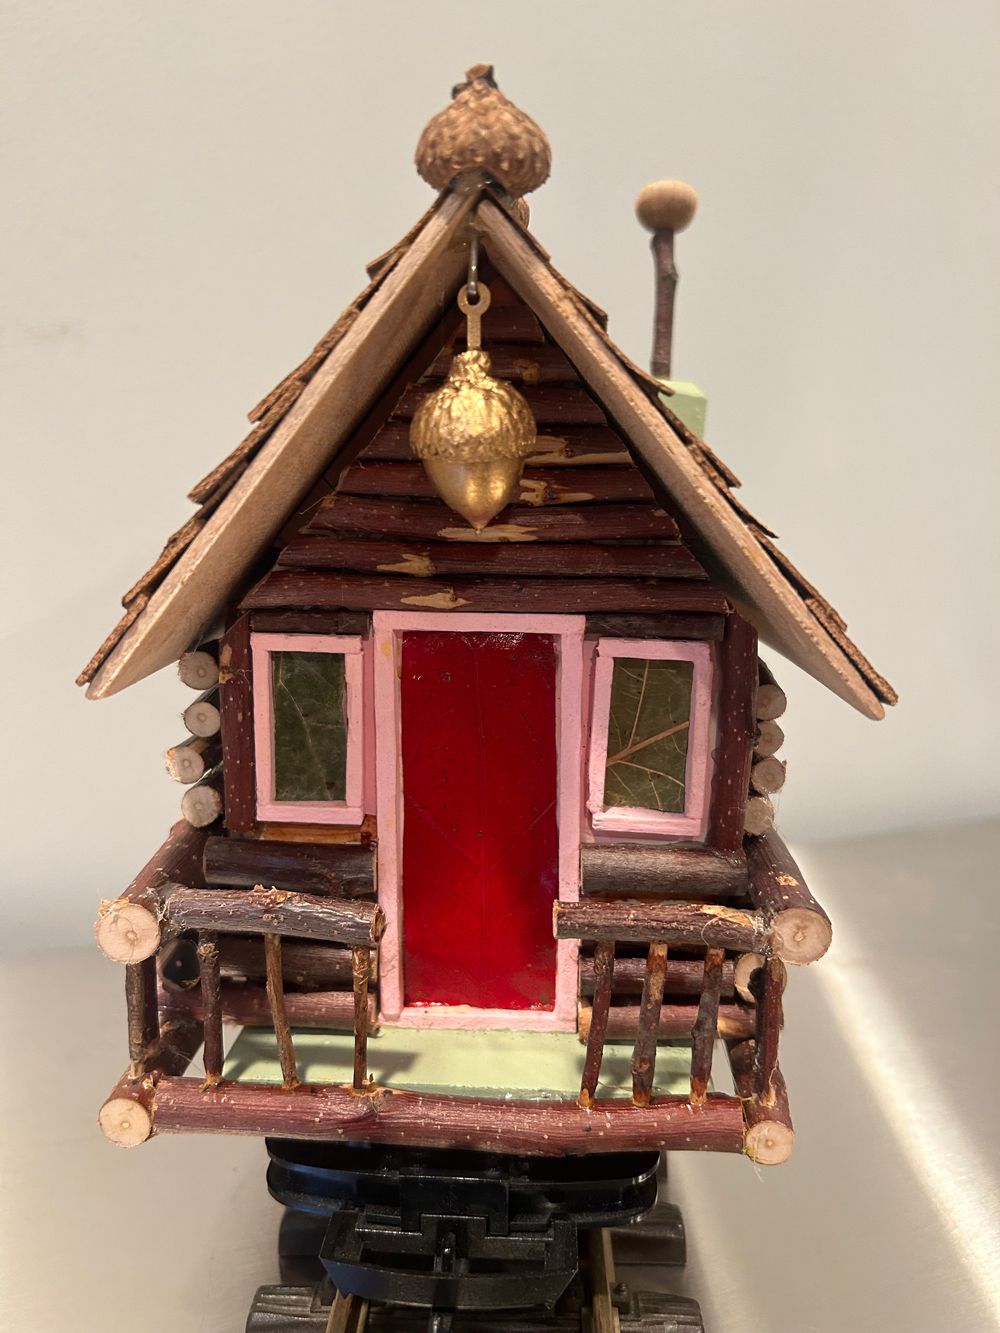
Gluing the door and window frames to the sides of the cabin. While the front windows are centered around the door, they are located 2” from the bottom. The side windows are also 2” from the bottom, and 2” from the front wall.
In keeping with the “Fairy” theme, I decided to use pastel colors. I used pink to paint the frames of the doors and windows, and light green for the front porch floor and the chimney base.
I cut a piece of maple leaf to fit inside the door frame, sprayed it red, and glued it when the paint dried. I cut pieces of green maple leaves to fit the window frames and glued them to all four windows.
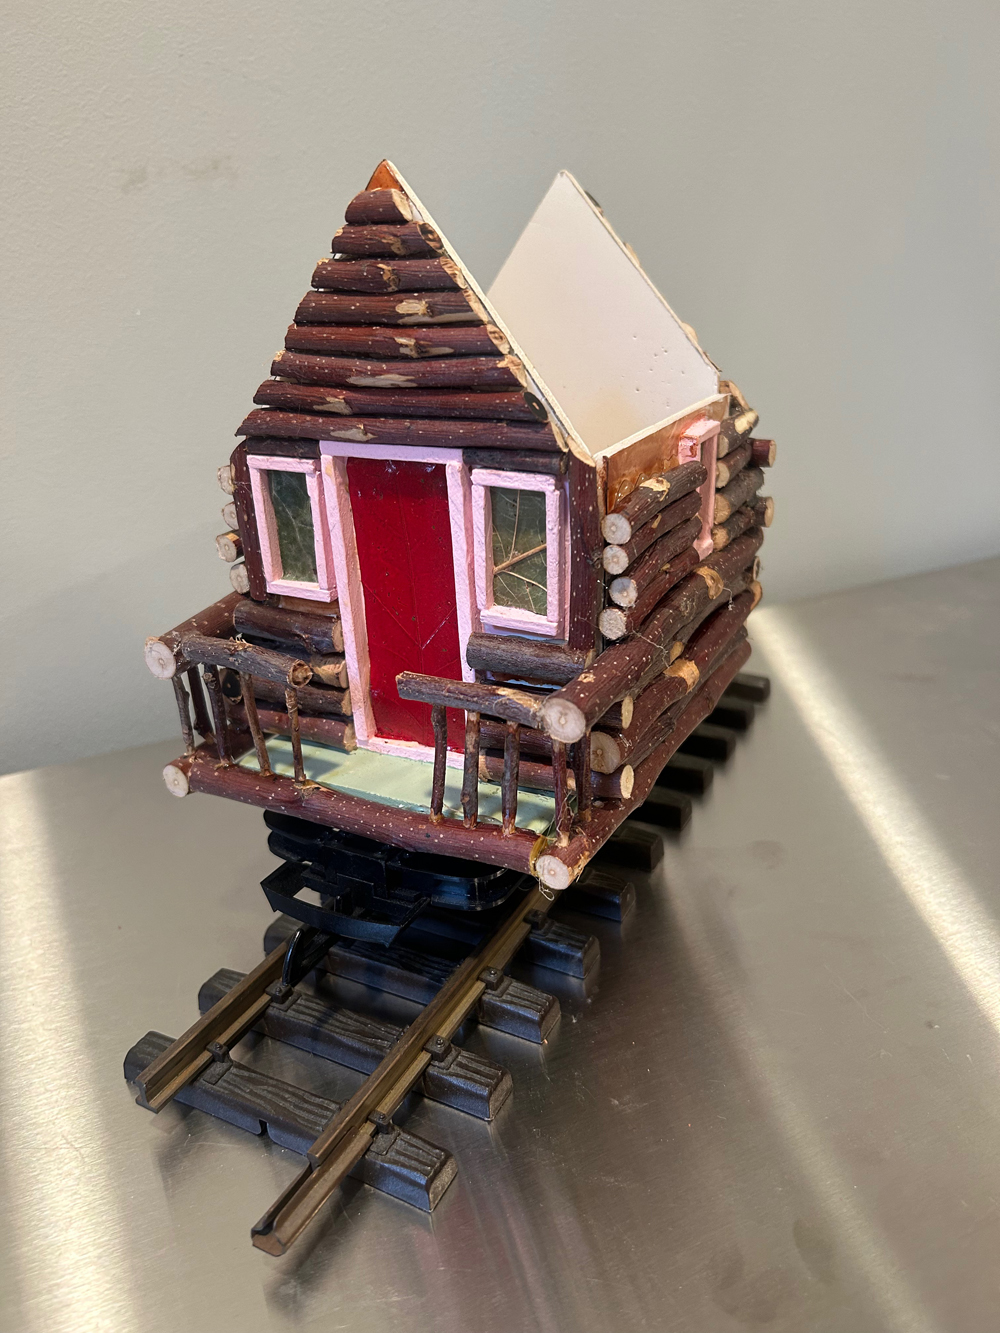
When the glue and paint dried, I began to cut and glue the “logs” to the sides of the walls using hot glue. I used a measure-cut-and-glue process to make sure each log fitted nicely all around. My scroll saw came in handy for these cuts.
NOTE: The “logs” do not have the typical notches at each end to allow them to interlock. I thought these logs were too small to cut notches. Instead, I just overlap the full logs at the ends. This results in gaps between logs, which I filled with shorter logs that fit in the gaps. Although this is a simpler process, the corner walls still have the overlapped look of logs in this type of cabin.
I was not sure how I was going to negotiate the angles needed to create a sturdy and good-looking porch railing. As the pictures show, I chose to make it as simple as I could, while still retaining the essence of a log cabin porch.
Once the logs were hot glued to the walls, it was time to work on the roof.
The two pieces of 1/8” plywood get joined together to the two cedar triangles, with carpenter’s glue and 5/8” 23-gauge brads (I used my pneumatic pin nailer).
The placing of these triangles to the roof panels is critical. They need to be placed exactly so they fit inside the cabin front and back walls. This allows for a snug fit and an easy removal of the roof to work when gluing the logs to the walls.
Adding the chimney
On one end of the 1 1/2” long square pine strip, center drill a 1/2” deep hole using a 3/16 drill bit. This matches the thickness of the twig I selected for the chimney pipe. Using the same drill bit, make a 1/4” deep hole in the acorn, which represents the chimney cap. Cut a triangle piece from the other end of the chimney base, making sure the angle matches the roof pitch. Using carpenter’s glue, attach the base, the pipe, and the acorn. Glue and pin the chimney base assembly to the roof, 1” from the bottom, and 1” from the back edge of the roof. Paint the chimney base light green.
“Ripping” the roof shingles
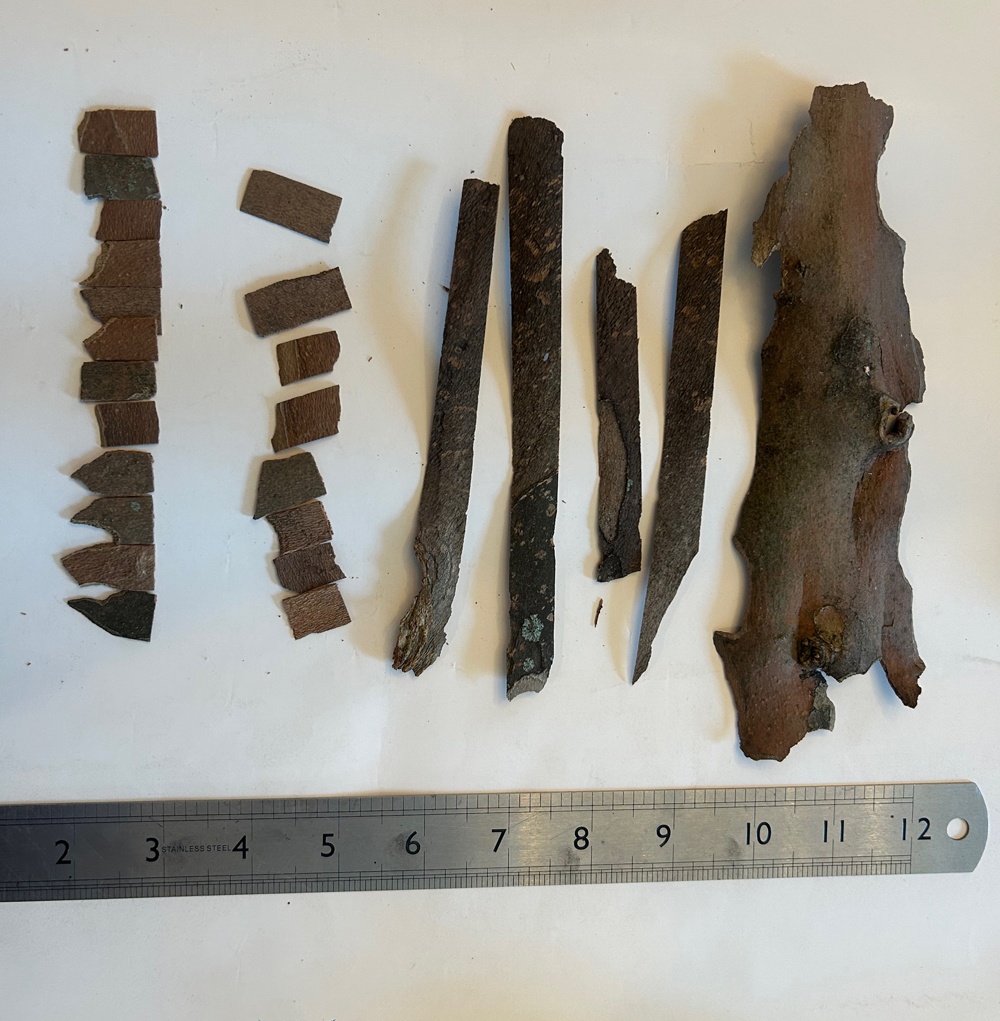
Using maple tree bark, cut 1/2” wide strips. From these strips cut individual shingles about 3/4” long. Keep the “live” edge on in as many pieces as possible to get an uneven wavy effect on a row of shingles to provide a more “rustic” look.
Starting at the lower edge of the roof, fasten the first row of shingles using carpenter’s glue. I used only straight edge shingles to match the straight line of the roof panel. Because bark shingles are very fragile, they would have broken off easily if placed over the edge.
Because the bark tends to be flexible and wavy, I used a strip of wood to clamp each row of freshly glued shingles. This step ensured that the shingles flatten a bit more as the glue dried, resulting in a stronger adhesion to the roof panel.
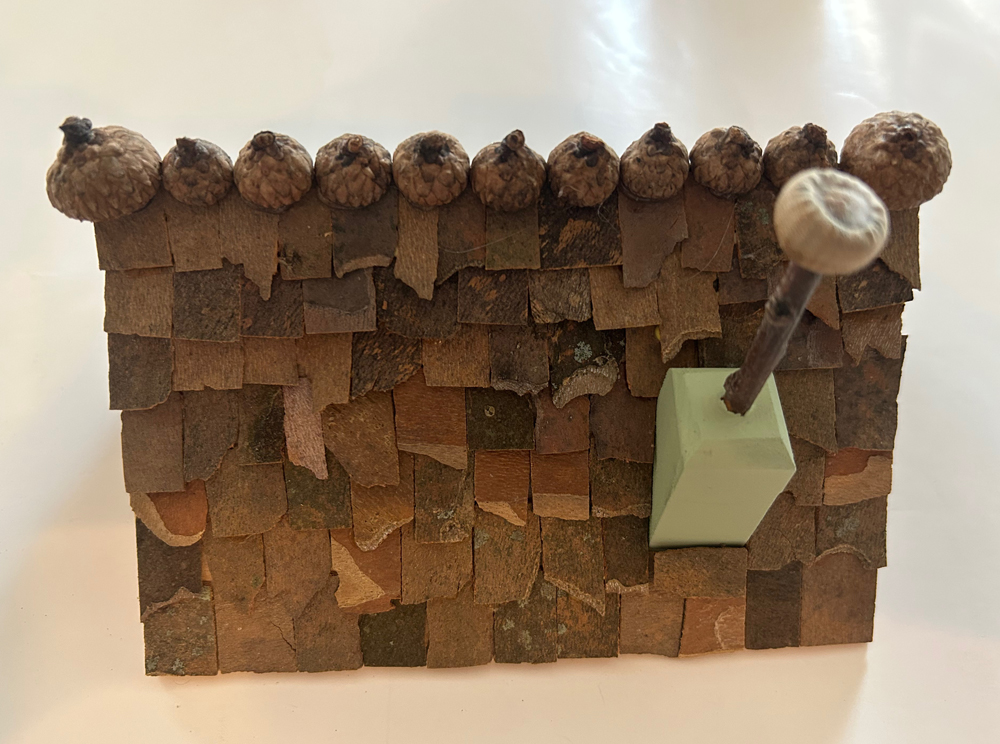
The “crowning” glory of the roof is the row of acorns along the ridge. Using my bench grinder, I carved a groove at the bottom of each acorn. This provided a better fit for the acorns to sit at the top of the ridge, along with more area for the hot glue.
As a final embellishment, I sprayed one acorn with gold paint and hung it from the front eave to “illuminate” the front porch.
As a final embellishment, I sprayed one acorn with gold paint and hung it from the front eave to “illuminate” the front porch.
Epilogue
So, the Fairy Walk event came and went.
For about three hours, the park was full of kids, many little girls dressed as fairies, some of the boys had their hallowing costumes on, all enjoying an unusually warm and sunny fall day.
The train set up was a hit with all, children, and parents.
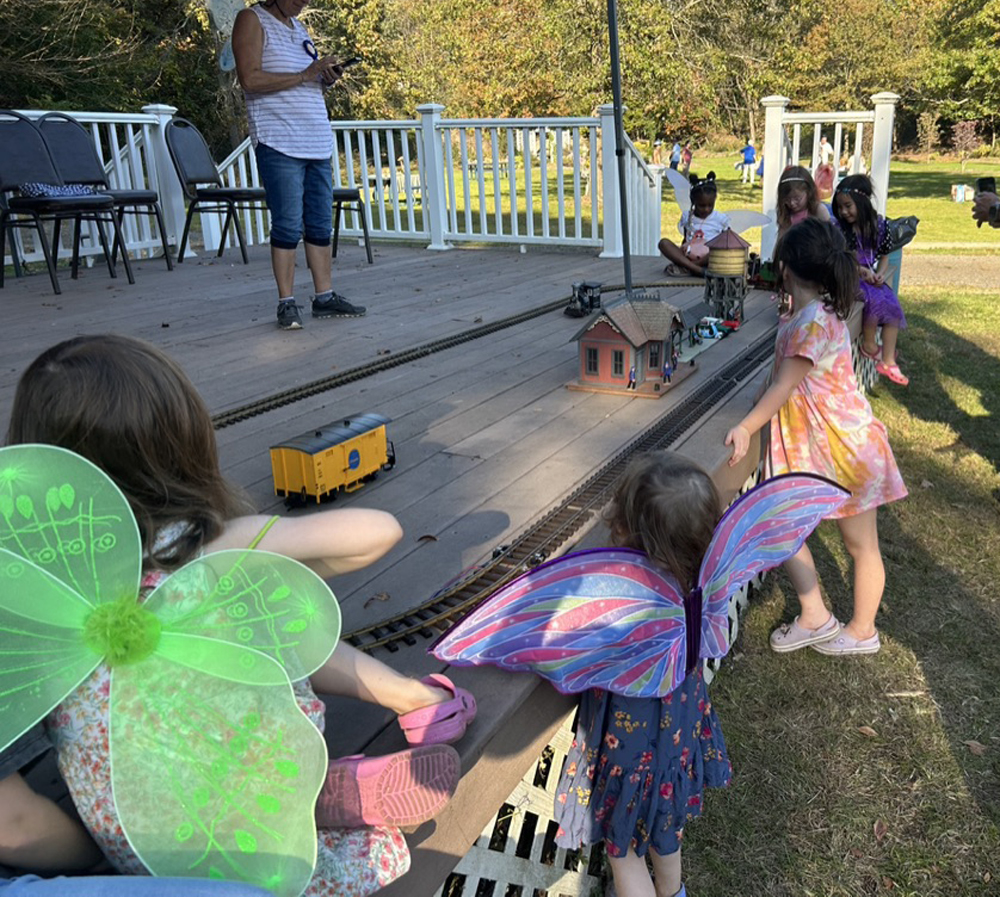
They kids stopped to ooh and aah in front of the train, and adults made comments about their childhood memories of attics and basements full of trains, and their fathers or grandfathers running those trains.
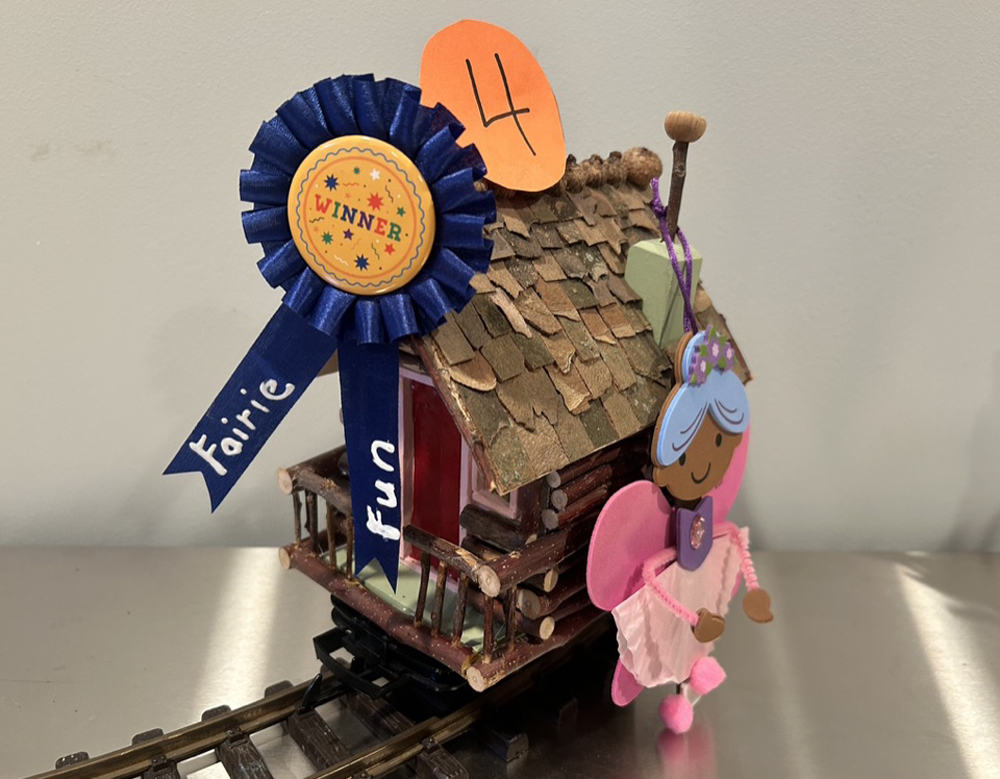
My Log Cabin Railroad Car was entry number 4. As it turned out, it received the 4th winner ribbon (including a generous coupon for dinner at the local pizzeria).
I received numerous comments about how nice the train set up was, and how it gave the festival a new dimension.
We all had fun, we had great weather, and our efforts were recognized!
I’ll enter this experience in my book as a win-win event.


