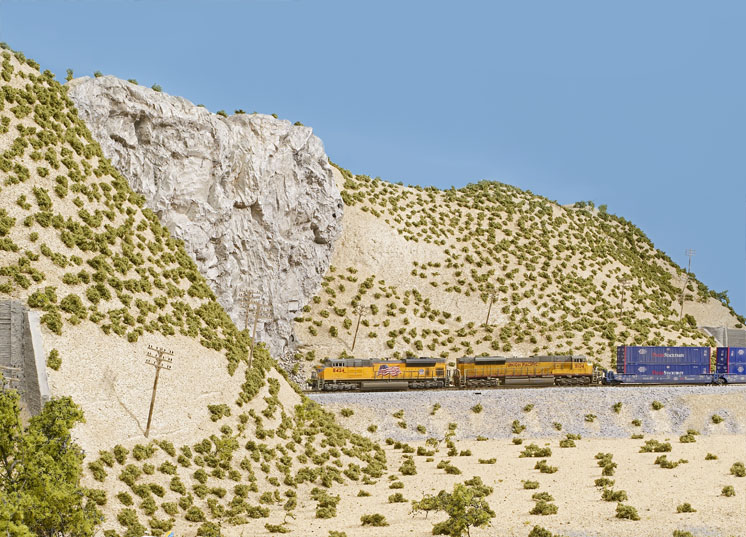


Some model railroaders enjoy laying track. Others get a kick out of wiring. I’m happiest when I’m building scenery. The desert landscape of the Meadow Valley Wash would be the signature scene of this layout, and I couldn’t wait to get started.
My friend Stener Harildstad and I looked closely at the photos of the Meadow Valley Wash in Mark Hemphill’s book Union Pacific Salt Lake Route, which provided inspiration for this layout. Then Stener sat down with paper and pencil and sketched the Wash as he thought it might look on our N scale layout. [His vision is shown on page 41 of the January 2010 issue. – Ed.]
Pink hills
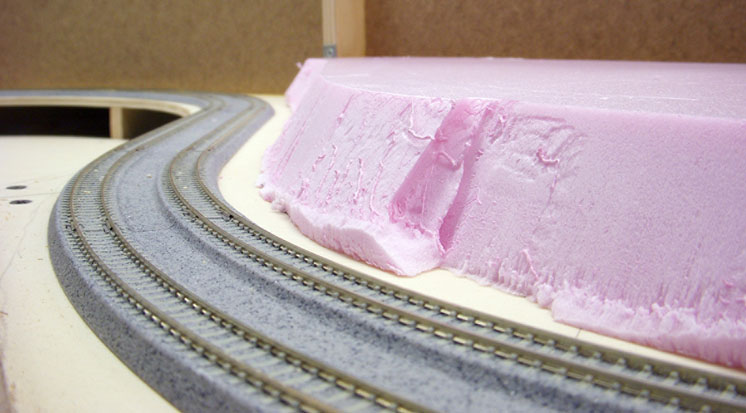
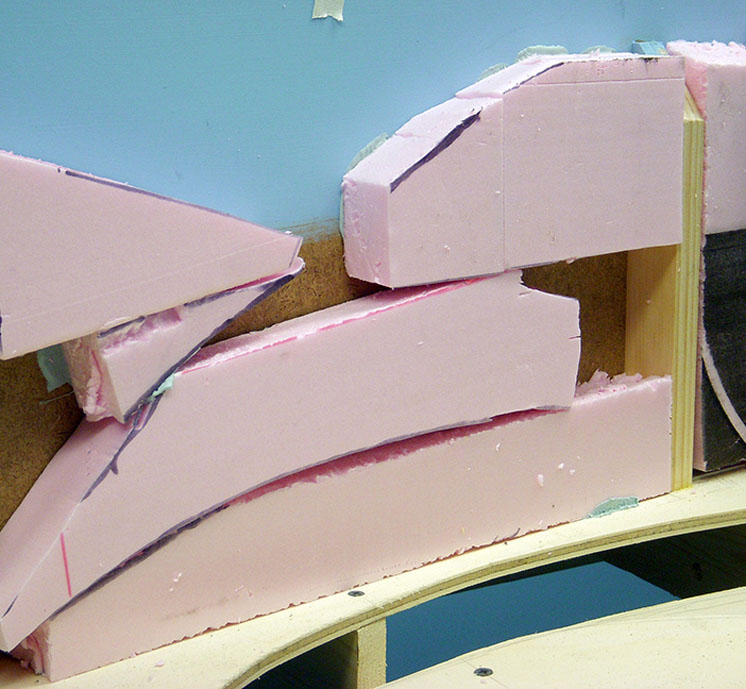
On the last day or two before Stener was to return to his home in Norway, we began cutting 11⁄2″-thick extruded-foam insulation board. I used a sharp, serrated kitchen knife (bought specifically for this purpose – not borrowed from the kitchen). I’d tried a knife blade in a saber saw, and that worked fine for cutting the general shapes. But for cutting the slope into the edges, the serrated knife worked better.
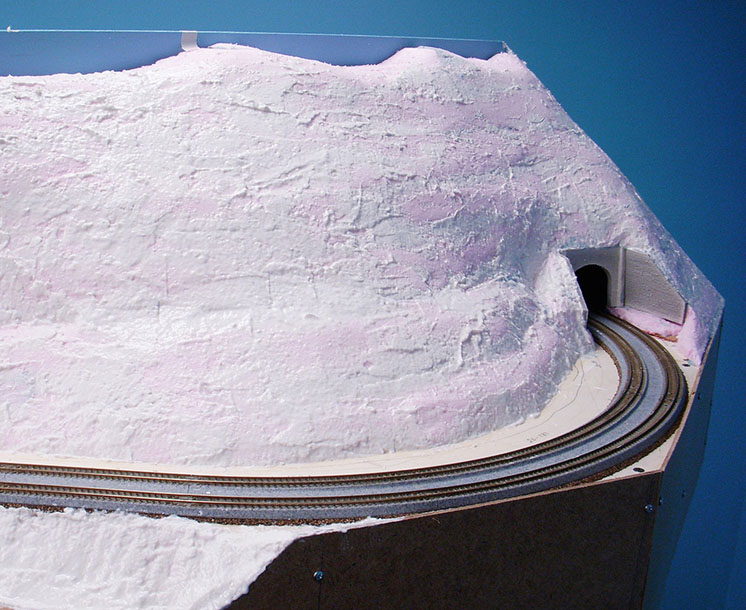
The idea is to cut the first piece to the shape of the base of the hill – pretty much following a curved line an inch or so in from the edge of the track. Then we used the serrated knife to cut the edge to about a 45-degree angle, as shown in fig. 1, roughly matching the slope we had cut on the end fascia.
Next, we flipped that first layer of foam on its top and used it as a template for the next smaller layer of the hill. We did this until we got all the way to the top. The hill needed to reach its summit about one inch (at the ends) below the top of the backdrop.
At this point we had a rough form for the first hill (right end). We made cutouts in the back edge of the foam to allow for the vertical backdrop supports, allowing the foam to seat flush. We also had to cut the tunnel through the first and second layers.
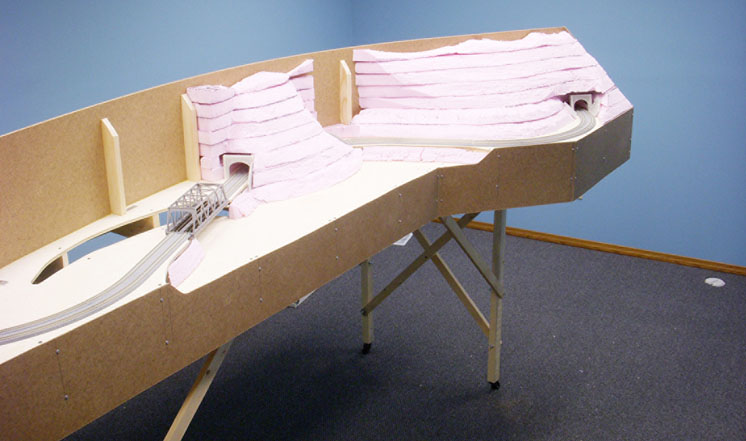
With the first hill in shape, we next cut the foam for the hill in the center of the layout, again providing a tunnel through the foam for the double-track main, as shown in fig. 2.
Roughing it in
I drew a light pencil line on the backdrop along the tops of the hills. Where there were no hills (eventually to be rock cliffs), I drew a wavy line, suggesting that the tops of the hills and cliffs wouldn’t be a straight line. Not having glued any of the mountains in place yet, I lifted off the stacks of foam and set them out of harm’s way.
With a brush, I applied two coats of blue paint on the backdrop above and a little below my pencil line. When the paint had dried, I placed the first layer of the hills onto the layout, traced their location, and removed them. Then I applied beads of PL300 Foamboard Adhesive onto the plywood and set the first layer of foam in place. I next coated the top of the first layer of foam with adhesive and attached the second layer. I stuck pins through the foam so it wouldn’t shift.
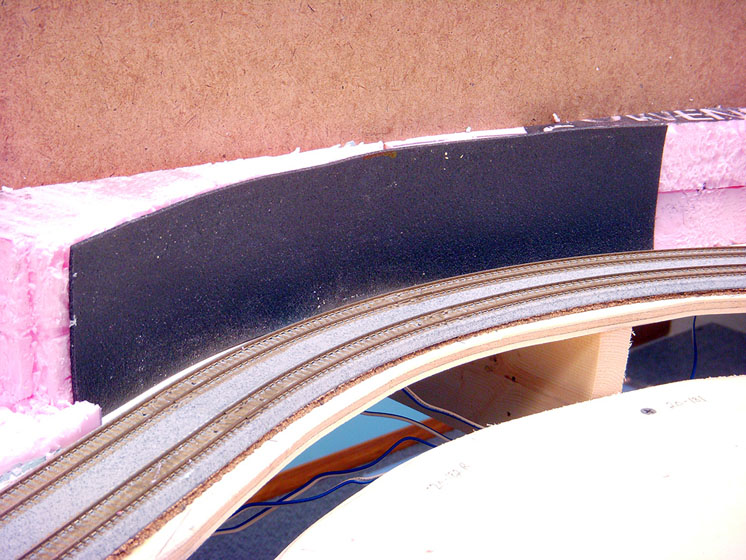
Next, I added the tunnel liner, which I made using 3″-wide strips of Woodland Scenics Track-Bed Sheets. I attached them to the foam with the PL300, as shown in fig. 3. I used pins to hold the roadbed material in place while the adhesive dried.
Before attaching the third layer of foam, forever precluding access to the tunnel interior, I added ballast along the edges of the plastic roadbed. I painted a band of Elmer’s white glue along the edge of the roadbed and poured Kato’s matching ballast onto it. When the glue had dried, I dribbled Woodland Scenics Scenic Cement onto the ballast with a small turkey baster.
With the tunnel liners in place and the edges of the track ballasted, I continued assembling the foam hills, layer by layer.
Tunnel portals and bridge
Installing the portals was no easy task. With the foam hills permanently in place and the tunnel openings where they were going to be, I temporarily set the portals in place and pushed a double-stack well car through the openings in both directions on both tracks to check for clearance.
I attached the portals to the underside of the third layer of foam – a bit high – and then filled in underneath. This was the only way I could get the loaded well cars to go through freely. I applied PL300 to the openings and hung the portals with masking tape until the adhesive set. I also used chunks of foam to support the portals temporarily. I used the same techniques to attach the wing walls. This completed the basic work on the hills that are above grade level.
Next, I shaped the pieces of foam to make a slope between the creek and track level; PL300 held these in place as well. Since much of the “headwaters” of the creek will be visible from one angle or another, I filled in the gap between track and creek level all the way back into the eventual canyon.
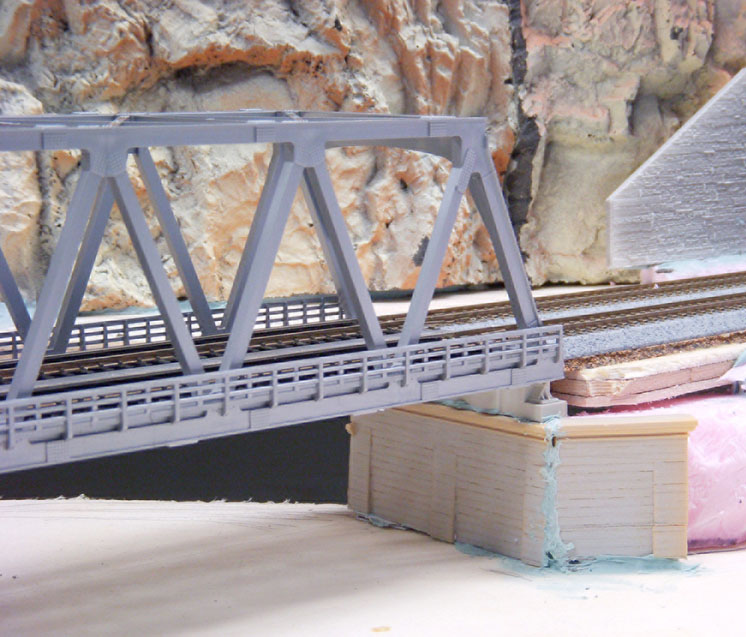
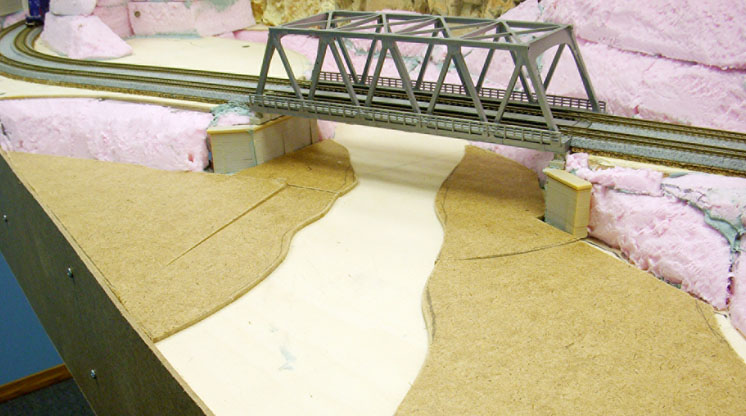
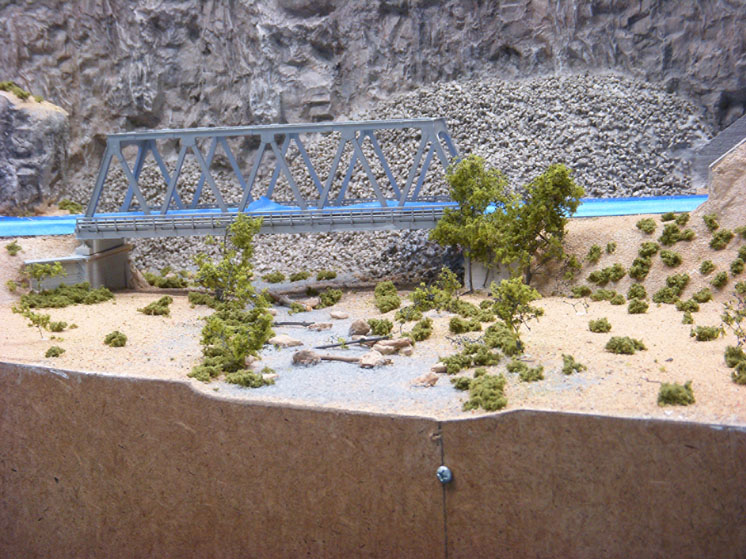
The Kato bridge spanning Meadow Valley Creek is a beauty, complete with shoes that rest on the bridge abutments. I picked abutments from Chooch, measured the distance between the shoes and the plywood, and used a razor saw to cut the abutments to fit. I fashioned wing walls from the abutments as well and carved out the foam to accommodate the piers and walls. I used PL300 to affix these to the plywood. See fig. 4. I added pieces of foam to blend the wing walls into the embankments going down to the creek.
Rockwork
I first came across the Noch rocks when I was building my large O gauge Lionel layout during my tenure as editor of Classic Toy Trains magazine. The rocks come in 8″ x 13″ factory-painted sheets, are lightweight, and are made of a very dense and easy-to-cut foam.
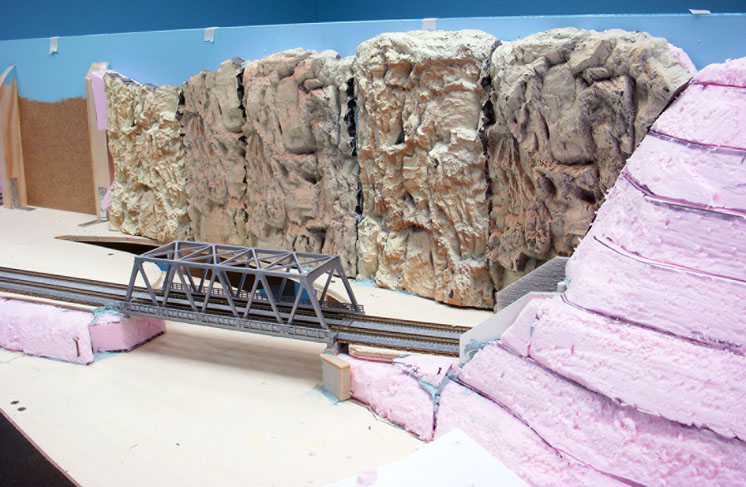
I needed to build three sections of canyon wall: a short one, a long one, and a double-sided one to hide the inner-most part of the creek. In the case of the short and long walls, I varied the height and width of the slabs, and I tipped a couple end for end to make sure that the rock pattern didn’t repeat itself. I used a serrated knife to make a clean, straight cut through the foam so I could butt the edges together neatly.
I didn’t want to cement the rock outcroppings directly to the backdrop, so I used PL300 to first cement scraps of foam behind them to give the bluffs a little more depth, as shown in fig. 5. Then I used PL300 to attach the rocks to the foam scraps, as in fig. 6. I also cemented scraps to the backdrop at the very tops of the cliffs to hide the gap and to form the tops of the bluffs.
The disappearing creek
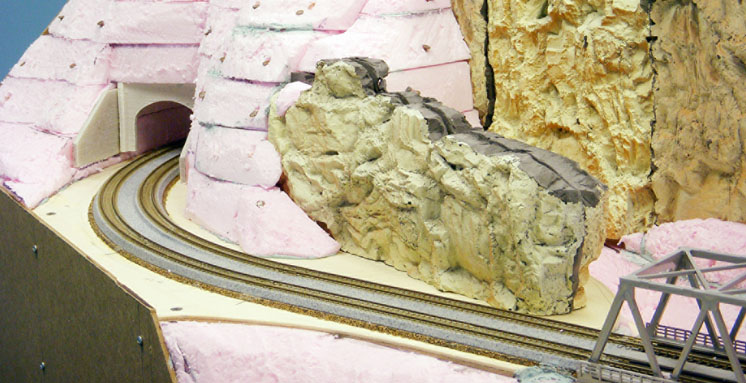
Hiding the source of the creek on the far side of the tracks was a bit of a challenge. I ultimately built a two-sided rock outcropping. Perfect solution? No, but no one who has seen the layout has commented negatively about it.
I placed two pieces of the foam together back to back and cut them to the shape I wanted. I also cut into the foam hill at the far left end to make the outcropping appear to come out of something, as shown in fig. 7, opposite. With the two sides cemented together, I set this rock aside. Had I cemented it in place, finishing the scenery behind it would have been much more difficult.
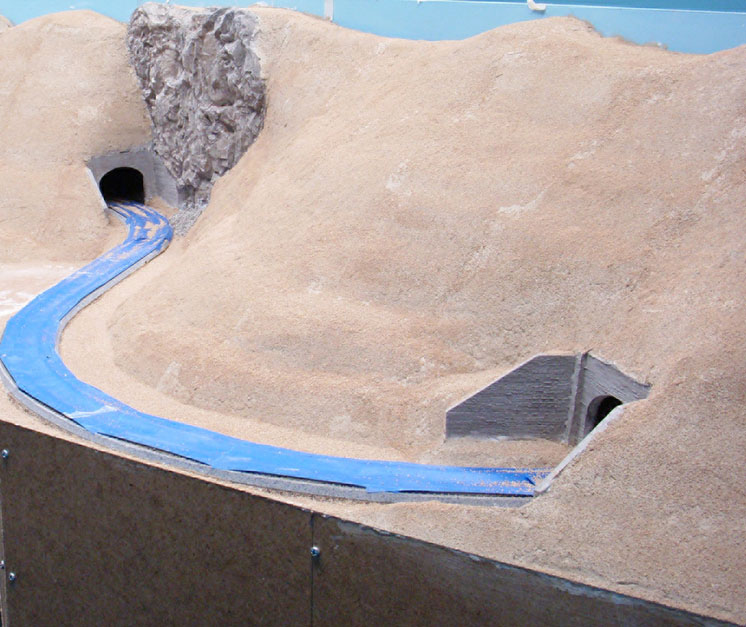
With the problem of the disappearing creek solved, I turned to the creek itself. Perhaps I could have just used the plywood to form the base of the wash, but I wanted a little bit of depth for the streambed. To simulate this, I cut pieces of 1⁄8″ tempered hardboard to cover the plywood base, except where the channel of the creek would be, as in fig. 8. I used Elmer’s Carpenter’s Glue and short drywall screws to fasten the hardboard. Then I added another layer of hardboard, set back an inch or so, giving a stream depth of about 1⁄4″.
Shaping the hills
While cutting the extruded-foam insulation board for the hills, I hadn’t spent a lot of time or effort shaping them precisely. With all of the chunks glued together and in place, I got out my Stanley Surform and started shaving away the mismatches. Then, as the seams became smoother, I switched over to rubbing 3M SandBlaster sanding sponges over the entire surface of the hills.
The horizontal seams between the layers of foam need to be hidden or they’ll show through the ground cover and make the hills look like a layered wedding cake. Sculptamold troweled onto the seams is a good start. I also applied a thinner coat of Sculptamold over blemishes in the foam. See fig. 9 on the next page. When this dried, I went back with the sponges and smoothed the seams and other rough spots.
Blending vertical seams
The Noch rocks aren’t necessarily made to be pieced together side by side. Where there are outcroppings on one piece, there may very well be indentations on the adjacent piece when you butt them together. Where this occurred, I used a hobby knife to carve away the outcroppings to more or less match the indentations.
My next step was to mix a batch of Sculptamold to a consistency similar to oatmeal. Then, using a small palette knife, I worked the Sculptamold into the gaps along the vertical seams. In some areas, I had to build up the Sculptamold so the two edges matched. I did the same with the seam along the top of the rock wall that hides the disappearing creek, as well as along the banks of Meadow Valley Creek itself.
Painting the rocks
Though the Noch foam rocks come painted, the cutting and carving didn’t do much for their finish. I painted the two rock walls and outcroppings with gray latex paint.
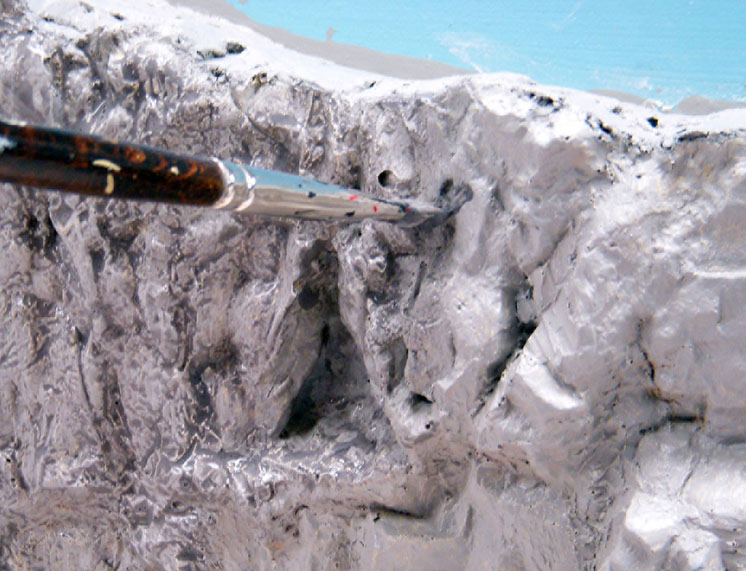
Next, I put a squirt of Mars Black acrylic artist’s paint into a food container and thinned it with water to make a wash. I dipped a paintbrush in the wash and flowed the liquid on top of the rock castings, letting it run down as rainwater would. I coaxed the wash down the cliff here and there so it would catch in the crevices, as shown in fig. 10.
In looking more closely at the photos and reading the text and captions in Hemphill’s book, I noticed that he comments on the orange color of some of the rocks. To suggest just a hint of this, I mixed a little Titanium White and Burnt Umber acrylic paint, adding white until I got an orange tint. Then I drybrushed the paint on the rock castings with a flat-end brush.
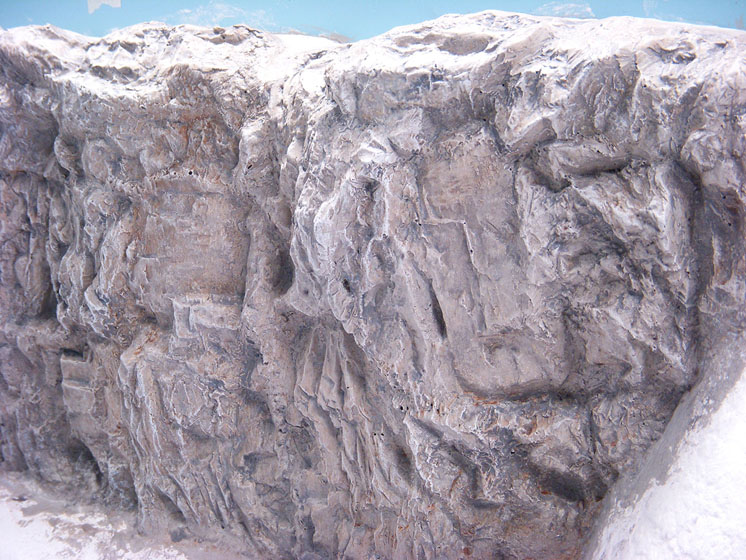
If the low areas in the rock face are in shadow, then the high areas should be in light. To simulate the effect of sun on surfaces, I drybrushed the high points of the rocks with Titanium White. Just a hint of white, as shown in fig. 11, is all you need.
Talus
Once I finished painting the rock faces, I worked on the talus pile. Woodland Scenics talus was the right color (gray) and about the right size, though pretty uniform. I painted on full-strength Elmer’s White Glue at the base of the outcroppings and then poured on some of the talus. To my chagrin, more of it rolled into the creek bed than stayed on the talus pile.
To fix this, I curved a piece of thin cardstock to generally match the curvature of the talus pile. Holding it near the bottom of the hill, I carefully poured on some talus. The card kept the excess from falling to the bottom. I carefully moved it up the slope as I continued pouring the talus out of the bag.
When that dried, there were still too many gaps. I applied more white glue to the gaps and sprinkled on pieces of talus. There are still some holes in the pile, but the overall effect is good.
Ground (sort of) cover
The predominant look of the Meadow Valley Wash is tan sand and gray/green brush. I’d already decided to use Woodland Scenics underbrush for the brush, but I hadn’t figured out how I’d capture the look of millions of plants.
But first things first. I went to my local home center and picked out a paint color I thought would look right for the hills and brought it home. When I compared the color against the Woodland Scenics ballast I’d chosen to use as the desert sand, I realized once again that I can’t trust my memory when it comes to colors. Back to the home center, but this time with the ballast in hand.
Starting at track level and working up until I had covered maybe a square foot of hill, I slathered on a thick coat of tan paint. While the paint was still wet, I sprinkled a thin layer of ballast onto the paint, staying an inch or so away from the edges of the painted area. That way when you apply more paint, you can overlap the paint without painting into a “sandy” area. I continued this process until the hills were covered with paint and sand, as shown in fig. 12.
The paint held most of the ballast, but some was loose on the surface. I soaked the sandy areas with Woodland Scenics Scenic Cement so the granules would stay in place.
Shrubs
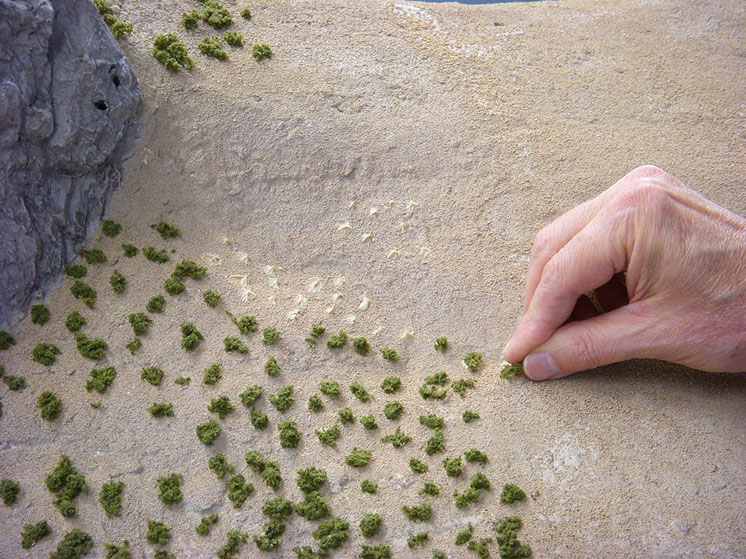
I used Liquid Nails to attach the Woodland Scenics ground foam I used for desert brush. After plopping about 30 or 40 dots on the side of the hill, I broke off little shrubs and stuck them into the adhesive, as shown in fig. 13.
When I stepped back to admire my work, my impression was that the hill had chicken pox. My wife agreed. So did David Popp, MR’s managing editor, when I sent him a photo. After discussing the problem with them, I decided the clumps were too big and too far apart.
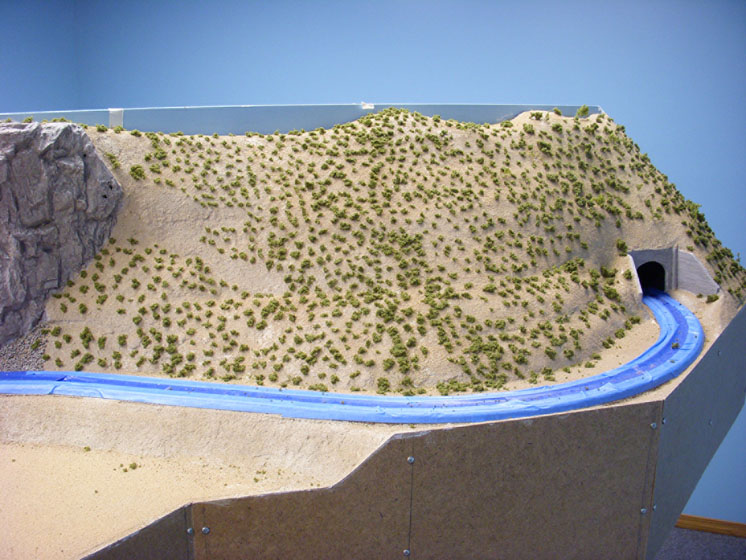
I left a few of the steeper parts of the hillside bare, rationalizing that nothing would grow on a hill that steep! In fact, the hills look more natural with a few bare areas. You can see the finished results in fig. 14.
Meadow Valley Creek
To model the banks of the stream, I applied Sculptamold along the edge of the tempered hardboard, shaping it to a gentle slope. I also used Sculptamold to blend the hardboard into the foam sloping down from the tracks.
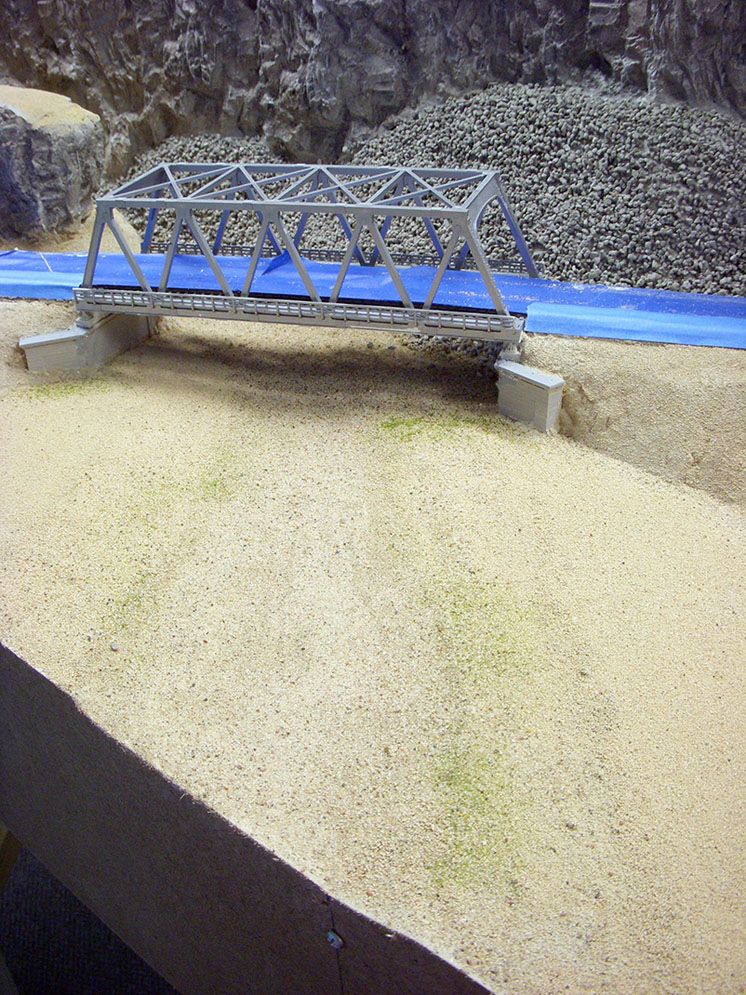
Next, I painted the entire creek bed with tan paint and then poured a thin layer of sand over the surface, as seen in fig. 15. In addition, I sprinkled a little bit of fine green ground foam along the banks of both sides of the creek.
A photo in Hemphill’s book revealed a detail I hadn’t thought of. The bed of Meadow Valley Creek has gray gravel in it. Apparently, small fragments of rock break off the nearby canyon walls and end up in the creek bed where they’re carried along by the seasonal rains. That was easy to suggest by sprinkling fine, gray ballast onto the streambed. I secured the loose ballast with Scenic Cement.
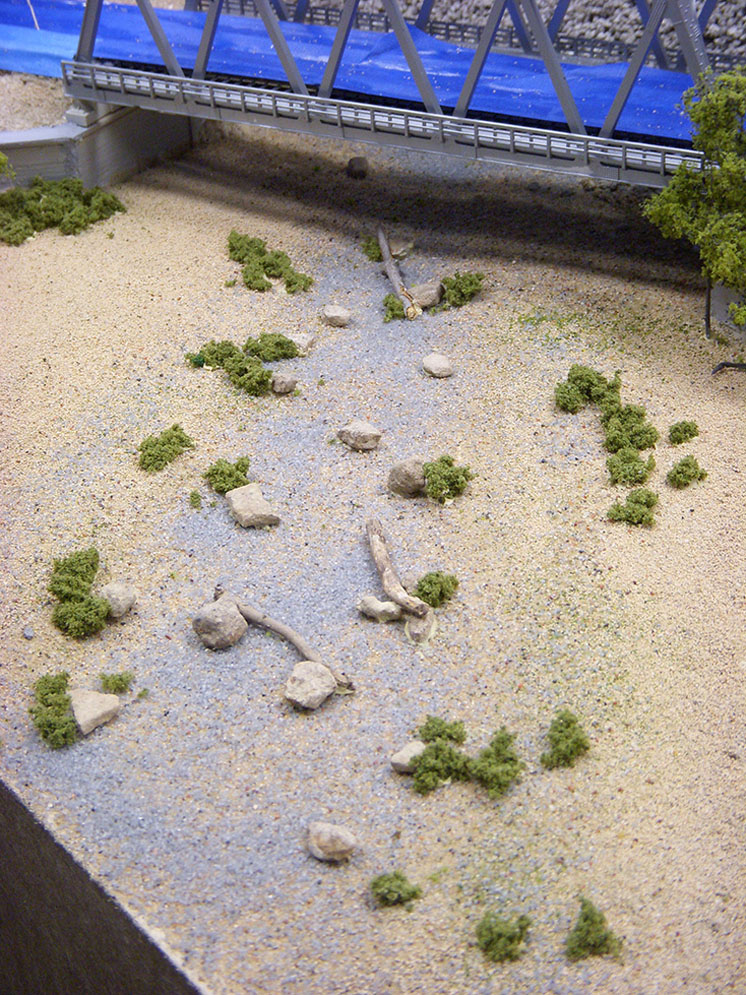
When the cement dried, I used dots of Liquid Nails to hold in place rocks that I brought in from the woods behind my house. I also glued down a few twigs, also from the woods as in fig. 16; they’re small, but big enough to look like fallen dead trees from growth along Meadow Valley Creek.
The photo on which I based this scene shows that trees had somehow managed to take root and grow near the bridge. I tore off delicate pieces of Woodland Scenics Fine-Leaf Foliage, picking pieces that looked like scrawny, scrubby trees. I drilled small holes in the sand-covered tempered hardboard, filled the holes with white glue, and set the trees in place. See fig. 17.
Ballast
The molded ballast on the Kato track looks good; it looks even better once the rails have been painted and the ties weathered. Where the molded roadbed meets the ground, though, it still looks like sectional track because of the hard line between the plastic and the surface below it.
Kato sells a ballast color that matches the molded roadbed. I brushed white glue along the beveled edge of the roadbed and along the base. Then I used a small cup to carefully pour the ballast onto the glue, as shown in fig. 18. When the glue had dried, I used a soft-bristle brush to gently nudge extraneous pieces of loose ballast back toward the track. Having covered the rails with painter’s tape, I then used a small turkey baster to dribble Scenic Cement over the ballast to hold the granules in place.
Where the tracks run close to the embankment along the wash, I poured Scenic Cement down the slope. Then I poured ballast down the hill after it, letting the granules tumble where they naturally would.
Still more to do
Though I modeled the Meadow Valley Wash in mid-summer when it would be dry, adding water would be easy with a two-part resin or ready-to-use water product [see the May 2010 Model Railroader installment of Step by Step on page 30. – Ed.]
Next time, I’ll wrap up this six-part series by showing you how I scenicked the Caliente, Nev., side of the layout.