


What’s in my dream 4-by-8 model railroad? A yard, continuous operation, and lots of places to switch. Just because you don’t have a lot of room for your model railroad doesn’t necessarily mean you need to give up on your dream layout. You might just need to scale your dreams back a bit. While that could mean modeling in a smaller scale, it doesn’t have to. You can still get a whole lot of model railroading fun in a small space with careful planning (and a pinch of pie-in-the-sky). So, let’s see what I can wedge into my dream 4×8 layout.
Let’s start with a list of John Armstrong’s givens and druthers. Armstrong, whom many regard as the founder of the school of realistic track planning, coined those terms for the criteria that govern a track plan. Givens are unalterable factors and must-haves, like layout space, scale, and minimum radius. Druthers are things we’d rather (“we druther,” get it?) include, but can be more flexible on. My list includes:
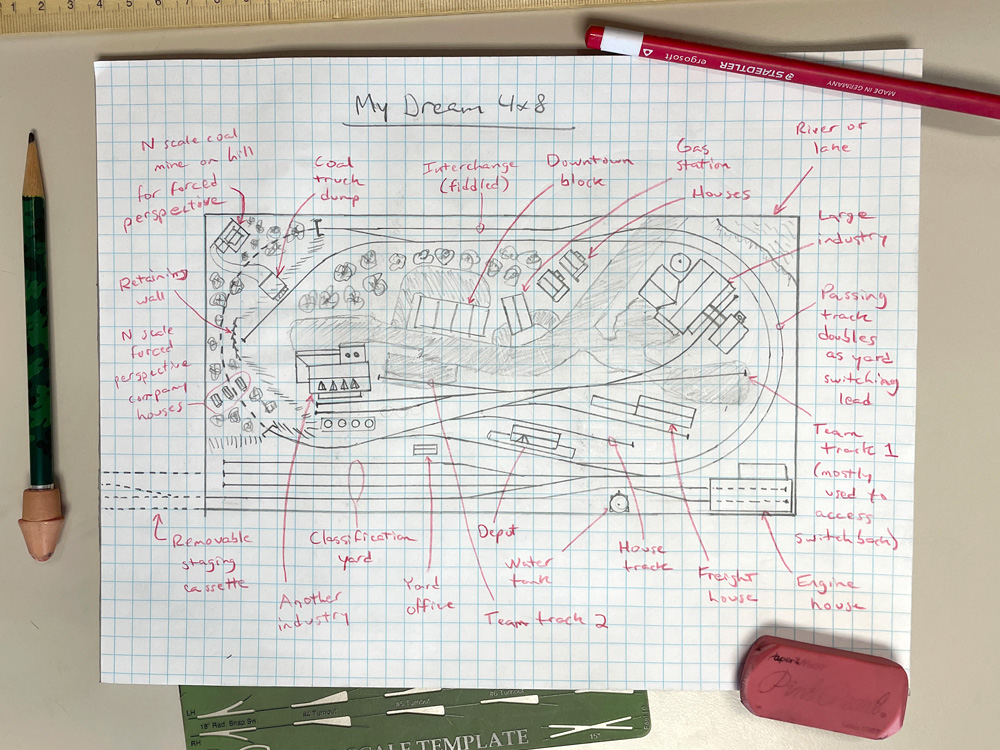
Givens: 4×8 size, HO scale, 18″ minimum curve radius, no. 5 minimum turnout, staging area (removable if necessary), passing track.
Druthers: Continuous operation option, short power and rolling stock, a town scene, a classification yard, numerous industries (including several universal ones).
Right off the bat, these requirements and desirable factors determine the basic shape of the plan. In a 4×8 footprint, continuous operation means an oval. To maximize the length of the yard, it should go outside the oval, along one long side. Even the shortest wheelbase four-axle diesels require a minimum radius of 18”, which leaves room for a four-track yard.
To allow the yard to be switched without fouling the main, I position a passing track around the outside of the right side of the oval and attach the yard to it. That way, the passing track can serve as a switching lead. Only when a road train needs to run around a train to position it for switching does the yard switcher need to stay out of its way. I push the passing track as far into the top-right corner as I can to make room for a two-track engine shed at bottom right, then build a compound yard ladder to maximize the length of the yard tracks.
No matter how small a layout is, if you want to operate it realistically, it needs staging. Staging represents the unmodeled rest of the world beyond the edge of the layout. Unless you’re modeling a railroad on an isolated island, you need somewhere for trains to come from and go off to. Since I’m limited to 4×8 here, I’ll cheat a bit by adding a removable two-track storage cassette, like the one we built for our Winston-Salem Southbound project layout (see our January 2018 and February 2018 issues).
Now that both ends of the oval are fixed, I can connect the two curves. I draw a straight line across the top of the 4×8, connecting to the left-side curve with a pair of offset turnouts. It’s a no-no on the prototype to route the main line through the diverging route of a turnout, but this space-saving tactic gives me a spur in both directions. I can place my first two industries.
Since there’s no room for a structure or even an unloading ramp between the top spur and the edge of the table, I curve the track off the edge to represent a connection to an unmodeled second railroad, turning this into an interchange. During an operating session, cars can be fiddled on and off this track to represent cars picked up and dropped off by a connecting railroad. “Universal industries” like this can ship and receive any conceivable car, making them indispensable for boosting operating variety.
Although ovals are good for continuous operation, they’re undesirable for realism. Therefore, I hide the left end of the oval in a tunnel. While my trains build up mileage running laps on the oval, I can tell myself they’re going to and returning from unmodeled locations. This gives me a hilltop on the left side of the 4×8, which gives me an idea. I curve the other spur about 45 degrees to maximize its length and draw in a coal mine truck dump on the hill overlooking the spur. Truck dumps are great space-saving industries, since the size of the truck dump is no indication how big or busy the mines it serves are. To maximize the visual size of the layout, I forest the hill with trees that diminish in size the farther they get from the truck dump, then place an N scale mine at the far corner. This forced perspective trick will make that corner of my dream 4×8 layout look bigger in photos than it really is. On the bottom left side of the hill, I add some N scale company houses for the same effect.
To break up the oval racetrack effect, I decide to add a cosmetic curve to the bottom side. This has the beneficial side effect of giving me room for a small yard office. Once I add a passenger depot – in the early diesel era, passenger service is still a must – there’s room for only one turnout leading to the interior of the oval.
Not a problem. I can still maximize the number of workable spurs by a switchback arrangement. First, I place two turnouts leading to a house track behind the depot and a spur to a freight house. These tracks receive and ship boxcars of less-than-carload-lot cargos, another versatile operating option.
Next comes a turnout facing the other direction to form the switchback. Since I have a natural aversion to tracks that look like they don’t have a function, I pave the area around the switchback tail, making it look like a team track.
A couple more turnouts split the other end of the switchback into three spurs. Two remain parallel to serve a large industry. I want it to receive and ship multiple kinds of cargos, so I draw a row of tanks or silos along the outer spur. Depending on what kind of industry it ends up becoming, these tanks or silos might receive petroleum products, cooking oil, liquid sweetener, grain, or plastic pellets. Maybe it’s a paper mill, receiving tanks of chemicals and kaolin slurry. Who knows? I’ll figure that out later.
The other spur becomes another team track. Since the first “team track” will have to stay vacant most of the time to serve as the switchback tail, I need another one to actually fulfill the function of a team track. If Team Track 2 fills up, Team Track 1 may be pressed into service, increasing the switching challenge.
One last spur track serves another large industry, at top right. I imagine this one as a food processor, like a cannery or large creamery, with a separate boiler house across the track from the main building.
Finally, I add a body of water at top right, a main street down the middle of the layout, and some non-rail-served town buildings to complete the layout.
To help you fulfill your modeling dream, check out the book How to Design a Model Railroad by Lance Mindheim, available now in the Kalmbach Hobby Store. How well does my dream 4×8 layout match yours? What would you add or subtract? Let me know in the comments below.


My ultimate 4×8 appeared in the Model Railroader forum a few years back. Look for Mobile HO Module 4×8 in the search engine. The layout was built to retract into the ceiling, and the post reflects that, but that only distracts from the genius of the design.
The layout features everything described here, yet it is NOT a continuous oval plan. By adding a second deck, the builder was able to make it into a loop to loop railroad, with the yard nestled inside the reversing loop on the upper level, and an oval for staging and some industries on the lower level in addition to the reversing loop. The way the layout was designed, instead of burying the climb between levels in a helix (if you’re modelling a mountain railroad what’s the point in that?) he was able to keep nost of it visible, and include a passing siding halfway up. And the overall effect of the layout does this all without appearing overly cluttered. The photos he posted here only hint at the creativity involved.
Among the features not shown , or not shown well in the photos he poested are the following:
The layout has a backdrop all around it, primarily on the lower level.
The lower backdrop has cutouts in it, so the level is divided into a series of vignettes.
In painting the backdrop. he painted a couple of scenes of distant mountains BELOW track level, giving the effect that the railroad is actually on the side of, or on top of a mountain rather than being in a deep valley. Others are done in the traditional way, giving the effect of being in a valley.
He has room on top for a small town, with enough space to not seem cramped.
On the bottom level a town is hinted at, but not actually modelled.
The other photos of this layout are on the author’s photobucket page, and I truly wish he’d posted them here. I would love to show them, but will not post without the author’s permission.
To be honest, I’d much rather run a railroad like this than one of those “straight track around 4 walls” layouts Model Railroader seems to favour. A good 4×8 is a work of art, and much harder to design and build than any of those layouts.
Hey Steve my first layout looks very similar to your dream,my classification yard was off the layout as an extension
very good work I hope you get to do it
John
Steve, why didn’t you use Track Planning Tools, by K.I.S.S. Method Inc? You have a couple of them at MR. Ask Cody. It would have made your track plan so much easier to draw and more accurate too.
It looks good and should work . The track plan reminds me of John Allen’s Gorre and Daphetid. I like the yard being down front so you build your trains with ease.
We’ve all had a 4 by 8 at some point. I have always found that 18 inch curvers are just too tight for H.O. (but will work great in N). Why not cut that 4 by 8 sheet into two 18 inch by 8′ strips and take the remaining 1′ by 8′ section and cut it in half. Assemble the whole thing with the the two 4′ by 1′ sections connecting the two long strips. Same amount of wood with alonger main and broader curvers.
By the way, I would love to say that this is my original idea, but I did read it someplace.
Wow Steve, that brought a whole flood of memories back. I remember my first HO railroad from a plan book, and it was something like that. But more than that, you captured the possibilities and the dream . . . . . you captured the essence of my enthusiasm as a 12 year old. Plans like this is what made me become a model railroader, because there was possibility, with all the elements of a real railroad at my fingertips.
As I segued into N Scale and “rediscovered” the hobby about 15 years ago, my first layout was similar on a 30 inch door with folding legs ( from a MRR article ). Todays railroad is 12′ x 24′ ish, but still a continuous operation with a yard (or two) , lots of switching and some scenic elements, all the basics in your 4×8 design.
Thanks to articles like this, it is these possibilities presented to young readers (and young at heart readers just starting out or rediscovering their past) that fire imaginations and promote our hobby. THANK YOU STEVEN
Very impressive and well thought out!!!
Love your concept.