Q: I’m planning my first layout and I need to learn about train movements and switching a model railroad. Specifically, how are cars spotted on facing-point turnouts versus trailing ones? How do I plan for trains running in both directions? – Jesse Brinson
A: For those who are new to switching a model railroad, let’s define a few terms. A turnout, commonly called a switch, is a section of track where the route splits between two possible routes. (I say “two possible routes” because even though there are such things as three-way turnouts and single- and double-slip switches, those are just combinations of multiple switches.) Modelers use the word “turnout” to describe the entire assembly of rails and ties that includes a switch, because on the prototype, the term “switch” refers only to the parts of a turnout that move – the throw bar (a.k.a. switch rod) and the points.
The points are the rails that move back and forth to guide the train’s wheels onto one of the two possible routes. Whether the turnout is facing-point or trailing-point is not a function of the turnout itself, but rather depends on the direction the train is traveling. If the train is approaching from the single route into the switch, it’s a facing-point turnout; if it’s approaching from the end with two possible routes, it’s a trailing-point.
A siding is a secondary track that branches off the main line. It can be connected to the main on both ends, in which case it’s a double-ended siding. If it’s only connected to the main by one turnout and the other end terminates, it’s a stub siding or a spur.
The basics of switching a model railroad
There are basically only three maneuvers you need to know: the shove, the pull, and the runaround. Everything else is some variation or combination of those three.
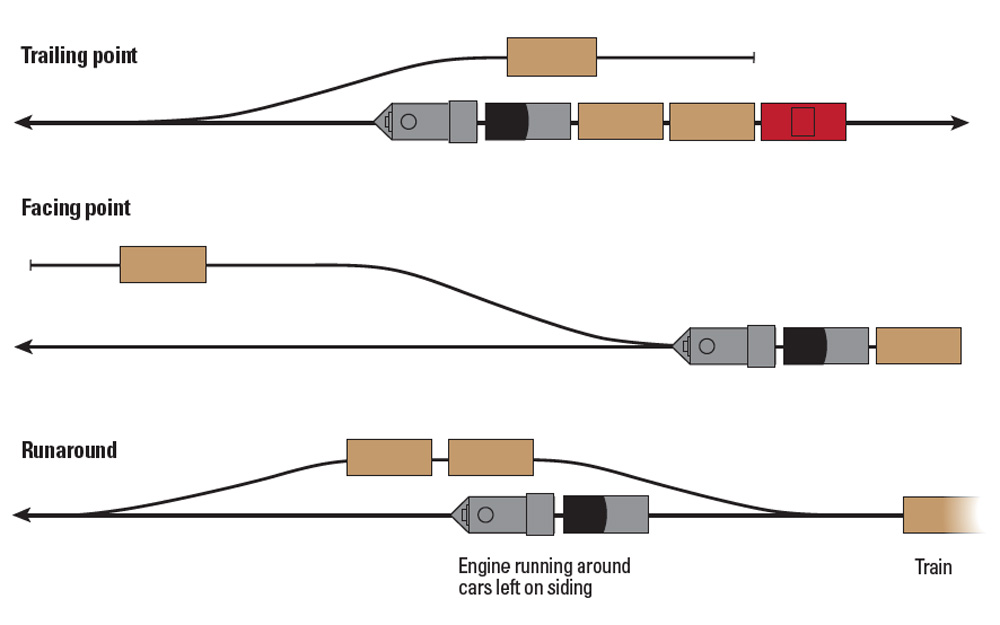
The shove is where a locomotive pushes a car into a siding, either in front of or behind the locomotive, uncouples from it, and leaves it there. The pull is the opposite: the locomotive enters the siding, couples onto a car there, and pulls it out. A runaround is where a locomotive uncouples from a car, uses a double-ended siding to run around the car, then couples onto the other end.
Spotting a car at a trailing-point siding is easy. The operator uncouples behind the car to be spotted, leaving the rest of the train on the main. He then pulls forward past the points of the turnout, lines the switch for the diverging route, and shoves the car into the spur. After uncoupling, he pulls back onto the main, lines the switch for the main, backs up to couple onto the rest of his train, and proceeds on his way.
It’s a little more complicated if your car is supposed to go on a facing-point spur. With the turnout ahead of your locomotive and the car behind it, you can’t pull into the siding without your locomotive getting stuck behind the car. To work a facing-point spur, you need to find a nearby double-ended siding so you can run around the car and shove it ahead of the locomotive.
More complicated situations
Things can get tricky in some situations. For example, what if you need to spot a car in a facing-point turnout, but no runaround track is available? You have a few options. One is to run around the car in another town and push it ahead of the locomotive all the way to the town where the car is to be spotted. This has safety concerns, particularly with visibility, but sometimes it’s the best you can do. You could also leave the car in an “off spot” to be switched by a train heading the other way, for which that spur will be trailing. If your train is a local turn – one that heads out and back, returning to its point of origin at the end of the job – you might decide to work all trailing-point spurs on the way out and facing-point spurs on the return leg, when those turnouts will be trailing-point.
Another tricky situation is a switchback. This is a spur that is accessed not directly from the main, but from another spur, requiring the locomotive to alternate forward and backward moves in a zig-zag fashion. A spur that branches off another spur isn’t a switchback unless your locomotive has to reverse direction to reach the end.
When you’re figuring out which end of the locomotive your car needs to be on to work a switchback, count the turnouts, and remember that each one is a reverse of direction. If there are two turnouts in the switchback, and the first one off the main is a facing point, go ahead and pull on in – the second will be a trailing point. If there are three turnouts, requiring three changes of direction, you’ll want the car you’re going to spot to be ahead of the locomotive.
You have to make the same calculation if you’re pulling a car from a switchback. If you can’t arrange things so the car ends up behind your locomotive when you re-enter the main, you’ll have to find somewhere to run around it before adding it to your train.
For more on switching a model railroad, check out “How to switch model railroad freight cars” on Trains.com.
Coupling and uncoupling
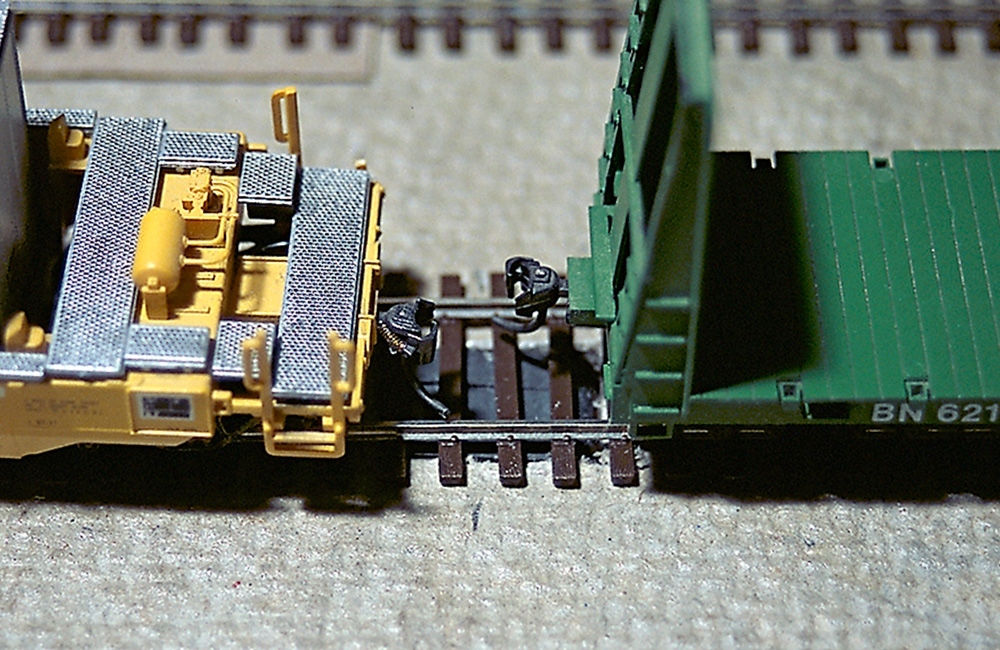
Most cars and locomotives today come equipped with magnetic knuckle couplers. These were pioneered by Kadee Quality Products in 1956, but today numerous manufacturers offer couplers that work like – and with – Kadees. Not only do knuckle couplers look more realistic than plastic horn-hook couplers, but they allow more realistic operation by enabling hands-free coupling and uncoupling. The key is the “glad hand,” a metal trip pin under the knuckle that pulls the knuckle open when it passes over a magnet between the rails or under the track.
Does this mean you can only drop a car where a magnet has been installed? No. There are other, more portable ways to disengage knuckle couplers, such as a magnetic probe that slides between the cars or a pick or skewer twisted between the knuckles. (Check out “Seven ways to uncouple” on Trains.com and Jim Kelly’s “N Scale Insight” column about uncoupling with swizzle sticks in our January 2015 issue.)
But one of the coolest features of magnetic couplers is “delayed uncoupling.” After uncoupling, push the cars back together while the couplers are still over the magnet. Instead of linking, they will be pulled to either side, letting you shove the car as far as you like before reversing to drop it. Look to Kadee’s website for a more detailed look at how to pull off the delayed drop, including a helpful video.
Now that you know all about switching a model railroad and uncoupling cars, build that layout and start running trains!
Send us your questions
Have a question about modeling, operation, or prototype railroads? Send it to us at AskTrains@Trains.com. Be sure to put “Ask MR” in the subject.