


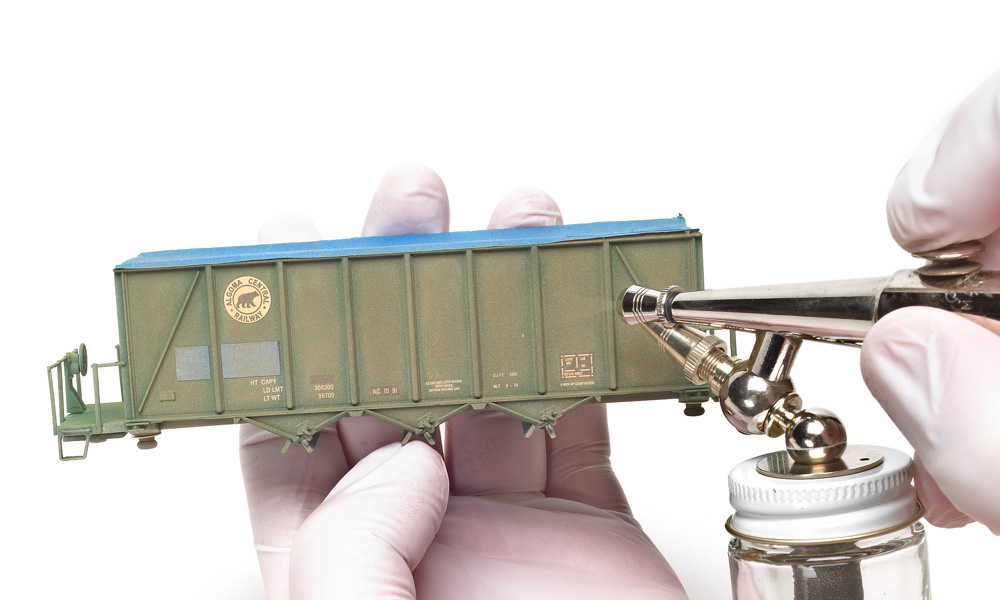
Q: I would like some advice on cleaning an airbrush while weathering. I use an older Paasche airbrush to weather my N scale rolling stock. Since N scale models take very little paint, the painting process usually only takes a few seconds to a minute per color. But cleaning the tip, the air point, and the color cup to change colors takes three to four times as long or more. Acrylic paint is especially problematic because it quickly polymerizes on my brush and is hard to remove. It’s very discouraging, so I hesitate to use my airbrush. Do you have any advice on how to change colors without allowing the previous residue to completely foul up my brush? – Jim Werling
A: There is, unfortunately, no shortcut to cleaning an airbrush. But there are ways you can get the most out of your airbrushing sessions and minimize that chore.
First, don’t weather single cars, one at a time. Let them run clean until you have at least five or six to weather, then do them all assembly-line style. That way you can spray all the cars’ underframes with Earth color before cleaning the airbrush and switching to Grimy Black.
Second, if you’re weathering, the effect you’re going for isn’t necessarily pure colors; a little mixing will be fine. So you don’t have to clean your airbrush completely between colors, especially if you have an external-mix airbrush. A quick rinse should be sufficient.
Here’s a quick-and-dirty (excuse the phrasing) technique for cleaning an airbrush while weathering. Assuming you’re using water-soluble acrylic paints, get two airbrush jars and fill one with distilled water, and the other with a 50-50 mix of distilled water and blue window cleaner. When you’re done spraying one color, remove the paint cup and rinse it out in the shop sink, leaving it to dry upside-down on a paper towel. Attach the jar of cleaner to the airbrush and spray it onto a piece of scrap cardboard or against the inside of your spray booth until it runs clean. Use a damp cotton swab to wipe off the tip if there’s any paint still sticking to it. Don’t worry about getting it absolutely spotless; if the paint is dried on enough that it won’t wipe off easily, you don’t need to worry about it contaminating the next paint color. You just want to keep the nozzle from clogging. Then switch to the water bottle and spray that for a bit to rinse out any cleaner residue.
That should be all the cleaning you need to do between colors, especially if you’re switching between similar colors (from Earth to Mud to Railroad Tie Brown, for instance). Then you can give your airbrush a thorough cleaning when you’re done for the day.
For more on keeping your airbrush clean, check out Cody Grivno’s article “Airbrush cleaning tips and techniques” on Trains.com.
Send us your questions
Have a question about modeling, operation, or prototype railroads? Send it to us at AskTrains@Trains.com. Be sure to put “Ask MR” in the subject.


This is a great article with very helpful hints. Another option is to use a gravity feed airbrush since they mostly have smaller cups. If you are in the States you can find a decent one at Harbor Freight for like $25. I think that might help with the smaller amounts of paint used. I too have a siphon feed and it is more tedious to change colors since there is a longer path of paint from the jar to the nozzle.
I really appreciate the hints about doing larger assembly line projects. That is a great thought. I will also have to set myself up with the cleaning jars also. Thanks for the tips!
I use a Binks Wren B-tio external-mix single action airbrush, with the siphon-fed paint cups, and used it [quite successfully] since the late-70s, except is the early days of the transition from solvent- to water-based paints (the early water-based paints were QUITE persnickety, to say the least), The Binks works VERY well for everything I am painting these days – old school, but tried and true!
Whenever I am doing a paint session, I have several paint cups ready to use for the various colors as well as a couple to use for “blowing out the airbrush” between colors. I use primarily Berryman’s B-12 Chemtool, an automotive industry carburetor cleaner that I get through O’Reilly’s Automotive. I buy it by the gallon, but keep a 16 ounce can by the paint booth.
WARNING: The fumes are toxic (IMO, mildly toxic) and can be offensive to some noses, but it works very well between color changes.
Using one of the cups reserved during the session for cleaning out the brush, I pit in some B-12 and spray onto a paper towel until the color is gone, usually takes about 1-1½ ml to get the color out and then I can change to a new color cup for the next color.
When the painting session is over, I use B-12 to thoroughly clean out my airbrush, disassembling to get all parts clean, reassembling and lastly blowing another 1½ – 2 ml of B-12 through the brush until all is dry. Before I start a new session, run about 1½ ml through the brush to assure it is ready to paint and get after the hew painting session.