Q: I was talking to a fellow model railroader about soldering track feeders to the rail. He said to bend the wire, then solder it to the joint between the two rails. Couldn’t I just lay the power wire alongside the rail and solder it that way? Or is there a reason that it has to have a bend in it? – Ken Peters
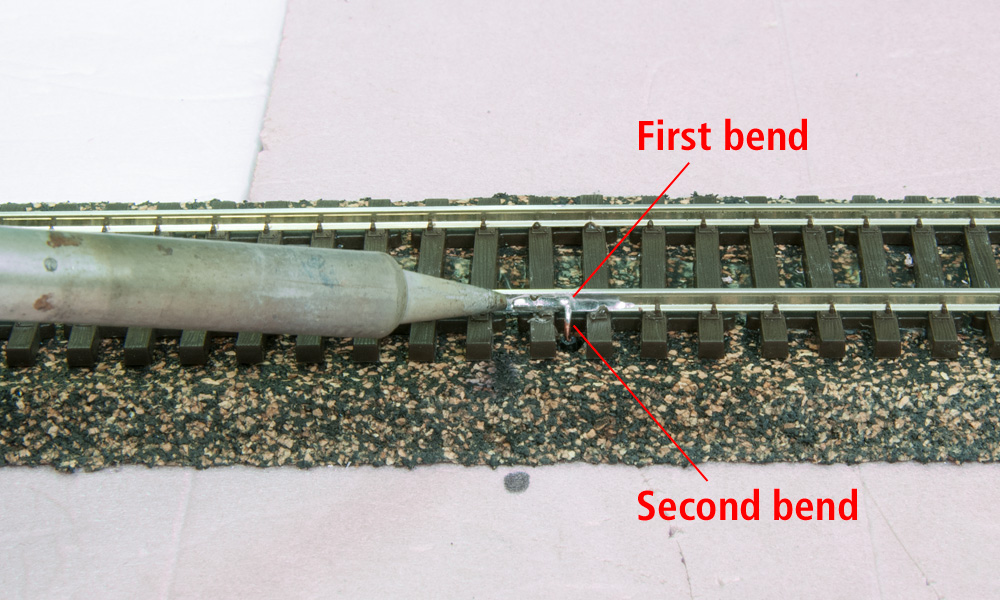
A: We actually recommend putting two bends in the end of your feeder wires, to form a dogleg. The point of this is to give your wire good contact along the side of the rail while keeping it unobtrusive as possible. First, drill the hole through the benchwork for your feeder wire between the ties, as close to the rail as you can make it. Run your wire up through the hole, then make a 90 degree bend about 1/4″ from the end, along the X axis, parallel to the rail. Then, use your pliers to grab that wire just a bit below the first bend, and give it another twist, this time along the Y axis, toward the rail. The result will be a dogleg that comes up through the hole, bends toward the rail, then turns to lie alongside it.
If you try to solder the wire to the rail first and then pull the end through the hole in your benchwork, you’ll put strain on the wire and the solder joint that could break one or the other. Best to bend the wire first and make sure it sits neatly against the web of the rail before soldering track feeders.
Once you have your wire bent to shape, use your soldering iron to tin both the wire and the web of the rail where it will attach with solder. Then use your needle-nose pliers or a small screwdriver to hold the tinned wire against the tinned rail and touch the soldering iron to the joint for just two or three seconds, until you see the solder on both surfaces melt together. A good solder joint will be shiny; a dull one is weak and could pull loose.
Clean the area with a toothbrush and denatured alcohol to remove any residue from the solder. Paint any exposed wire insulation black or rust color, weather the rail and solder joint, add ballast, and you’ll hardly be able to tell it’s there.
To learn more about wiring your layout, check out Larry Puckett’s book Wiring Your Model Railroad, available in the Kalmbach Hobby Store.
Send us your questions
Have a question about modeling, operation, or prototype railroads? Send it to us at AskTrains@Trains.com. Be sure to put “Ask MR” in the subject.